
Ever find yourself still struggling to make out a bird, even when your binoculars are trained directly on it? No matter how steady you hold yourself, you simply just don’t have the reach. You could get a stronger pair of binoculars, but these come with inherent drawbacks, such as stability issues and, of course, a heftier build. What’s our solution?
It’s only natural that after using a pair of binoculars, some birders will find that they yearn for more, and the only way to practically get more reach is to use a spotting scope. These are essentially terrestrial telescopes, using one lens to magnify an even greater distance than our typical handheld optics can manage.
If you’ve been shopping for a spotting scope, you’ll likely have noticed that these optics come in a variety of different shapes and sizes. Some are sleek, and straight, while others are bulkier and curved, with the eyepiece angled slightly upward. While they differ in appearance, and we’ll touch upon these differences later in this guide, their basic functionality is identical.
To get started, we’re going to look at the essentials of spotting scopes, from front to back. We’ll be covering everything you need to know about these optics before making your choice, so you can be sure that you’re choosing the right tool for your needs.
The Basics
Spotting scopes are optics that use a series of lenses and prisms to produce a magnified view of distance subject matter. For some, these are birds, for others, potential dinner. No matter what the goal, their function remains the same. For those who are used to binoculars this concept will be quite familiar. After all, what is a scope but half a binocular.
What Are Those Numbers, and What Do They Mean?
Magnification & Objective Lens Diameter
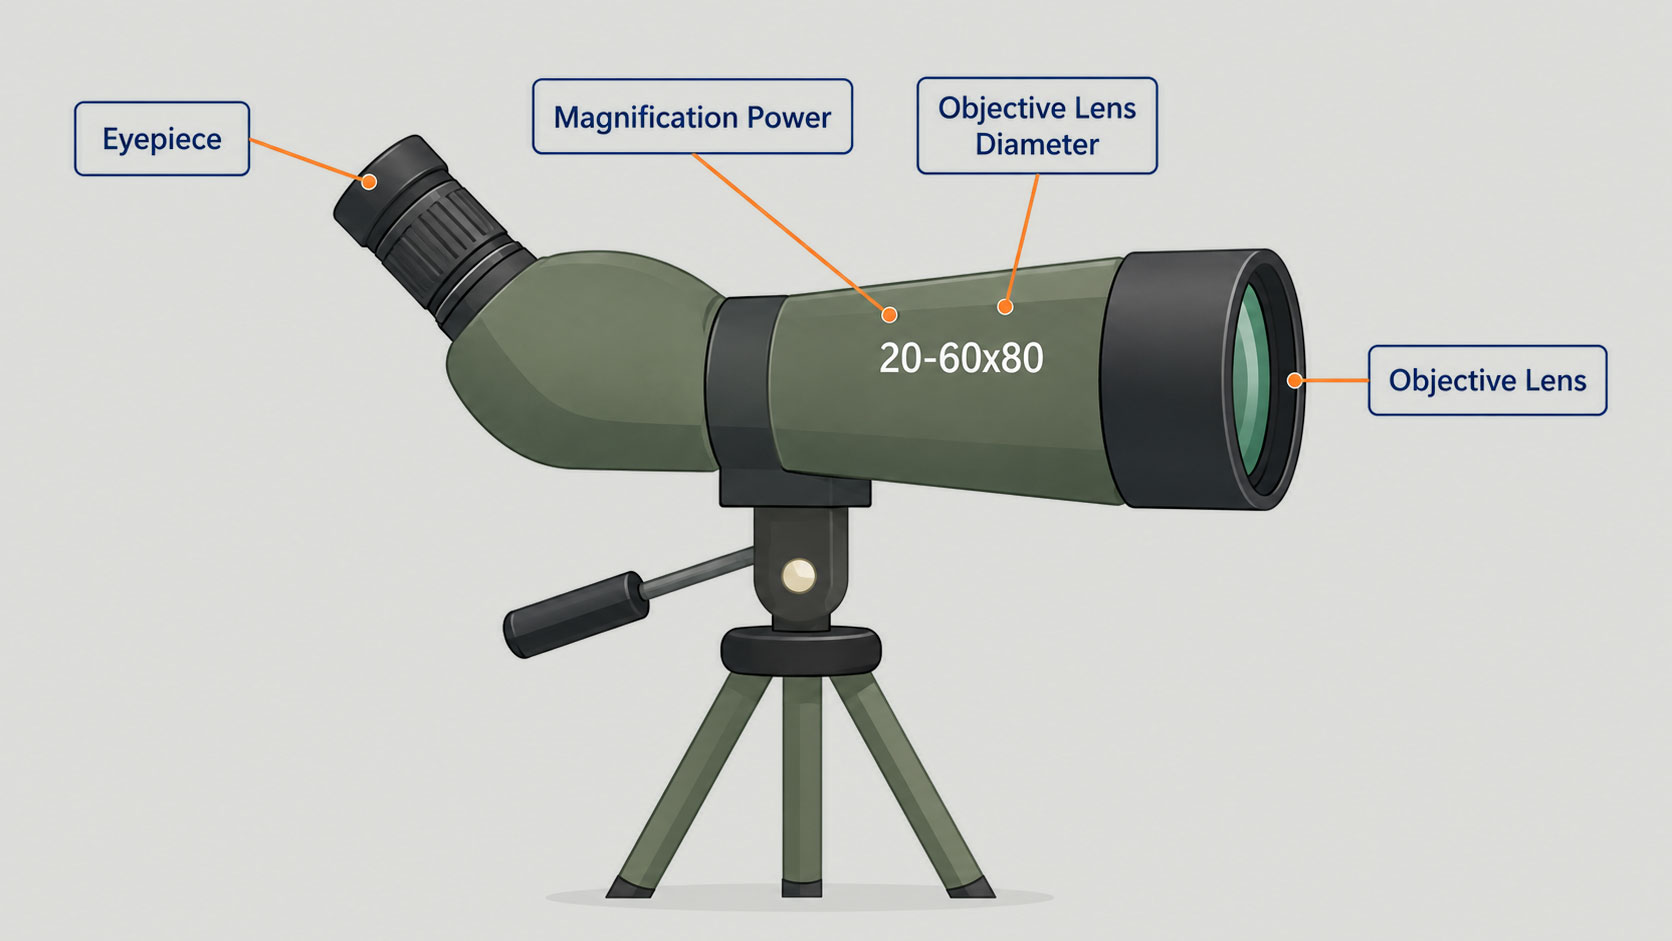
Like a binocular, scopes are named after a sum of their parts. These numerical naming conventions are based on the qualities of these optics, such as the objective lens diameter and magnification, but unlike most binoculars, scopes have a variable magnification. The first two numbers represent our magnification, and the second, our objective lens diameter. What do these values actually represent in an optic? Let’s find out.
Magnification
Magnification is the process of increasing the apparent size of an object. In optics, this is usually referred to by a numerical value such as 2x, 4x, and so on. In any sport optic, the first number, or in some cases, numbers, refer to the magnification of the instrument. Binoculars are identified by two numbers like 10x42 whereas spotting scopes are often given three, like 20-60x85.

These first two numbers both represent our magnification, because in most scopes, we can zoom in. With the twist of the zoom ring, located on the eyepiece, we can increase our magnification as needed. Just be aware that by doing so, we’ll alter the brightness of our image as well as our exit pupil. Luckily, we don’t have to worry too much about brightness in the field, as most scopes are equipped with large, bright front elements or objective lenses.
Objective Lens Diameter
Magnification may be what draws us to a certain model, but there’s more to consider when shopping for spotting scopes. Front and center on a spotting scope sits the objective lens, or front element. The larger our objective lens, the more light that it allows into the instrument, resulting in a brighter viewing experience. For more serious observations, look for a big objective, as this will reduce eye strain during longer periods of use, though don’t get carried away.
Exit Pupil
What’s an exit pupil? Simply put, an optics’ exit pupil diameter is what determines how bright our image is. The larger our exit pupil, the brighter the image. This is determined by dividing the objective by the magnification: so, a 10x42 binocular has a 4.2mm exit pupil diameter. That’s a generous size, and larger than the pupil of the eye most of the time. But a 10x25 pair of binoculars has an exit pupil of just 2.5mm, which is smaller than the average pupil dilation and will be harder to see through clearly.
These scopes offer variable magnification and are shown as 10-30x60. In this example, 10x magnification is at the low end and 30x magnification at the high end. This is incredibly convenient, but this too comes at a cost. Zooming optics might have a perfectly acceptable exit pupil diameter under low magnification but one that’s somewhat small under high magnification. For example, this 10-30x60 binocular has 10x magnification at the low end and 30x magnification at the high end. At 10x, the exit pupil diameter is a respectable 6mm, but at 30x, it’s only 2mm.
In a 20-60x80 scope, our exit pupil will be around 4mm at 20x but will close all the way down to 1.3mm at 60x. Not an issue in bright daylight as covered above, but certainly a challenge as our lighting conditions darken. Good news is we can zoom out to gain some brightness.

Eye Relief
Eye relief is the distance between the spotting scopes eye piece and the eye looking through it. This is especially important to consider if you wear glasses, as the additional space they introduce can hinder your viewing experience. Luckily, most scopes have adjustable eyepieces, so users can set them to their comfort level.
We’ve covered exit pupil and eye relief in greater detail, but the key take away is that the bigger our exit pupil, the brighter the viewing experience. For low light situations, the larger the better, whereas bright daylight viewing is less worrisome, so long as our exit pupil is just as big if not bigger than our own pupil size.
Field of View
Magnification has a direct effect on an optics field of view or angle of view. Generally speaking, the lower our magnification, the wider our visible field of view and vice versa. This is why, in binoculars, many bird watchers prefer an 8x optic, as the wider field of view makes it easier to locate that tiny brown sparrow among a sea of brown grasses. The longer our optic, the narrower our field of view tends to be.
This is why the issue of field and angle of view are often overlooked in scopes, as their significantly longer magnifications mean they’re going to have narrow field of views, especially when compared to binoculars. For this reason, many birders use both optics in tandem; binoculars to find, and the scope for detailed observation.
Eyepieces
Magnification may behave similarly in scopes and binoculars, but the way in which we achieve it is quite different. Unlike in binoculars, magnification in scopes is determined by the eyepiece. Eyepieces come in a variety of forms with various magnification levels, field so view, and even variations in eye relief.
Zoom v. Fixed
Some scopes come with a fixed eyepiece while others offer interchangeability, where the eyepiece can be removed and switched to users liking. Whichever option you decide to go with is a highly personal choice, though there are some factors to consider. Fixed scopes provide the best possible clarity, but if you lose track of your subject, refining it will come with more of a challenge. For this reason, fixed eyepieces are most often used in astronomical observations, where your quarry isn’t moving around too sporadically.
Birders will benefit most from zoom eyepieces. Why? For the same reason birders often prefer lower magnification for locating birds. The lowest power, say 20x, can be used to scan and find a bird, and once isolated, simply zoom in to the maximum power, 60x, for closer observation. Of course, if you’re birding and regularly require the longest end of your zoom, a fixed eyepiece will suffice.
Why Are Scopes with Similar Specs More Expensive Than Others?
There can be a huge range in price between apparently similar spotting scopes. For example, B&H sells 20-60x80 scopes ranging in price from less than $200 to nearly $6,000. The main reasons for such a large price range are the quality of the glass optics, the types of coatings applied to the lenses, and other features that might be added, such as the housing material.
Aside from price, these factors can also alter the appearance of a scope. If you’ve been shopping for optics, you will have noticed that some look very streamlined while others look chunkier. Some are straight whereas others show an eyepiece that is angle upwards. This is because the physical appearance and size of a scope is determined by the type of prism it uses. Additionally, the prism type can be (and often is) a factor in determining price.


Prism Type
Further down the optical chain sits our prism. Prisms are used to correct the orientation of the view horizontally and vertically so the scene looks natural; without a prism, sport optics would make things look upside down and flipped. There are two principal types of prisms: roof and Porro. These function similarly in both scopes and binoculars though unlike binoculars, which tend to have these prism clearly noted, scopes do not have these features clearly identified. Why is this?
Prism type has a direct correlation in the form factor of a pair of binoculars, whereas the differences in scopes aren’t so clear. While it’s true that smaller angled scopes, like the one in the example above, use their prism to direct the light path towards the eyepiece, in larger angle optics, you can find both prism types.

Binocular prisms are more clearly defined as either porro or roof designs. Scopes generally do not feature such easily identifiable prisms, but they perform the same basic function mentioned above. For that reason, they’re often referred to as such. The relationship between prism shape and how they function can be better understood by looking at the shape and over all style of the scope, of which there are two prominent options: the angled and straight scope.
Advantages of Angled Scopes
The most popular style is the angled spotting scope, and for good reason. Due to the angle, users don’t need such a tall tripod. This lack of height also serves to reduce shake from wind. The taller a tripod, the more prone it is to vibrations. If birding with others, there’s no better option than the angled scope, as it is much easier for people of varying heights to use the same scope.
Advantages of Straight Scopes
The most practical reason for the straight design is that it’s more intuitive to find and track a bird. Like a binocular, these follow the natural viewing path of the human eye. In fact, if you look at a cross-cut image of a straight spotting scope, you’ll notice that it looks like one half of a binocular.
In general, users, especially beginner birders, will find it is easier to acquire and track birds with a straight scope, but the angled scope offers more viewing comfort. For that reason, we recommend every birder have a good pair of binoculars along with any scope, as they provide an easier tracking experience at lower cost and a smaller footprint.
Glass
The type and quality of the glass used for the lenses and prisms matter. Generic optical glass may have imperfections, and if it isn’t ground and polished correctly, it could bend light oddly, causing colors to look skewed or prevent its ability to achieve tack-sharp focusing, or you may notice distortion at the edges. Specialized glass, such as low dispersion or extra low dispersion, is engineered to have virtually no distortion and transmit light better without bending it. The resulting images are generally clearer, sharper, with true color rendition and higher contrast.
You may also see some spotting scopes made with “Eco-glass.” This general term refers to ecologically friendly glass that doesn’t use lead or arsenic. While this may or may not affect the image quality, if your lenses break or you need to dispose of your scope, you can feel confident that you’re not adding to chemical pollution.
Coatings
Lens coatings are films applied to lens surfaces to reduce glare and reflections, increase light transmission and contrast, and help make colors look more vivid. Any light reflected is light that never reaches the viewer’s eyes, so by eliminating reflections, the image ends up being brighter and sharper.
Coatings, in general, are good, provided that the coatings do something. It’s easy to put a cheap coating on a lens to give it a cool-looking orange tint, but the coating might not do anything to improve image quality. If you aren’t able to test a scope before buying, the best you can do is research the brand, look for user reviews, and ask questions before you buy.

Terms such as coated, multi-coated and fully multi-coated refer to the location and type of coating processes used. Coated lenses are the most basic and denote that at least one lens surface has at least one layer of coating on it. Multi-coated means that multiple surfaces are coated and/or multiple layers of coatings have been applied to each surface. Fully multi-coated means that all surfaces—inner and outer—of the lenses have multiple layers applied to them. This treatment offers the highest level of light transmission, clarity, contrast, and color rendition. At the pinnacle is broadband fully multi-coated. These coatings are engineered to be effective across a wide spectrum of wavelengths and provide the best performance.
Focusing
Obviously, an important part of using any sports optic is making sure your image is sharp in focus. The clear majority of spotting scopes use a center focus system with one or two knobs/dials. The main knob will cover major adjustments, and the secondary will be for finer focusing.
The main focus knob will be set atop the scope or on the barrel itself. Adjust the main dial or knob first until your image becomes as clear as you can get it. If it’s not as clear as you expect, don’t panic. That’s what the secondary knob is for. From here, we can use this more sensitive adjustment to finely dial our focus for the optimal level of clarity.
With center focusing, many manufacturers will have a dioptric adjustment dial on one of the eyepieces to fine-tune the focus to match individual optical prescriptions. The dioptric correction amount is decided by each manufacturer, usually by model, and can be on the left or right eye, or both. Certain models have the dioptric correction integrated into the center focusing mechanisms.
Construction
The build quality of a scope shouldn’t be overlooked, especially when considering weather sealing, though we’ll touch on this specific aspect. What we will talk about, first and foremost, is the chassis, or framework, of the scope. After all, a sturdy chassis is essential to a durable, long-lasting spotting scope.
Most optics today are constructed out of either aluminum or a magnesium alloy, providing strength while maintaining a lightweight build. Now, you may hear terms like “aerospace grade” thrown around on occasion, but don’t let these terms fool you. Both the braces that support the wings and the brackets that hold up the snack tray fit this description. All you need to know is that the aforementioned alloys are strong and lightweight.
Protection
Any scope is built to withstand day to day use, with some prioritizing portability, and others robustness. Which of these qualities you prefer will depend on your specific needs. Are you driving to a location and setting up right by the car, or will you be hiking great distances and traversing difficult terrain? If your answer is the latter, you’ll need a scope with good weather and dust sealing.
Weather Resistant, Waterproof, Fog Proof
One of the most advantageous features to look for in a tool that will likely see some inclement weather is resistance to the elements. Luckily, most scopes on the market today offer some form of weather resistance or water proofing. Some optics are measured using the IPX Waterproof rating guide. This rating will determine under what conditions the optic should or can be used, but there’s variation.
Other optics use general terminology like “weather resistant” or “waterproof” to describe their instruments, which is certainly straightforward. If you intend on using your scope outdoors, as intended, in any capacity, some form of resistance is essential to ensuring their longevity and your peace of mind.

No Rating
Scopes that have no weatherproofing should not be used in the rain or at sea, because moisture can get inside them. When water gets into the optical tubes, it can condense on the inside of the lens (called “fogging”), which interferes with your view, and eventually leads to internal rust and corrosion.
Weather Resistant
Often, but not always, the optic will employ some type of seal—an O-ring or gasket—to keep moisture, such as from general humidity or a light mist, from getting into the optical tubes. You can take a weather-resistant scope out in moist conditions without causing damage. The air inside the optical tube will probably be just ambient air from the factory where they were assembled, and due to air conditioning and other factors, will usually have an extremely low moisture content. What this means is that under most normal conditions, a scope right out of the box shouldn’t have fogging issues, even if it is O-ring or gasket sealed.
Waterproof
These scopes are sealed with O-rings to prevent moisture from getting inside; but they can still fog up on you. Depending on the construction and the seals, some waterproof binoculars are also submersible for various amounts of time. Certain manufacturers rate their optics for limited depths for limited amounts of time; others will adhere to military standard specifications and rate them for much greater depths.
Fog Proof
Fogging occurs when the air inside the optical tubes contains moisture. If you go from a warm cabin to frigid conditions outside, the moisture can condense on the inside of lenses, causing them to fog. Fog-proof binoculars are filled with inert gases such as nitrogen or argon, or a combination of the two, to prevent fogging. The inert gas is dry and is pumped into the optical tubes under pressure, keeping the gaskets and O-rings firmly in place.
Accessories
All optics have their fair share of accessories, but with scopes, these can make or break an outing. With all the magnification scopes provide, we’re bound to get some shakiness in our image, so how do we counteract this? We can’t just pull out a scope handheld like it’s 1745 on the open seas. We need a way to stabilize our scope for a better viewing experience.
Tripods
Most spotting scopes will require a tripod to stabilize them. Sure, you can hand hold a small scope or monocular for a limited time, but with all that magnification, you’re bound to end up shaking at some point. For that reason, a sturdy tripod with a fluid or panning head is essential. Why a fluid head, you may ask? These tripod heads add resistance, or drag, to any movements, meaning that it’s easier to track moving subjects without fast, jerky movements.
Stay-On Cases
Spotting scopes can be a pricey investment, and their size can make them hard to conceal from stray dings or dents. For those reasons, protecting them is essential. Manufacturers make padded, modular cases that can be used to protect either certain parts, or the entire optic. These leave space to access essential controls while offering front lens and even protection for the eye piece when not in use.
Final Thoughts on the Long View
The world of spotting scopes is vast and constantly evolving. No matter what you’re using them for—from hunting on the tundra to comet watching—there is something for everyone at every price. This article has offered a basic introduction to the terms and technologies that will affect your buying decision and the overall performance of the optic. After making your selection, don’t forget about the accessories that can enhance your viewing experience and turn a good view into a great view.
If you’d like to learn more about optics, from binoculars and spotting scopes to even rifle and telescopes, check out our other articles and guides on the B&H Explora Page!
