
In today’s ever-evolving, digital world of images being shared online in an instant, it’s easy to think of printing your photos as a thing of the past. Yet there is still a strong case to be made for the pleasures and value of publishing photographs in print. In fact, the trend for self-published photo books has seen steady growth in our increasingly digital world. There continues to be lasting import to the unique beauty and tactile pleasures of a collection of images gathered between the pages of a photographic book.
One elegant and efficient solution for managing the bookmaking process is through the Adobe Lightroom Book Module, which leads you from start to finish within a single, unified workflow.
What is the Book Module?
Launched in 2007, Adobe Lightroom is a powerful image-organizing, processing, and optimization software that now offers users a connected photographic workflow across multiple devices through Adobe Lightroom Creative Cloud. The Book Module debuted in 2012, as part of Lightroom’s Version 4.0. Adobe integrated the bookmaking module into the Lightroom platform in collaboration with the independent book publishing company Blurb, which offers a direct link for printing, marketing, and book distribution.
According to Daniel Milnor, Blurb’s Photographer at Large, in the past fiscal year, Lightroom’s book module was the workflow of choice for nearly ten percent of the books Blurb printed. “It’s the easiest way for photographers to maintain their images, adjust those images and create a book of selected images, all within one app,” he says.

Adobe collaborated with the independent book–publishing company, Blurb, to create a one-stop–shopping experience for photographers and enthusiasts wishing to design and publish their own projects. Books covering a wide range of subject matter, including the options listed here, are made available for direct sale via the Blurb website.
In terms of content, Blurb books cover a wide range of subjects—from travel folios to commercial portfolios to wedding albums to vacation snaps and more—with vibrant photographs being the common denominator.
Adobe Lightroom’s Basic Framework
For those unfamiliar with Lightroom, let’s start this exploration of the Book Module’s functions and tools with a basic description of the Adobe Lightroom interface. Upon opening the program, you’ll find names of the various activity modules—Library, Develop, Map, Book, Slideshow, Print, and Web—in the top right corner of the screen. Running down the left rail are menus for a range of image display and containment options—Navigator, Catalog, Folders, Collections, and Publish Services—with buttons for Import and Export actions below. Running down the right rail, below the activity modules, are menus for various imaging and cataloging functions: Histogram, Quick Develop, Keywording, Keyword List, Metadata, and Comments, followed by Synch Metadata and Synch Settings buttons.

The Adobe Lightroom interface presents photos in a Filmstrip display along the bottom of the screen, with various presentation options in the central window, such as this example of the Compare View.
When you begin the workflow process by importing images into Lightroom’s Library Module, a row of small thumbnails populates a Filmstrip Display across the bottom of the screen. These images can be viewed simultaneously in a central window, at flexible sizes and formats, which can be selected from the five icons located in the left corner above the Filmstrip—Grid View for an overview, Loupe View for a single image, Compare View for a spread, Survey View, to enlarge specific images flagged in the central window, and People View, which identifies all images that include people.

The Grid View in Lightroom’s Library Module allows you to move your images around into a basic sequence to tell your story.
Preparing Your Image Files
Before you proceed to the Book Module, it’s helpful to spend some time in the Library Module organizing the images you wish to work with and sequencing them into a basic order to tell your story. This is also a good opportunity to add or update metadata, such as image captions, titles, copyright status, camera settings or other text. Since it will be possible to pull some or all of this data into text fields associated with each image in the Book Module, adding this information up front saves time and makes the bookmaking process easier. For maximum efficiency, create and save a Metadata Preset with basic copyright information that can be universally applied to all of your images, and then add captions or other details to individual images, as needed, under the Metadata Menu along the right rail.

The Library Module is also the place to add metadata for each image, which can later be accessed as caption information in the Book Module layout.
Once you have a general image sequence identified and metadata applied, click the + symbol in the Collections Menu and create a Lightroom Collection for this project. Don’t worry if you’re not totally sure of a final image selection or sequencing, you can add or eliminate images and change the sequence later in the process.
Entering the Book Module
To start the bookmaking process, highlight the folder containing your Saved Collection and click on the Book Module along the top right of the screen. You’ll see all of your images automatically populate successive spreads of a book. Directly below the Book Module menu you’ll find two buttons: Create Saved Book or Clear Book. You can go either way—name and save the default layout and refine the design and image sequence from there, or clear the layout and build your book from scratch using a wider selection of templates—but before you save anything, it’s essential to choose your Book Settings from the pull-down menu along the right rail.
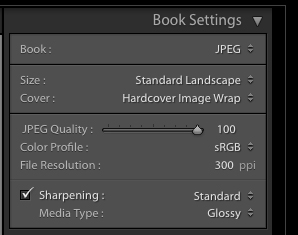
Your first decision about making a book should be to select the format and size of your book in the Book Settings Menu, pictured here.
The top menu option here, Book, offers three media options: to print a hard copy of your book through Blurb or generate PDF or JPG files for presentation as an e-book or output through other printing services.
![]()
Next comes one of the most important decisions—the Size of your book. It’s best to finalize this before beginning the layout process, since the positioning of images and text elements will be adversely affected if you change your book size midstream. The Book Module offers templates in five size options: a Small or Large Square format (7 or 12"), a Standard Portrait or Landscape format (horizontal or vertical at 8 X 10"), and a Large Landscape format (13 X 11" horizontal) or the metric equivalents.
If you’ll be publishing a print version of the book, you can also select from three cover types: a Hardcover Image Wrap, a Hardcover Dust Jacket, or a Softcover book (a No Cover option is also available if you choose to output the book as a PDF or JPG).
The next decision for printed books is Paper Type. Blurb offers five different options—Premium Luster, Premium Matte, Proline Uncoated, Pearl Photo, or Standard—and you can request a packet of swatches to check out the paper in advance. According to Milnor, Blurb’s premium papers are most popular, with their Proline options being close second. “But, paper is so subjective, especially with photographers,” he says. “I know very high-level photographers who prefer our standard paper to anything else.”
If you’ve selected the option for a PDF or JPG output, the Book Settings menu will change to display a sliding scale of JPG quality settings, various choices for Color Profiling, three Sharpening levels (Low, Standard, or High) and Matt or Glossy Media Types.
For those who will be printing their book with Blurb, there’s one final selection to make—for a Logo Page—which refers to whether or not you want the Blurb logo printed on the end page of your book. Here, it pays to click yes, since including the logo will give you a respectable price discount.
At the bottom of the Book Settings menu is a line item for Estimated Price, which is automatically calculated per book and updates with every selection you make, so you can keep track of exactly how much your decisions will cost.
Page Layout Options
After setting up the bones of your book, it’s time to explore layout options using the Auto Layout and Page tabs. Go ahead and click on the Clear Book tab mentioned earlier, and the default layout will disappear. You can easily regenerate this same default by opening the Auto Layout menu and clicking on the tab by that name.

Upon entering Lightroom’s Book Module, the images will be imported from your filmstrip display into a basic page layout. You can clear this default and choose other layout options from the Auto Layout menu.
Increase your layout options by clicking on the two triangles to the right of the Preset option and scrolling down to select the Edit Auto Layout Preset. This will bring up a window with lots of options for custom templates.
All of these templates can be more easily studied under the Page tab. With this tab open, click on the black triangle midway down the right side to uncover the full list of template options organized under 12 categories.

The Page Menu allows you to select from more than 180 page layout templates, to design your book page by page.
All told, there are more than 180 templates to choose from, with 47 templates that feature One Photo per page (including options with and without text), nearly as much choice for templates with Two, Three or Four Photos per page, 11 options each for Multiple Photo pages and Two-Page spreads, and four layout choices that consist primarily of Text.
If you’d prefer to work with a template based on the content of your book, there are more than 100 stylistic choices organized under the terms Clean, Creative, Portfolio, Travel, and Wedding. A thirteenth category, Favorites, lets you save the templates you use the most for ease of retrieval.
Another function of the Page menu is to add Page Numbers to your book, which can be placed in the Corner, at the Top, on the Bottom‚ or at the Side of the page. In cases where a page number would be distracting, you can remove the number by right-mouse-clicking over it or selecting the Toggle Page Number option from Lightroom’s Edit menu in the browser bar; the program will account for this when it picks up the numbering process.

If you want your book to include page numbers, click the box at the top left of the Page Menu. Select where on the page the numbers will go from the pull down menu at top right.
You may be wondering about the black lines and gray edges that appear near the borders of each page. These are print production guides that can be turned on or off by clicking open the Guides Menu. If you find these distracting, you can disable them while you’re exploring layout options, but don’t forget to turn them back on and check carefully for production errors before delivering the file to the printer.

The Guides Menu allows you to control whether or not to display the various production guides for image bleeds and text bounding boxes. Disable the guides while you are working by clicking the box at top left, but make sure to turn these back on for a final production check before publishing your book.
At this point, you should click on the Create Save Book button mentioned earlier, to pull up the window in which you can name and save your project as a subfolder inside the Smart Collections Menu on the left-hand rail. You can even save your project in multiple versions to compare and contrast different creative choices.
Image Sizing and Enchancement
As you populate your book with images, it’s easy to make a wide variety of individual layout changes and image adjustments on the fly. You can reposition an image on the page or move it from one page to another simply by clicking and dragging. Clicking on an individual page also brings up two interactive tabs, highlighted in black. A Zoom Slider above the page allows you to enlarge individual images, while a black triangle at the bottom right provides easy access to all of the page templates, so you can test other layout options efficiently for a given page.
Another mechanism for image sizing, the Cell menu, is located midway down the right rail. This allows you to size individual images with a measurement called Padding. Adjusting the initial slider applies padding to all sides of the image. For more control, click on the black triangle at the top right of the menu box to reveal Padding adjustments for one side of an image at a time.

The Cell Menu allows you to control the size of your images in the selected page template by padding applied to one or more sides of the image area. Click Link All to apply padding to all sides. A zoom slider for cropping images is also accessible above each image in the central window.
When working with sizing and sequencing your images, it’s helpful to change your view of the project as you go. Similar to the Library Module, you’ll find icons for viewing Multi-image, Spread, and Single Image options toward the lower left of the screen, directly above the Filmstrip View. When the Multi-image viewing option is selected, you can zoom out even farther by adjusting the Thumbnail Slider in the lower right corner of the central display. This will enable you to get an effective overview of your entire book. Additionally, in the top left corner above the central window, you’ll find three icons Fit, 1:1, and 1:4, which allow you to zoom in and view an individual image in closer detail.
When refining your image selection and sequencing, you may find certain photos are in need of enhancement, or you might even want to make universal changes, such as image sharpening or toning. This is where Lightroom really shines as a one-stop shop for a complete imaging workflow.

You can easily adjust exposure or color balance of individual images in your layout by working on an individual image in the Develop Module. I adjusted this image, which was shot through a car window, to remove the unsightly green color cast.
Simply navigate to the Develop Module, where you can make a full range of post-processing image adjustments, either individually or globally, to get the desired look. Then navigate back to the Book Module, where you’ll find these changes automatically updated in your layout.

Once I adjusted the color to better match the rest of my images, I simply clicked back to the Book Module for my changes to be automatically applied to the layout.
Text and Type Options
If you’ll be adding captions or text to your book, you’ll want to explore the Text and Type Menu items, located toward the bottom of the right-hand rail. First, open the Text Menu, where you’ll find indicators for both Photo Text and Page Text. To the right of the Photo Text box is a pull-down menu with multiple text options that can be pulled from your Image Metadata and then edited as needed for a caption. A sliding scale for Offset allows you to move this text box up and down the page. Buttons at the bottom of this menu, labeled Above, Over, and Below for photo text, and Top and Bottom for page text, allow for automatic placement of the text in relation to images.

When entering image captions or page text, click on the Book Module’s Type Menu to display hundreds of available typefaces and other options for customizing the look of your book text.
In the Type Menu, you’ll find pull-down menus with hundreds of available typefaces, nearly a dozen type treatments, a Color Picker for type, plus sliders for Size, Opacity, Tracking, Baseline, Leading, Kerning, Columns, and Gutter adjustments. At the top of this menu are options for six different Style Presets, as well as the option to save your own type settings as a New Preset.
Once you decide on individual text/type options, go to the Lightroom Edit Menu in your browser’s menu bar and click on Select All Text Cells to apply your choices universally throughout your book. If there’s one page you don’t want to change, you can use the command/control key to deselect that page.
Covers, Backgrounds, and Other Design Elements
Despite the popular idiom about not judging a book by its cover, we all know that covers count for a lot. For this reason, it’s useful to build your book from the inside out, so your decisions about the front and back cover are informed by the final look and feel of the interior contents.

Save the final decisions about your book’s front and back cover to the end of your bookmaking process, so you have a solid feel for the overall look and flow of the book. A dozen choices for cover designs can be accessed from the little black triangle at the bottom right of the front cover layout.
There are 12 template options for Front/Back Cover choices, which you can access by clicking on the black triangle at the bottom right of the highlighted cover cells. Most of these cells allow for the placement of images and text, as well as the vertical placement of a book title along the spine.

You can also choose to add a background color to your book, or graphic treatments for Wedding or Travel subjects, such as the graphic element shown here.
At the bottom of the right-hand rail you’ll find a menu option Background, which allows you to add graphic elements and colors to your layout. Click on the black triangle at the right of the central square to reveal a range of graphic treatments relevant to Travel and Wedding subject categories. A third option, Photos, allows you to select an image to use as a background treatment, while an Opacity Slider below allows you to control how visible the graphic or image will be in the background. Beneath this, click on Background Color to access a Color Picker that allows you to add a full range of colors or shades of gray.
Production Check and Delivery
Once you feel confident with the book layout, go back to the Guides Menu and click on Show Guides to check the image bleeds and make sure all text areas are inside the black bounding box.
If you’re producing the book as a PDF or JPG, look to the lower right corner, just above the filmstrip and click on the Export Book to PDF/JPG button. If you’ll be delivering the book to Blurb, look to the lower left corner for an Export to PDF button, after which you can click on the Send Book to Blurb button in the lower right corner.
Even if your book is destined for printing with Blurb, it can be helpful to print a review copy of the PDF file at home before delivery to Blurb. It’s surprising the details you can pick up on when viewing the project on paper rather than on screen.

Once you’re ready to publish, ordering your book from the Blurb Web site is merely a click away. If you’re looking to order a quantity of books, build time into your production schedule to first order a single copy as a final proof, to ensure all your selections look just right.
If you plan to order multiple books, it’s important to build enough time into your schedule to order a single printed copy from Blurb as a final production proof, to ensure that everything looks its best and you’re satisfied with your paper choice. It may add a little time to your workflow, but the knowledge that everything is going to print correctly is peace of mind.
Most Blurb books are printed and delivered within 7 to 11 business days, depending on the delivery date you select when ordering. There is no option for rush-printing services, but the calculator on the Blurb shipping page will give you an immediate sense of the delivery timeframe and the shipping price for an order placed the same day.
So, with the year winding down and all the visual memories you’ve captured still parked in your camera or phone, what better time than now to organize your images and put them together as a book to share with family and friends this holiday season?
