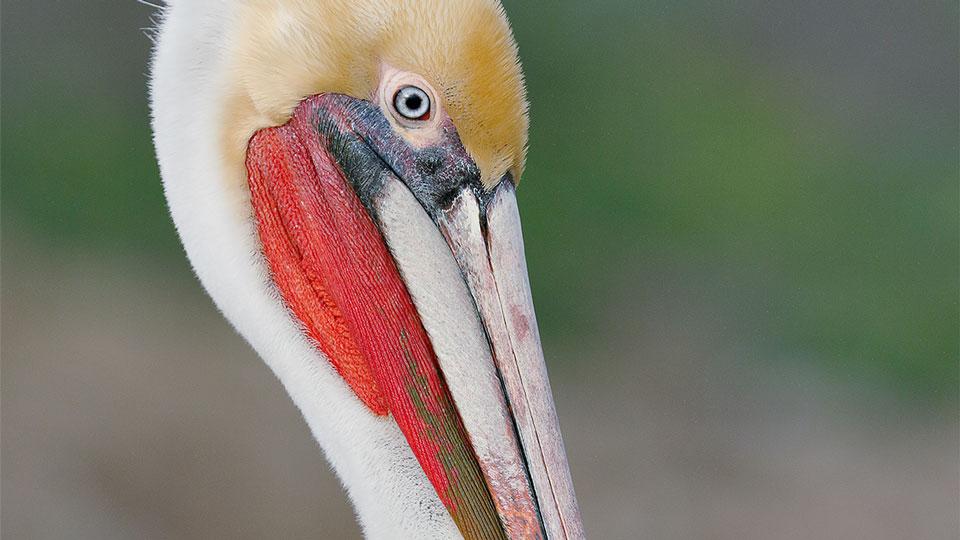
La Jolla, California, is the best place on the planet to photograph the spectacular Pacific race of Brown Pelican, along with a nice variety of other birds that frequent coastal California. In winter, the pelicans and several other species like Brandt’s and Double-crested Cormorants, are molting into their handsome breeding plumages. The pelicans sport their fire-engine-red bill pouches. Most days are clear and sunny. Making images of the pelicans with deep Pacific-blue backgrounds is a snap. On sunny days, I point my shadow right at my avian subjects so I am pretty much restricted to ocean backgrounds.
On a rare cloudy morning, in San Diego, I was able to work well off light angle and photograph this pelican with a distant cliff background. The green and the earth tones of the hillside and the soft light combined to allow me to create a special and different image.
Gear Used
• Canon EF 100-400mm f/4.5-5.6L IS II USM Lens
• Delkin Devices 64GB CF 1000X UDMA 7 Memory Card
What I love about nature photography is that everyone is equal. Here’s the flash card. There’s the door. Let’s see what you can do.
My mom lived in San Diego for more than 30 years. Each time that I would visit, she would say, “Where are you going tomorrow, to La Jolla to photograph pelicans?” After I’d say, “Yes,” she’d say, “What’s the matter with you, don’t you have enough pelican pictures already?”
The Gear Plan
The 100-400 II is amazingly versatile. With the 7D II, it gives me an effective focal length of 640mm (12.8X magnification), 896mm (17.92X magnification) with center point Expand Autofocus when you add the Canon Extender EF 1.4X III, (the latter best on sunny days). With the 7D II, you have a relatively lightweight rig that is easily hand-hold-able by most folks. Being free of a sturdy tripod frees you up tremendously. It makes it easier to maneuver on the rocks and to get into position to create the image that you want. The 4-stop IS (image stabilization) system works as advertised and allows you to create sharp images at slow shutter speeds.
If a pelican does a head throw, cleans its bill, or decides to flap, the zoom allows you to get quickly to the proper framing. Did I forget to mention that it is a great flight-photography lens? And the minimum focusing distance is an incredibly short .98 meters, or 3.2 feet. Most folks can point the lens straight down and photograph their own toes! This makes the 100-400 II ideal for subjects like flowers, butterflies, dragonflies, and frogs.
Technical Details
First I set ISO 400, my go-to ISO value. After making and checking a test histogram I went with an exposure of 1/1250-second at f/5.6. This was perfect with lots of data well into the fifth-most histogram box, the one with the light tones, and no data pegged (clipped) on the left side of the graph where the dark tones live. All that with no blinkies. Perfecto.
I did my best to parallel the pelican’s bill with the back of the camera to minimize any potential depth-of-field problems. After choosing an AF point one row to the left and two rows above the center AF Point, I set AI Servo/Expand/Rear Focus AF. The chosen AF point that fell on the base of the bird’s bill was active at the moment of exposure. I made sure to pick a spot that was on the same plane as the bird’s eye to ensure adequate sharpness on the eye. Why? When viewing wildlife images, the first thing that we do is to look in the subject’s eye. If it is not sharp, folks will be turned off.

Post Production
I edit my images (select my keepers) in Photo Mechanic and convert all of my Canon RAW files in Canon Digital Photo Professional (DPP), the free software that comes in the box with your new Canon camera. I love using DPP to convert my RAW files. Then I bring the converted TIFF into Photoshop CC to be optimized. I adjust color and contrast, make lots of targeted adjustments, use NIK Color Efex Pro, and clean up both minor and major distracting elements. Note: This pelican image is pretty much straight out of camera.
About the author: Arthur Morris is a long-time birder and photographer. You can read more at his BIRDS AS ART blog. He also teaches the BIRDS AS ART Instructional Photo-Tour (IPT) in San Diego. Students learn to use their histograms, how to anticipate bird behavior, how best to use their camera’s AF system to create pleasing image designs, and how to see, use, and understand light.
