Macro photography is a specialized genre that has wide appeal. Despite its familiarity to most as just being “close-up shooting,” there are a variety of terms and tools that come up in the macro photography field that don’t seem to affect other broader, more general shooting methods. Let’s take a look at some of the specialized nomenclature and tools of the macro trade.
1. Macro
Starting with the obvious one first, macro photography is loosely defined as close-up photography done at scales of life-size or greater. We’ll get into this more in the next point, but the key here is the distinction between (true) macro photography and just close-up photography, which is having your subject reproduced at least at life size. There are many “macro” lenses on the market offering half life-size magnification (1:2), and for the sake of conversational vernacular, we continue to call these “macro lenses,” but if you want to be a pedant, then you will have to start at life size to be doing true macro shooting.

2. Reproduction Ratio
Stated literally, reproduction ratio is the ratio of the size of the image of the subject on your sensor to the real size of the subject. In more practical terms, imagine you are photographing a subject that is exactly one centimeter long; if this subject is rendered one centimeter long on your sensor, then you have a 1:1 (or life-size) reproduction ratio. If a four centimeter-long subject takes up one centimeter on your sensor, then you have a 1:4 (quarter life-size) reproduction ratio. And, similarly, if you photograph a subject that is 1 millimeter long and it takes up 4 millimeters of space on your sensor, then you have a 4:1 (greater-than life-size) reproduction ratio. Reproduction ratios can also be expressed as a magnification, where 1:1 is the same as 1.0x, 1:4 is the same as 0.25x, and 4:1 is the same as 4.0x.

3. Working Distance
Related to focusing distance, working distance can often be a more crucial figure for macro photography because it accounts for the physical length of the lens being used. Whereas focusing distance is the measurement from the sensor/film plane to the subject, working distance is the measurement from the front of the lens to the subject. This is critical info for the macro photographer because many common macro subjects, such as insects or other living creatures, will run, fly, or crawl away if you get too close.

For example, Nikon’s 200mm f/4 macro lens, which offers a 1:1 reproduction ratio, has a minimum working distance of approximately 11.6"; its 60mm f/2.8 macro lens, which also has a 1:1 reproduction ratio, has a minimum working distance of just 3.8". This means that with the 200mm lens, you can be just about 8" farther away from your subject than with the 60mm lens while still achieving a 1:1 reproduction ratio.

4. Depth of Field
I’m not going to try to summarize or outdo Todd Vorenkamp’s three-part tome on depth of field here, but I am going to point out that depth of field affects macro photography probably more than almost any other genre of photography due to the physics of how “light rays must be bent more to intersect at or near the image plane.” Subject distance and focus distance are key to how depth of field is rendered and, in macro photography, you are almost always going to be working at or around minimum focus distance and minimum working distance. Having such shallow depth of field can often be a benefit, since it allows you to isolate your subject from a busy background, but things can get a bit intense up close, with in-focus ranges often measuring in the millimeters. It’s not uncommon to be working at f/22 or f/32 to achieve sufficient depth of field, as well as employing the following technique…
5. Focus Stacking
Focus stacking is a relatively new technique for achieving extended depth of field. While it can be applied to any genre of photography, I’d argue its merits are best suited for macro photography. Take a look at Shawn Steiner’s tutorial for more specific information but, in short, this process employs several exposures of the same scene with the focus plane changing from shot to shot. These exposures are then merged (typically in post-production) into one frame to yield greater depth of field than would be possible with a single exposure. The other benefit of this process is that you can work at a middle aperture, such as f/8, where lens performance is typically best, compared to f/22, where diffraction may reduce apparent sharpness. The downside to focus stacking is that it is compulsory to work on a tripod and the subject cannot move between exposures.


6. Flat Field Lens
Referring to a previous article again, my article on optical anomalies describes field curvature and how it is essentially an aberration that occurs with all lenses. This is true; however, macro lenses often feature optical designs to mitigate field curvature, and thus are called flat field lenses. By correcting specifically for field curvature, macro lenses have a more even plane of focus to better suit photographing flat objects/planes (a common task for macro lenses, i.e. reproduction and copy stand work). This type of design is also beneficial regarding depth of field concerns, because the plane of focus will be even from edge to edge, to aid in making more exact adjustments.
7. Close-Up Lens/Diopter
As a specialized field in photography, there are also several specialized, purpose-made tools for macro shooting. One of the easiest to use is the close-up lens or diopter, which is similar to a filter that you screw onto the front of your lens. Differing from a filter, though, close-up lenses have a semi-bulbous, convex element that helps to shorten the minimum focusing distance of any lens. These lenses typically come in sets with different dioptric strengths, which allow you to pair different lenses to achieve varying degrees of shortened focus.

8. Reversing Ring
Similar but also quite different, reversing rings are a unique solution to achieving shortened minimum focus with any lens. The concept behind these simple tools is to attach a lens to a camera in reverse, so the rear element of the lens faces outward and the front element is facing the sensor. The reversing ring attaches to your lens via its filter threads (so a step-up ring may be required) and then it has a bayonet mount to attach to the specific type of camera in use. This technique works best with lenses that have a manual aperture ring and are manual focus; however, there are some automatic reversing rings for working with more modern AF lenses. Additionally, for an even more pronounced effect, coupler rings can be used in conjunction with two lenses, where you reverse one lens onto the front of another lens for even greater magnification and shortened focusing distance.

9. Bellows and Extension Tube
The final auxiliary tools to help achieve shorter focusing distances with any lens are bellows and extension tubes. These are equally as simple as the previous two methods, but tend to yield better results (optically speaking) since you are not adding any additional optics to your shooting setup. Both of these tools work on the same principle of increasing the flange distance between your lens and the image sensor to shorten the available focusing distance. Extension tubes are the simpler of the two methods, since they are a rigid and repeatable way to increase the flange distance. And like close-up lenses, extension tubes typically come in sets that allow you to vary the distance in increments by using tubes individually or in combination with one another.
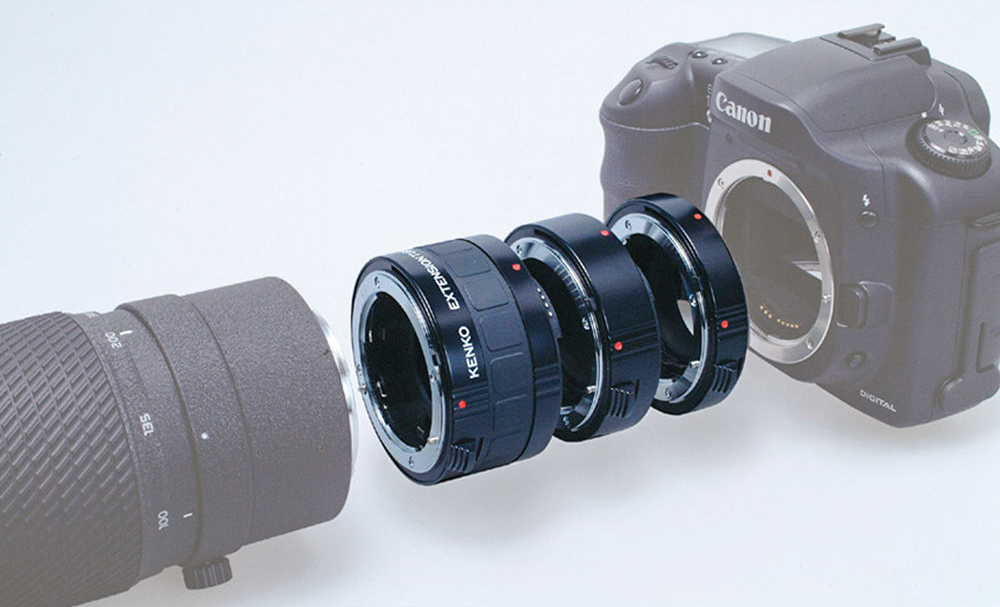
A bellows, on the other hand, is a flexible and more precise tool for adjusting the flange distance to any distance required. Whereas extension tubes may come in 10mm, 20mm, and 30mm lengths, a bellows lets you work within a range of, say, 30mm to 200mm, with infinite increments in between.

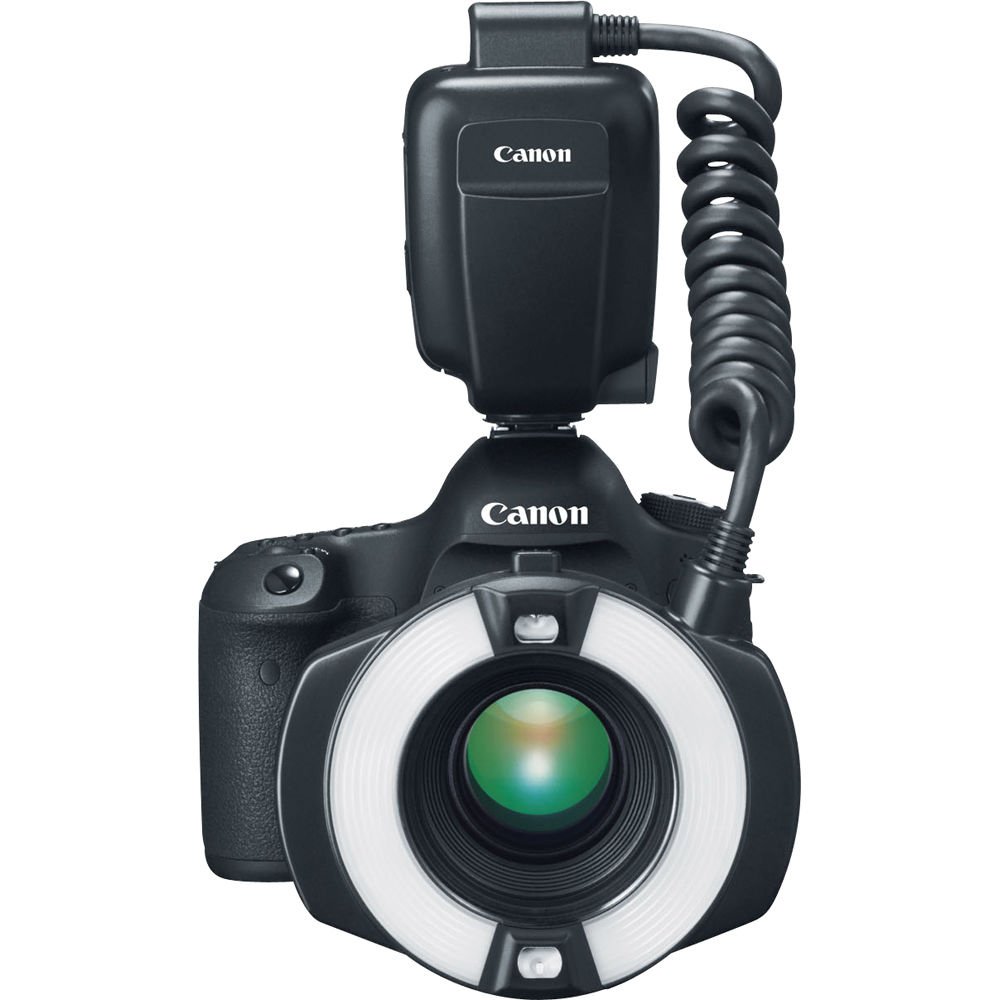
10. Ring Flash/Ring Light
The last pair of tools we’ll cover here are ring flashes and ring lights. Nowadays, these tools are being used for a wide variety of genres, including fashion and portraiture, but these ring-shaped lights originated as a perfect way to illuminate close-up subjects. Since, with macro shooting, you are often exceedingly close to your subject, you are also often blocking the ability to use off-camera lights to illuminate your subject. Ring flashes/lights solve this issue by attaching directly to the front of your lens to provide even, unobscured light on close-up subjects. They’re pretty straightforward tools, with the main choice coming down to whether you prefer the higher output of a flash or the versatility of a constant light source to suit both photo and video applications.
Did we miss any other specialized tools or phrases of the macro world? Let us know your thoughts in the Comments section, below.
