
For in-the-know musicians, engineers, and producers, going Windows for your production setup is the best-kept secret in town for two big reasons: price and power. But, with great power comes great responsibility.
Often, people go out and buy Windows machines that are well within their DAW’s system requirements, only to come home and find that they’re experiencing lackluster performance. The problem is that Windows is optimized for a wide variety of uses out of the box, and has some default settings that don’t favor the kind of processing power needed for pro audio work. So, whether you use Ableton Live, Pro Tools, FL Studio, Cubase, or anything else, if you’re hearing clicks, pops, or dropouts during recording and playback, or receiving annoying errors, here are seven tips that you’ll definitely want to try.
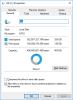
Tip #1: Set Your Computer's Power for High Performance
This is the #1 most important tip in this article. Many Windows computers come with default power settings that are in place to favor energy conservation, but in turn hinder your PC’s performance. This can cause problems for you even in the simplest audio or music projects. To ensure power settings that are conducive to high performance:
- Click on the Start Menu, and start typing “Control Panel” then go to the Control Panel when it pops up
- Make sure the view is set to “Small/Large Icons” rather than “Categories”
- Go to Power Options
- Choose High Performance and then click Change plan settings
- Set Put the computer to sleep to Never
- Click Change advanced power settings
- Expand USB settings, then expand USB selective suspend settings and set to Disabled
- Expand Processor power management, then expand Minimum processor state and set to 100%
- Click Apply, OK, and Save Changes


Tip #2: Optimize Processor Scheduling
This tweak will allow your computer to run your DAW more efficiently.
- Go to the Control Panel and select System
- Go to Advanced system settings and go to the Advanced tab
- Click on Settings under the Performance heading, which brings up Performance Options
- Go to the Advanced tab and set Processor scheduling to Background Services
- Click Apply, then OK
Tip #3: Hard Disk Optimization
Although this is not required for SSDs, if you’re using a spinning disk hard drive to store your audio files, this optimization will improve load times and general disk performance when recording and playing back audio.
- Go to the Start menu and open the File Explorer
- Click This PC in the left column, then right-click on the hard drive you intend to use for audio storage
- Select Properties
- Make sure Compress this drive to save disk space is unchecked
- Make sure Allow files on this drive to have contents indexed in addition to file properties is unchecked
- Click Apply, then OK
- Repeat for any drive you’re going to use for audio


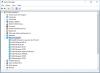
Tip #4: Disable USB Power Management
If you’re using a USB audio interface, you’ll want to disable USB power management, to free up bandwidth on the USB bus. This can help with device recognition and driver installation issues.
- Open the Control Panel and click on Device Manager
- Open Universal Serial Bus Controllers, and double-click the first USB Root Hub heading
- Click on the Power Management tab and uncheck the box that says Allow the computer to turn off this device to save power and click OK
- Repeat process for all other USB Root Hub items
Tip #5: Disable Windows Background Apps
Windows runs quite a few applications in the background by default, even when you’re not using them. Disable these background apps to free up processing power.
- Go to the Start menu, select Settings
- Select Privacy, then Background Apps
- Switch Off the apps that you aren’t using, or that you do not wish to run in the background when you are not using them


Tip #6: Run as Administrator
This can correct issues when launching your DAW, as well as problems that can occur when using certain hardware drivers.
- Right-click on your DAW’s shortcut icon that you use to launch the program
- Choose Properties
- Click on the Compatibility tab
- Check the box that says Run this program as an administrator
- Click Apply, then OK
Tip #7: Update Network Adapter Driver
Outdated network adapter drivers can be inefficient, and can slow down system performance. Make sure you’re using the latest drivers to ensure that you’re dedicating as much processing power as possible to your DAW.
- Click the Start Menu, type Device Manager and press enter
- Click the triangle next to Network Adapters
- Right-click and go to Update Driver, then Search automatically for updated driver software. If no driver is found, you’ll need to update the driver manually.
- Double-click on the network adapter heading to show properties
- In the General tab, you can see the model and the manufacturer. In the Driver tab, you can find the driver version and the date
- Go to the manufacturer’s website to find the latest driver, and install manually


Well, there you have it, seven tips for optimizing your Windows 10 computer for audio and music production. I hope your system is now running smoothly, and that you’re able to jump back in and start making music. If you have any thoughts or questions, please feel free to let us know in the Comments section, below.
