Back in 2010, I was working at a liquor store in Kansas. It was August, our second hottest month, and we were in the middle of a weeklong heatwave that kept temperatures around 100 degrees for days on end. The A/C in our store was busted, so I was cranky and uncomfortable and, generally speaking, not in the best mindset to deal with nuisances of any kind. Which is why, when a large fly landed on the screen of my Apple PowerBook G4, I, instead of wisely shooing it away, decided to punch said fly into oblivion—only to miss wildly and, of course, punch through my laptop screen instead. Whoops.

Now, back then, I wasn’t technically savvy or financially solvent enough to fix the broken screen, so I put the laptop away, under my bed, out of sight, for years.
Flash forward to Hard Drive Week 2018, when, by sheer coincidence, I was cleaning out my room and discovered my broken PowerBook buried in a bin of old sweaters. A sucker for serendipity, I thought it would be fun to pull out the hard drive and see what was on there. This is how I did it.
Before we start, it’s worth mentioning that, while these directions are specific to a 15" PowerBook G4, many of these same instructions can be applied to other models and laptops with similar bodies and builds.

The first thing you need to do is unplug your Mac (if it’s plugged in) and remove the battery. The easiest way to remove the battery is to use a coin to unlock the locking screw. Once you do, the battery will pop right out. Next, you have to remove all relevant Phillips and hex screws from the body. There are about 20 screws altogether, and to remove them, you’ll need both a Phillips #00 screwdriver and a Torx T6 screwdriver. I didn’t have either on hand, so I picked up an inexpensive OWC toolkit to help me out.

The order you choose to remove the screws is up to you, but I found the easiest way was to start with the Phillips screws on the bottom—including the screws inside the battery and memory compartments—then remove the Phillips screws along the three sides (left, right, and back), and, finally, the two hex screws at the corners of the upper case (just above the speaker grilles).

Once the screws are out, you can lift the upper case off the chassis. Be careful here, though, because the case is still connected to the keyboard and trackpad cable. What you want to do is gently separate the case from the chassis and tilt it way from you so that it leans against the screen (see image above).
With the case propped against the display, go ahead and disconnect the tape and trackpad ribbon connecting the case to the logic board. Now, the case should be completely untethered and you can set it to the side.

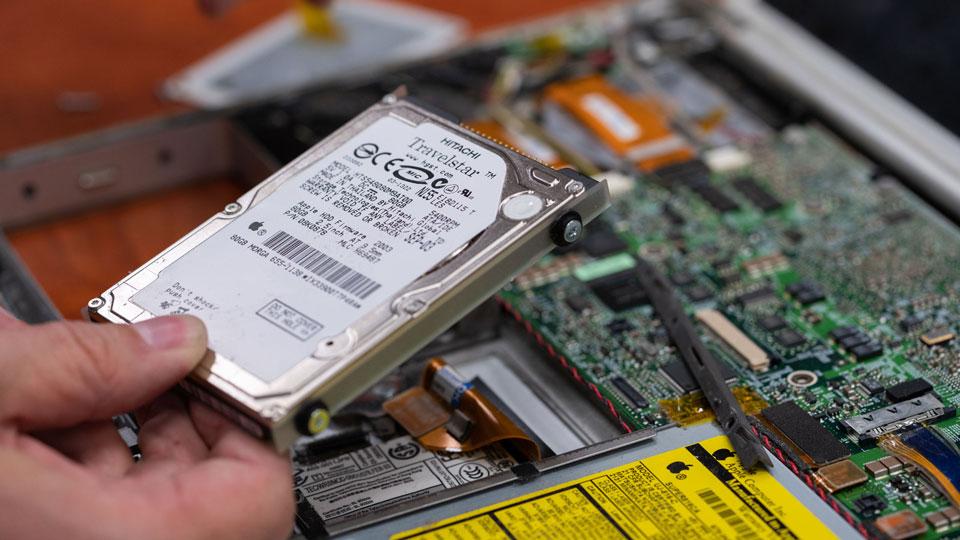
Next, take out the Phillips screws from the hard drive retaining bracket and remove the bracket. Once the bracket is gone, you can disconnect the orange hard drive cable and tape from the logic board, freeing the hard drive. You might have to wiggle the hard drive a little bit to get it loose, but start from the right side and it should lift up fairly easily. Once the hard drive is out, carefully remove the ribbon cable from the hard drive.

Now that the hard drive was out, I was ready to connect it to my desktop. This was the easiest part of the process. Using a C2G IDE / SATA Drive Adapter Cable, I connected the PowerBook hard drive to my iMac via USB and, in seconds, the hard drive appeared as a discoverable disk on screen. Finally, after 10 long years, I was able to recover everything that stupid fly had taken from me. I opened up the drive and found… mostly a lot of out-of-focus pictures of me with too much hair product. Hm. OK, so maybe the fly was on to something.

In the end, cracking open my PowerBook time capsule didn’t prove as rewarding as I hoped, but I did learn a lot about removing hard drives in the process, so I am grateful for the experience overall. What about you? Questions about removing your own hard drive from a laptop? Any tips for other electronic excavators? Let us know in the Comments section, below.