
Has it been at least six months since you bought or built your computer? Maybe a year? Chances are it is finally time to look inside your case and see what awaits you. But you shouldn’t just jump in blind. You should have an idea of what you should do and how to do it so that you don’t run into any issues. We are going to break down why you should clean your computer, the tools that you should have, the techniques that I use, and more! So, get your gloves on and let’s get on with the cleaning!
Why Should You Clean Your Computer
You like breathing, right? I know I do! Your computer likes breathing too! Keeping it nice and clean on the inside helps your computer run better! Fans can spin around and pass air throughout the case, keeping your internal components cool. Similar to how they impact your lungs, smoke and small particles can cause damage and prevent you from completing various daily tasks. There have been some instances where computer owners have seen system-wide failures occur simply because they didn’t clean their system.

There are various nightmare scenarios I have seen play out. I’ve seen computers that housed families of bugs to immense amounts of pet dander caught up on the filters. Those who like to smoke, vape, or light candles near their computer are also susceptible to build-up within the fans and heatsinks of the computer. The best way to prevent this from getting worse is to maintain a cleaning schedule. Developing a sort of routine when it comes to computer maintenance will save you tons of headaches and tons of money!
The Tools You’ll Need
Before you open the case, you are going to want to prepare some equipment. Like I said, there are various scenarios that could play out here and it is important that we ensure we have the right tools for the right job. We don’t have to disassemble the entire system, but there are some basics you should keep on hand.
You’ll absolutely want some isopropyl alcohol to help with cleaning various parts of your PC. Because it is non-conductive and quick to dry out, it is the best solvable solution for cleaning. Do not use household cleaning products because they can be conductive, leave behind residue, and do far worse.

Cotton swabs are also great to have on hand especially to get dirt off the hard-to-reach places. They can squeeze between fan blades, between heatsink fins, and a whole lot more. I would avoid cotton rounds and balls alike as they can get caught on other elements that you might not realize. Cotton swabs are small and precise to get the job done!
I would also suggest some canned air—two cans to be exact, depending on the project. This is because you’ll be swapping between both cans. Sometimes a can will need more time to repressurize and you don’t want to wait, so having a backup is handy. There are electronic blowers that can also help if you don’t want to use canned air.
There are some other tools that you could use if you want. Anti-static gloves are nice to have on hand along with the famous anti-static wrist band. A headlamp for hands-free lighting is also a good addition, especially for small nooks. If you are doing a deep clean, a good screwdriver set is necessary.
Perhaps the most important tool to have at any time is a garbage bag. If you open your system and anything crawls out, it might be time to bag it up and toss the entire system. Your computer is their home now and you shouldn’t use chemicals like sprays or anything to try to get them out because you will damage your computer. Sometimes bugs like to live in the power supply and if that is your specific case, there isn’t much you can do. There will be a lot of refuse to clean and there comes a point where all the cleaning in the world will not help.
One last thing to be aware of is if you like to use vacuum cleaners. They come in all shapes and sizes but make sure that you buy one with an anti-static compliant brush. Sometimes they are not and that can cause damage to components.
Case and Filter Cleanup
Before we start, power down and unplug your case. Wait about a minute before you start cleaning. While unplugged, press the power button a few times. This will ensure that any internal capacitors are drained of electricity.
Next, we are going to start cleaning the outside of the case. If it is particularly dirty you can simply use a wipe or spray a cleaning solution on a paper towel to wipe it off. This is the only time and place where I can suggest this. Glass side panels can also be cleaned this way. Never, and I mean never, spray the computer down with the cleaning solution. You do not know where the spray itself will go and that could cause damage.

After you have done a basic exterior cleaning, you’re going to want to tackle the filters. Most cases will have just a front and bottom filter. You want to keep your case manual handy or find it digitally online via your manufacturer’s website. This will tell you where your filters are located if you can’t find them yourself. Additionally, some cases require you to pull off a panel to reach said filter, this will be highlighted in the manual.
If you find the front panel and pull off the cover, you should see the filter. You also might not see the filter, because it is covered in dust and dirt. Due to how the fans are, you might see the dander make a neat circle. This is because of how the fans draw in air. If the filters are dirty, they can’t be as effective as we need them to be.
The power supply filter is also incredibly important to clean. This filter tends to be located wherever the power supply can be mounted. In most cases, this is near the lower back of the case. Small form factor cases may have a different place for the power supply and lack a filter. This is where the manual becomes incredibly handy.
Filters can be removed. Many modern cases feature magnetic filters, which can be pulled off and vacuumed. If you want to go the extra mile to wash them, you can do that under warm water with some cleaner (although that isn’t necessary). Most importantly, you want to dry the filter out if you decide to make it part of your dishwashing. Use a paper towel to hand dry it and keep an eye out for water remnants. Remember, water and electricity do not mix.
A Nice Dusting
Now that the exterior and filters are cleaned, it’s time to tackle the inside. This is where all your tools will come in handy, and it is worth keeping them all within arm’s reach. There are multiple paths you can take when it comes to cleaning it out. You could go for the fans first, or the bottom of the case, or the CPU.

I personally like to start with a good dusting. Simply take off the side panel of your system and take a quick look. If there isn’t a lot of dust, then you can keep it inside. Otherwise, if it is caked with dust, I would say it is a good idea to take your computer outside. You don’t want a large amount of dirt to circulate in your room, especially if it is caked on. You may also want a mask or some sort of mouth and nose covering to prevent you from breathing it in.
Once you are done with dusting, you want to examine around the case and see what else needs to be cleaned. When using a blower, some dirt may settle on other parts, so you want to be as thorough as possible. Tough dirt will stick to the motherboard and rest within the heatsink fins. You can try to blow this out, but it may prove fruitless.
Fans, Heatsinks, and Radiators
When it comes to fans, heatsinks, and radiators, cleaning can get really challenging. These are typically the parts that work together to ensure your components are getting ample airflow. Folks who smoke, light incense, or have candles around their computer might find a layer of substances stuck to some of these parts. This is where the isopropyl alcohol comes into the picture. We are going to use cotton swabs and paper towels to get these bits cleaned. But we also have to be a little conscious about the time and effort versus pricing.
For example, if you have a fan-based CPU cooler, it might just be easier to replace the cooler instead of spending a lot of time cleaning it out. This also goes for fans and other parts that are relatively inexpensive. Additionally, components like fans tend to get better over time with new technologies that enhance airflow better than your current fans. For a decent price you can actually have a better performing system rather than trying to take a cotton swab to all of the fan blades or blow out the radiator. These are rather extreme circumstances though. If you have had your PC for years and this is the first time you are cleaning it, then I would suggest just replacing fans and coolers.
Fans
Let’s start with how to clean fans. You’ve seen them. They are boxy, have fins, and spin around really fast. They also tend to capture dust along the edge of the fins, which weighs them down and creates something called drag. This is when the air doesn’t fully circulate properly because of the dust and debris. Cleaning these is simple. If you want to do a light dusting, you can take some canned air and quickly blow it through the fins but make sure you lock down your fan with a finger or a cotton swab.

The reason why you lock a fan down before using canned air is because the motor of a fan can create low-voltage current. When electricity goes to the fan, the internal coils rotate and that makes the fan spin. If you blow air through the fan without securing it, the low-voltage current could go back to the motherboard and potentially create burnout somewhere. It might be fun to watch it spin around but be cautious and lock it down!
The inner body of the fan that houses the fin portion can be easily cleaned by using a cotton swab and just going around the body. If you go slow enough it won’t affect the fan blades at all. For the exterior, you can also use a paper towel, cleaning cloth, or an anti-static brush.
Heatsinks
Heatsinks are all over your computer! From your CPU cooler to the motherboard, there are a few. The CPU cooler usually consists of at least one fan and a heatsink. During typical operation, the heatsink removes heat from the CPU and the fans blow cool air over the fins to keep them well within operating temperature. Your front fans might grab some dirt and blow it into your case, which means that same dirt also hits your CPU cooler. If they get clogged, temperatures rise, fans can’t blow air through the fins, and your CPU heats up to the point where it could throttle performance or completely die out.

So, to clean it, simply unplug the fan from the motherboard, unscrew the unit, and it should come right off. If it doesn’t come off right away, it might be due to the thermal paste acting as a bond between the processor and the heatsink. This tends to happen in older systems.
To remove the CPU cooler in the event it is stuck, simply get a cloth of some sort and drape it over the cooler. This is going to act as a barrier between your fingers and the heatsink fins (they can cut you). You want to slowly twist it, applying very light pressure. Then turn it the opposite way a little. You want to go back and forth and eventually it should loosen. Never pull the CPU cooler off! If it is stuck, you could rip off the processor along with the socket and you will most definitely need a new motherboard!
If the CPU cooler doesn’t move at all, you have multiple solutions. Much like changing your car’s oil, you can run the system for about five minutes and that should make the processor nice and warm, eventually freeing up the thermal paste. Another option is to take a hair dryer to soften the paste.
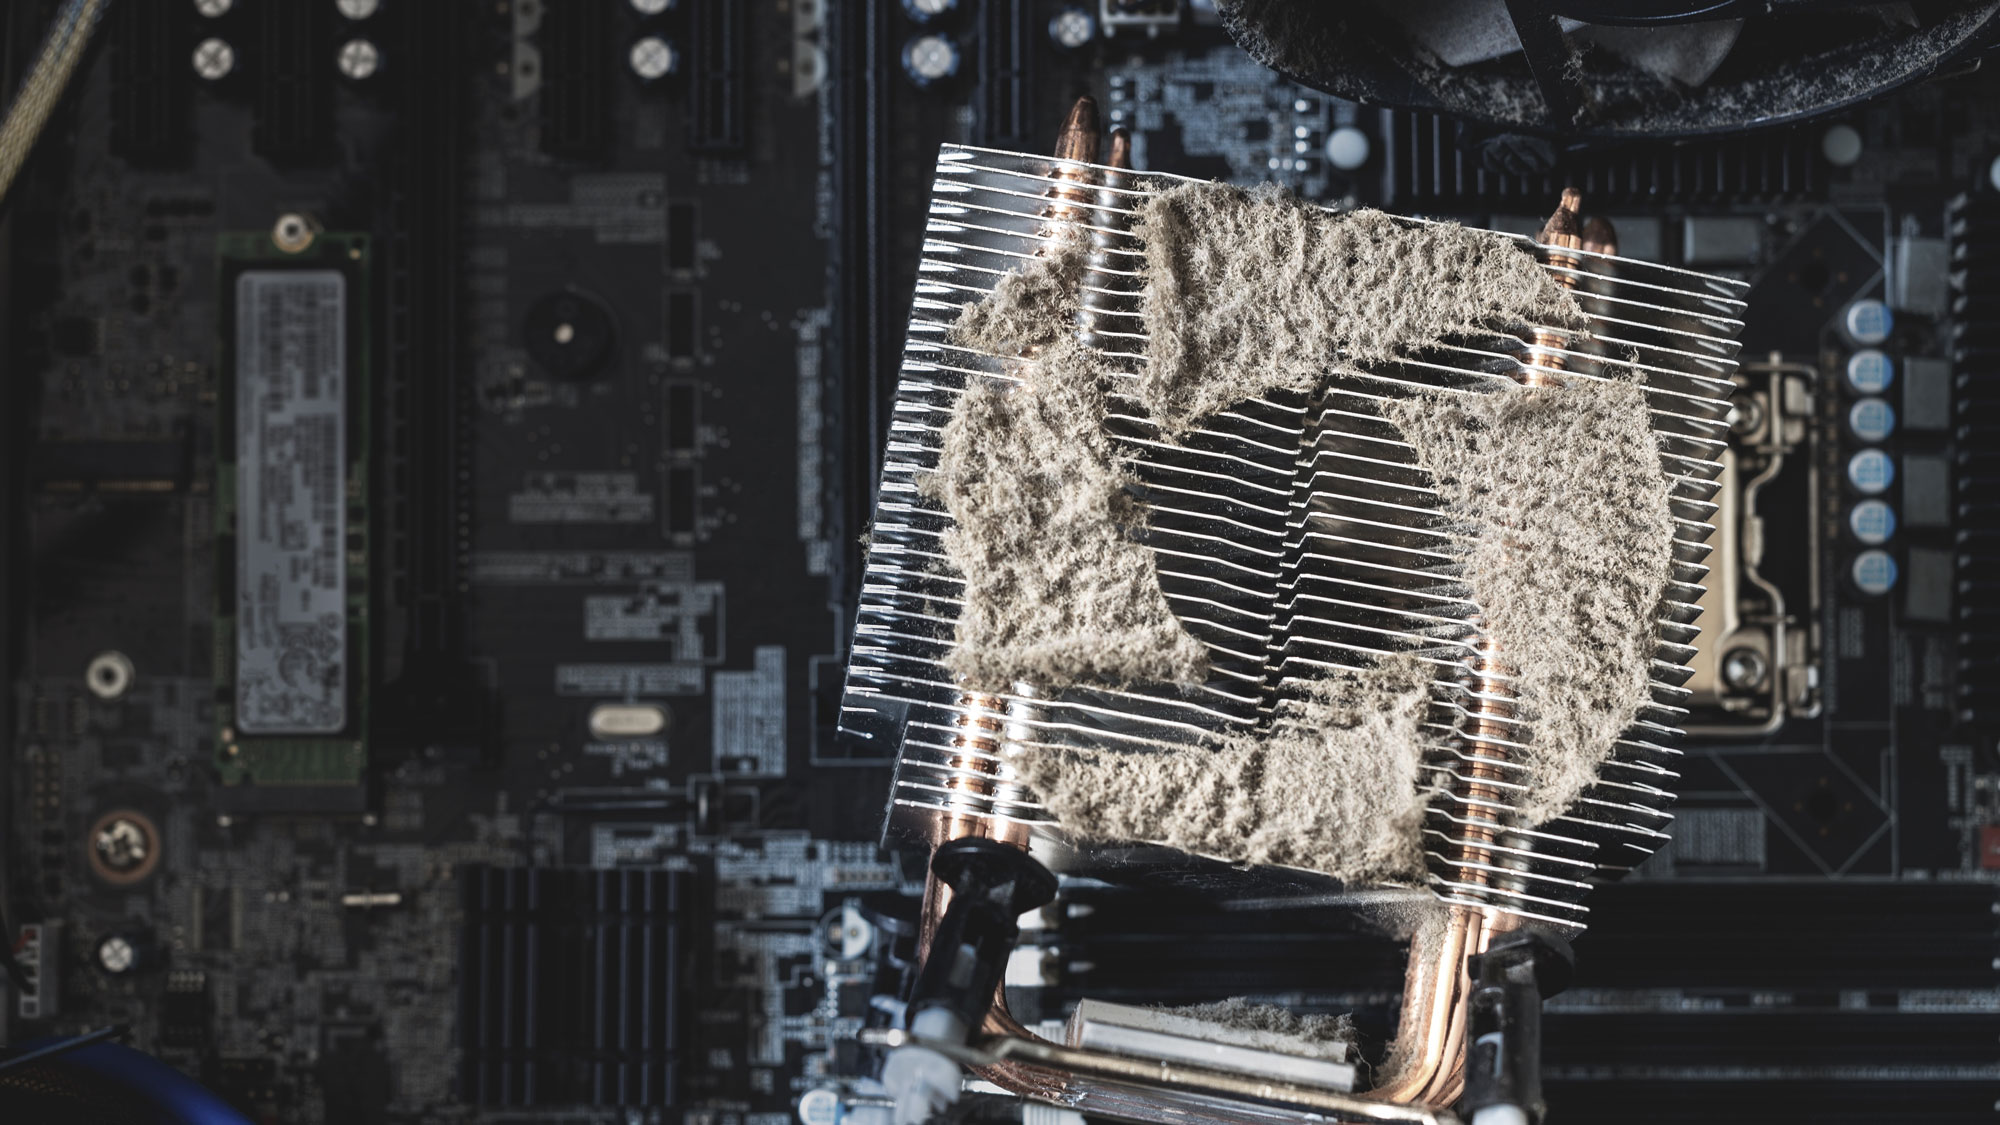
Once the whole CPU cooler is off the motherboard, you can remove the fans. These are typically held in place with some thin wire clips. Be careful taking them off! Once they are safely removed, you can blow some air between the heatsink fins to get some dust out. The fins are stacked in a way that is too small for cotton swabs and other cleaners. As long as you immediately dry the heatsink off, you can put it under running water from your sink, but make sure you fully dry it right away, remember that water and electronics do not mix. Placing a hair drier on cool, using an electrical blower, or using canned air will also work. For motherboard heatsinks, you are better off using a cotton swab and some anti-static clothes or brushes.
Radiators
Constructed from aluminum fins and copper piping, radiators could be a bit tough to clean. Radiators are just one of three main parts to an All-in-One (AiO) cooler. These are designed to pull air in to cool your system while also cooling your CPU. Despite being about an inch thick, the average radiator has an intake side which is the side facing the front of your computer and an exhaust side, which is the side facing the inside of your computer.

Fans are typically affixed to the radiator with two configuration options. A pull configuration has the fans attached to the exhaust side of the radiator and pulls air through the radiator. A push configuration, which I suggest, has the fans affixed to the intake portion of the radiator and pushes air through the radiator. This often produces cooler air, but it also means it is likely to pull in more dust which can get on both the fans and the radiator.
Pull configurations are harder to clean as dust builds up. Air is constantly being pulled in which can cause clogging. A pull configuration does the same, but you get more dust on the fins of the fan, but it also prevents the radiator from getting caked up. To clean this, blow some canned air from the exhaust side of the radiator. It should expel dust and debris from the intake side.
To clean the fans themselves, just follow the above section. Radiator fans are essentially the same thing as case fans.
When it comes to the CPU cooler portion of the AiO, you don’t really have to do much. It is an enclosed device that features a pump, cold plate, a heatsink (in some cases). You can do a simple wipe down on the parts but there is no real need to remove the device unless you are taking the whole unit out for cleaning. In that situation, you will want to clean up any thermal paste using isopropyl alcohol, then when you are ready to reinstall it, throw on a fresh layer of thermal paste.
Graphics Cards
The largest part of your system is going to be your graphics card. These usually consist of a thin PCB with some processors and other components. But the cooling apparatus is what takes up most of the size of the GPU. This consists of a huge aluminum heatsink and fans.

If you are an experienced builder or you do not mind experimenting, you could take the entire housing apart to clean off the inside. Just be careful as that may void your warranty. The most basic way to clean the GPU is to blow some cool air through the various sides of the casing.
Inside and Out
A part of the cleaning process doesn’t always have to deal with cleaning your physical parts. You should also take some time to clean out your system’s files and folders too! Organizing your data and running some malware scans will also prolong the lifespan of your system! There are a few antivirus software suites that happen to offer malware and registry scans to help clean your operating system.

Not every piece of software is free though and, in some cases, may require a subscription or full payment. These also often feature additional benefits that include backup and data recovery, real-time protection, Virtual Private Networks (VPN), and more! The important thing is to find the one that gives you what you want the most. Bitdefender, ESET, and Malwarebytes are all solid options!
Frequently Asked Questions
Q: Will my PC run better if I clean it?
A: Absolutely! If you have a lot of dirt or dust in your system, it can clog up various parts of your system like heatsinks and fans. This actually diminishes the cooling performance of your system, which causes something called thermal throttling. In some instances, it could cause complete shutdowns due to lack of air.
Q: What are the signs of a dirty PC?
A: There are a few. As I said before, thermal throttling and overall slower performance can be a sign. Other signs could be just looking around the area your PC is in. If it’s rather dusty or dirty, it is safe to assume that the inside of your case is the same. For computer systems with clear side panels, just look in.
Q: How long do I leave the PC after cleaning?
A: As long as you don’t use any water for parts, you can connect it back up immediately. Otherwise, let all your parts dry. If you used any isopropyl alcohol, you should be fine by the time you put everything back in the case.
Q: How often should I clean my PC?
A: It really depends on your surroundings. On average you want to clean your PC every six months. If you happen to have pets or smoke, you may want to clean your PC every three months. If you clean your computer often by giving it a good dusting, then you shouldn’t have any issues when it comes to dust and dirt buildup.
Q: What tools do I need to clean my PC?
A: I did answer that question within the opening paragraphs of this piece but if you plan on cleaning your system often, you don’t need much more than a can of compressed air and maybe an anti-static brush. If it’s been a while, then you may need everything I highlighted.
Q: Can dust permanently damage a PC?
A: After ample buildup, it absolutely can! Over time dust can cause malfunctioning within the system via thermal throttling or causing shorts over certain parts. It can take a while before it gets to that level though.
Cleaning your PC could be a monumental task, but it can be quick and easy if you take proper care of it! Basic maintenance doesn’t take up much time and spending fifteen minutes of cleaning could save you hundreds of dollars in the future. Keep your system clean and you can easily get ten years out of it!
