
As photographers, we are faced with a wide array of lighting conditions, ranging from bright sunlight to dimly lit interiors. Using ambient light as your main source is often preferable; however, in a situation such as an event or portrait where time is of the essence, you will need to know how to properly expose all these varying scenes using both natural and artificial light sources.
Being resourceful with your lighting setups lends greater efficiency, and having a lighting system you can easily move from one situation to the next quickly is crucial. One of the mainstay techniques of lighting multiple scenarios is to work with an on-camera flash, though this has its limitations. The most versatile technique is to use an off-camera flash system.

Off-camera flash systems, either wired or wireless, function in a modular manner to best suit the spontaneous nature of event and portrait photography. Working with an off-camera flash requires the knowledge of a handful of technologies and terminologies. It should be generally understood that off-camera flash simply means that you are using one or more external flashes to light the scene, and your camera will be communicating with these flashes using some sort of remote method, either a hard-wired connection or a wireless one.
Beyond this, there are also two distinct ways to determine how to expose properly when using flash: TTL and manual flash. TTL flash is like the way a camera computes its automatic exposure information, whereas manual leaves all of the settings up to you, with no automatic interface determining exposure settings. Both systems have their pluses and minuses, and both can be used interchangeably if needed, depending on the subject.
TTL and Manual Flash Metering
Through-the-lens (TTL) metering with flash is a system that balances your camera’s exposure settings to that of the flash output and the distance of the subject. To do this, you must be working with a flash and a camera that use the same TTL system. Most brands have their own TTL system, such as Canon’s E-TTL II or Nikon’s i-TTL, and similarly branded flashes or third-party flashes are available in the same system. You must pair a flash and a camera’s TTL system, or else you will only be able to work in manual mode with your flash. TTL metering functions by using a brief pre-flash just before the exposure is taken; this pre-flash will strike the subject and then—at the speed of light—the proper exposure settings are determined based on the ambient light and the distance your subject is from the camera. Once this has been calculated, both the flash power and the camera’s settings will be in tune to render a properly lit subject.

On the other hand, when working with manual flash, you will be setting both the flash’s power level as well as your camera’s settings to properly expose your subject. The benefits of working this way are that you have greater control of the ratios between ambient and flash light falling on your subject, and unlimited control of how light or dark your images are. The reasons for using manual flash settings are much the same as those for working in manual exposure mode with your camera versus shooting in an automatic mode. It can be a slower method of working compared to TTL metering, since you determine the exposure settings yourself, but you will have greater overall control of your lighting.
When working with manual flash, a flash meter can quickly determine proper exposure settings, versus using a more complex system of figuring for guide numbers. A flash meter is a type of light meter that can record short bursts of light and displaying subsequent exposure values. Flash meters can control test flashes to help with light-reading accuracy for final exposures. Flash is read in incident mode, not reflective mode; this means that the meter will be measuring the light that is falling upon the subject, not the light reflected from the subject.
Flash Brackets and Cables
One of the simplest ways to remove a flash from the camera to provide you with more options and control is to use a flash bracket and then connect your flash to your camera using a cable, to either a sync port or to the camera’s hot shoe. A flash bracket is a structured grip or plate that attaches to a camera, typically via its tripod socket, and then allows you to attach a flash to it in order to move the flash away from the lens. Aside from giving you a wider range of positioning for the flash by moving it away from the axis of the lens, you will also be preventing redeye in your subjects.
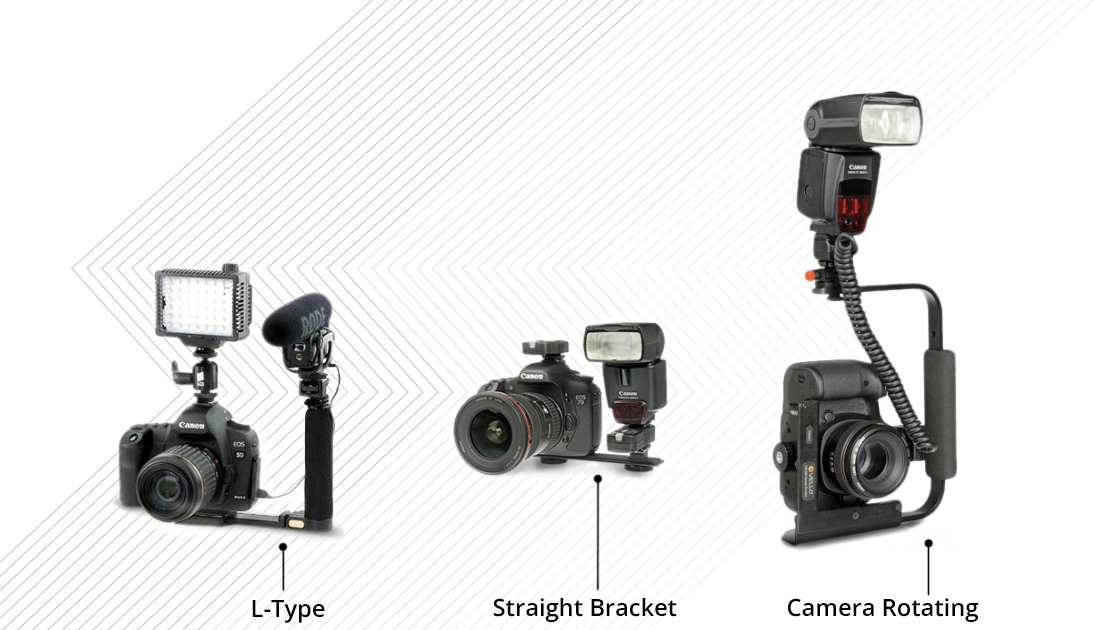
Brackets are available in a variety of shapes and sizes, and each provides a different functionality. A straight bracket is the most basic, and simply places your flash off to the side of your camera. An L-type bracket is similar, but it incorporates a handle into its design to give an additional point of stability for working with your flash. Flash-rotating and camera-rotating brackets are a bit more sophisticated, as they allow you to shoot in either horizontal or vertical orientations and maintain an upright flash position.
For connecting your bracket-mounted flash, a cable is the most common method, due to the short distance between the flash and the camera itself. Cables do the simple job of relaying when an exposure is being made so the flash can fire. This is the only task a simple sync cable does, whereas a TTL cable passes the exposure information between the flash and camera. Basic sync cords are used when working with your flash in manual mode, as they do not transmit any information aside from firing the flash. These cords are available in a wide selection of different connection types and need to be chosen according to the type of camera and flash you are using.
If you’re working with a basic cord and a camera that does not have a dedicated flash sync port, you can use a hot-shoe adapter to provide a dedicated sync port that uses the camera’s hot-shoe functionality. One of the benefits of working with an adapter is that you will still have the option of placing an additional accessory, such as a monitor or external microphone, on the hot shoe in addition to your cabled off-camera flash. If you choose to work within a TTL system, there is also a range of flash cords that feature TTL connectivity so you can reap the automatic exposure metering benefits of TTL while using your flash on a bracket, or handheld. The TTL flash cords are available for numerous TTL systems and need to be selected in deference to your flash-and-camera combination, to maintain accurate flash metering.
Wireless Flash
The second, and ultimately more versatile, method of using your flash off camera is through wireless triggering. Wireless triggering is an overarching term that encompasses three distinct methods for firing a flash without the use of a cable. There are three methods: optical, infrared and radio—and each has its own benefits and can all be employed to accomplish types of lighting that is either very difficult or simply not possible if you were to fire your flashes physically.
An optical trigger, or optical receiver, is the most basic way to trigger flashes wirelessly, as it requires no additional power and is incredibly minimalistic. These receivers contain light receptors that, once another flash has been detected, instantly trigger the flash to which they are connected. Many current flashes contain a built-in optical receiver and require no additional receiver to be triggered optically. However, if you’re working with an older flash, a flash without an optical receiver, or when you need to increase the optical sensitivity of your flash, an optical receiver can be a useful accessory.

Additionally, since optical receivers typically do not require additional power to function, they are ideal backups to other triggering methods in case of battery or other electrical failure. The one drawback to working with an optical receiver in a situation where other photographers are also photographing with their own flash-enabled cameras, they can unintentionally fire your flashes. While this might not affect your own images, it can cause confusion if the flashes are firing at a substantial rate, which can also lessen your flashes’ battery power and recycle times. Regardless, an optical receiver is a proven method for wireless triggering and an ideal remedy for other equipment’s failure.
Infrared triggering is like optical triggering with the exception that the receptor functions after detecting a burst of infrared light, rather than a visible one. This is to say that an infrared transmitter still produces a burst of light to transmit its signal; however, there is a strong infrared filter in front of the light source that attenuates much of this light and converts it to an infrared signal.

This is beneficial because you are not dependent on a visible beam that emanates from either your camera or a flash directly wired to your camera; you can use a single flash off-camera and wirelessly trigger it from anywhere. Like optical triggers, many cameras and flashes have built-in infrared receivers or transmitters, but an auxiliary infrared system will often be much more sophisticated and powerful than those contained in your existing equipment. An infrared system functions best indoors, or in other situations where you have direct line-of-sight between the transmitter and receiver.
A radio receiver is the most refined system of wireless triggering, as it requires no optical or visual sort of transmission and is entirely invisible. This allows you to trigger flashes without direct line of sight, and often at greater distances than optical or infrared transmitters and receivers support. For photographing elaborate setups, radio receivers are likely the most efficient means of wirelessly triggering lights because they can support numerous groups of lights. This ability lets you work with several lighting scenarios and transition between them quickly and easily.

PocketWizard has long been a notable choice for radio recievers, and most of their units feature the unique quality of also being transceivers—a combination of both transmitter and receiver in the same device. This provides more versatility, as you can purchase several PocketWizards and use them on either multiple cameras or flashes to suit different situations. Even transmitters from flash manufacturers have focused their efforts on radio, embedding receivers in the flash units themselves.

Wireless Flash with TTL
Using your flash with manual settings wirelessly is a straightforward, albeit more difficult, way to remotely trigger a flash. It is more difficult because you need to develop and adhere to a system, metering or testing, to calculate your exposure settings. It is simpler in nature, though, because there are fewer compatibility restrictions and you have a broader range of options and methods to tether your flash wirelessly.

When working with TTL metering in a wireless fashion, equipment compatibility is paramount for everything to work seamlessly. However, when accounted for, TTL and wireless flash afford you several options relating to convenience, efficiency and speed that cannot easily be accomplished when using a fully manual setup.
Channels and Groups
Wireless radio receivers usually function by using different channels, or frequencies, to communicate with the flash or the receiver attached to the flash. This benefit is twofold: it allows several photographers to photograph wirelessly in the same environment without accidentally triggering each other’s flashes and it allows you to set up different lighting schemes that you can transition to and from without having to manually adjust each unit. This can provide immense benefits when photographing events such as a wedding where you might be transitioning between ambient lighting scenarios very quickly; the ability to pre-plan and set up tested lighting arrangements and oscillate between them by simply changing channels can save a great deal of time and effort that you'd rather spend documenting the event.
In addition to working on different channels, some TTL systems also support groups of flashes within a single channel. Groups can consist of one or more flashes that are all controlled by a commander controller, or "commander." By grouping flashes, or several flashes within a single group, you can control the output levels of each of these groups when working with multiple light sources. An example would be to have your main lights set to one group, and your accessory, fill, or any other secondary light sources set to another group; this provides you with the ability to control the light ratios between groups wirelessly, to fine-tune the overall look of your ultimate image. To utilize wireless TTL groups, you must use some sort of trigger, either a commander flash or a dedicated controller.
This trigger, if using an on-camera flash, will contribute to the overall exposure while also giving you the ability to modify the light output of the other lights in your group. A dedicated controller is a TTL-enabled radio or infrared unit that performs the same functions. However, it does not emit a flash and thus does not affect the lighting setup. The TTL settings, including the ability to alter light output levels among groups, are typically made through the camera’s menu system, while the commander flash itself is controlled through the flash’s own menu system.
Put it to Practice
The advantages of working with one or several flashes off-camera are enormous regarding the freedom and creative possibilities you are afforded by not relegating a flash to the top of your camera. Especially when you're photographing in outdoor spaces or event venues where the lighting circumstances are often mixed, difficult or fluctuating, having controllable lighting systems that can be placed and manipulated puts you in control of how the resulting imagery looks.

When building an off-camera lighting setup, you should consider the type of environment you will be working in and previsualize the type of lighting you want to achieve. The combination of these two factors can help you decide if you will need radio transceivers with more than 10 channels because there will be other photographers around, or if you can just work with a simple single-channel infrared receiver because the situations are controlled.
As artists, we’re always learning. Never discount the benefits of a new tool in your arsenal and always be open to new ways of doing things. To learn more about lighting and off-camera flash, check out our other guides and articles on the topic. For all things photo, video, and audio, read more on the B&H Explora page!
