
When recording, mixing, or mastering, it’s critical to refer to meters to ensure the project is properly balanced and leveled but the nature of metering can be difficult to parse. The philosophy and mathematics of different methods of metering can produce vastly different results even when analyzing the same exact audio signal. Understanding how metering works and how to use it is key for creating professional sounding music.
In this guide, we discuss the basics of metering, the science and philosophy behind the different methods, and how to properly use meters to make your mixes and masters the best they can be.
Understanding the Decibel
The decibel is not an absolute measurement—it expresses a value as a ratio relative to a reference point. Without a suffix that defines the reference, the decibel is meaningless. It must ask: “Compared to what?” Because of this, it is important to understand that 0 dB is not absence of value: 0 dB means the measured value is equal to the reference point.
I’ll do my best to avoid difficult mathematics: Logarithmic is the inverse of exponential. Decibels are measured on a logarithmic scale because they must represent a massive range of values. Sound pressure level (SPL) or “acoustic power” can be measured on a linear scale with Pascals (Newtons (watts) /meter^2), but the human ear can detect pressures from 0.00002 Pa to 20 Pa (an order of magnitude in the millions), making this an inconvenient solution.
Even though Pascals are a linear scaling unit, charting loudness using Pascals results in an exponential curve. Logarithmic is the inverse of exponential, and decibels are measured logarithmically. Since the pascal scale represents the hearing exponentially, using decibels results in a linear scale—making for a much more natural and intuitive method to measure loudness (0 dB to approximately 130 dB).
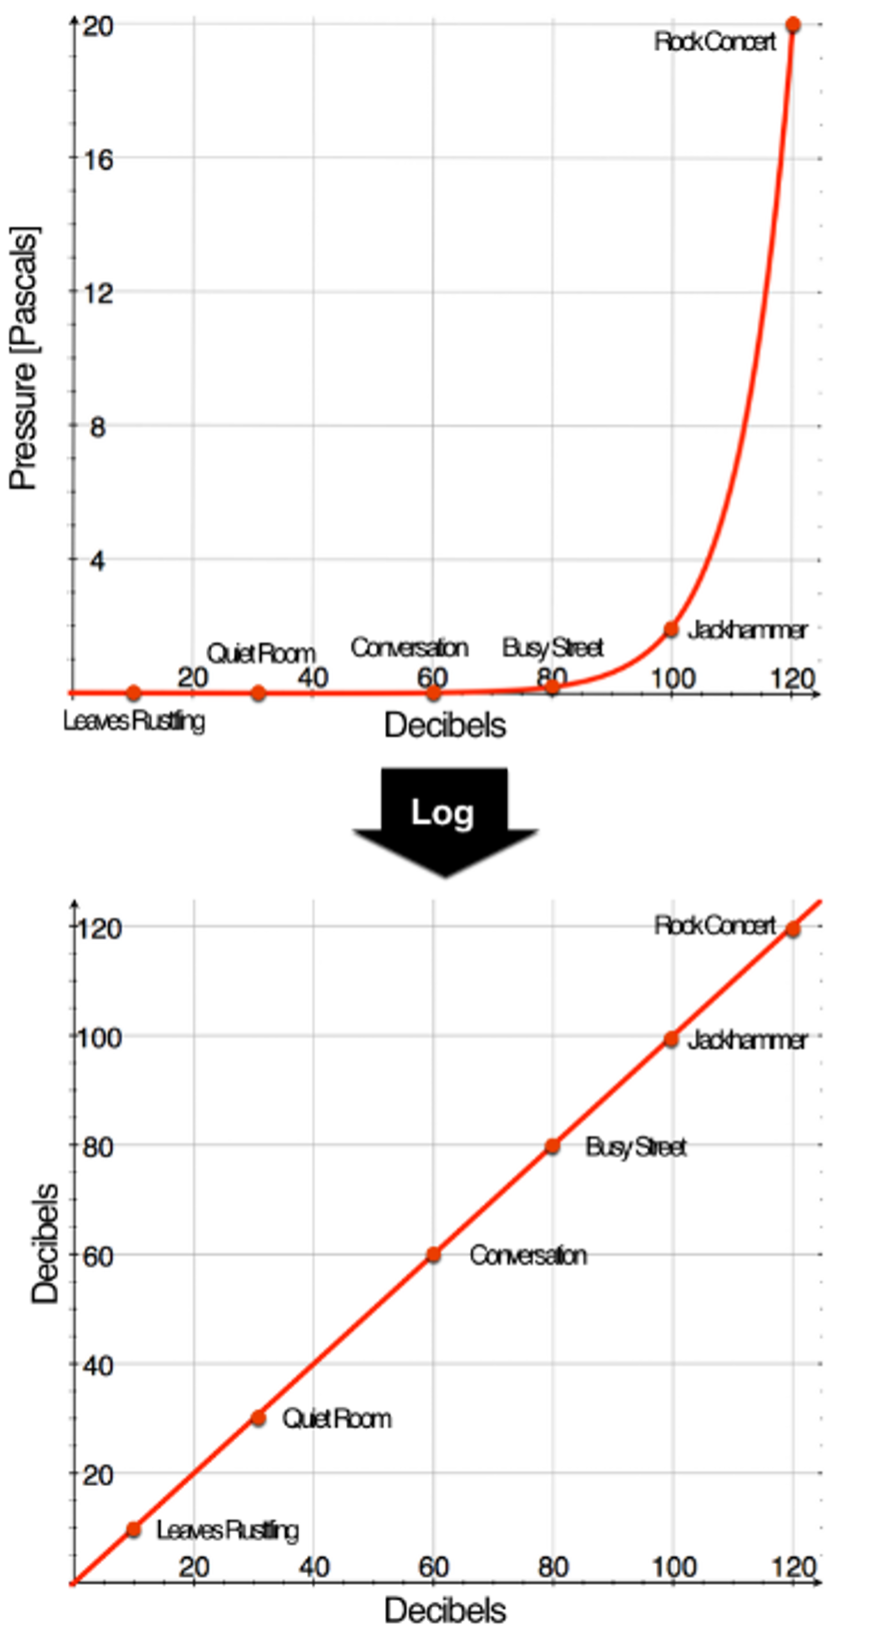
Throw out conventional scale when dealing with decibels. Instead, start thinking logarithmically. Duplicating an audio signal will double the voltage and SPL but NOT the loudness (it boosts loudness by +6 dB). An increase of +10 dB is needed to double perceived loudness. For example, +20 dB would be four times as loud, and +30 dB would be eight times as loud. This is generally true, but it depends on the frequency of the signal.
Here are some of the decibel measurements that are most relevant to sound and audio:
dB SPL (Decibel Sound Pressure Level): Reference point of 20 micropascals, the minimum hearable threshold of a human when presented a sinusoidal wave at 1kHz. It measures real-world acoustic energy.
dBu (Decibels Unloaded): Reference point of .775 volts RMS (Root mean square – more on that later), used with professional analog audio equipment line levels (+4 dBu standard). VU meters display dBu.
dBv: (Decibels relative to 1 volt): Reference of 1 volt RMS. Consumer equipment line levels (-10 dBV standard)
dBFS (Decibels Full Scale): Reference point is the maximum level a digital system can handle before clipping/distortion, set at 0d BFS with a range of -∞ to 0. Used for peak meters, digital RMS meters, and LUFS in DAWs.
Understanding Perceived Loudness: The Fletcher-Munson Curve
If you got the hang of the last section, it’s clear to you that human beings do not perceive the loudness of a sound in direct proportion to its acoustic power/SPL. Another thing to contend with is the fact that human beings do not perceive all frequencies at the same loudness, even when they’re equally as powerful.
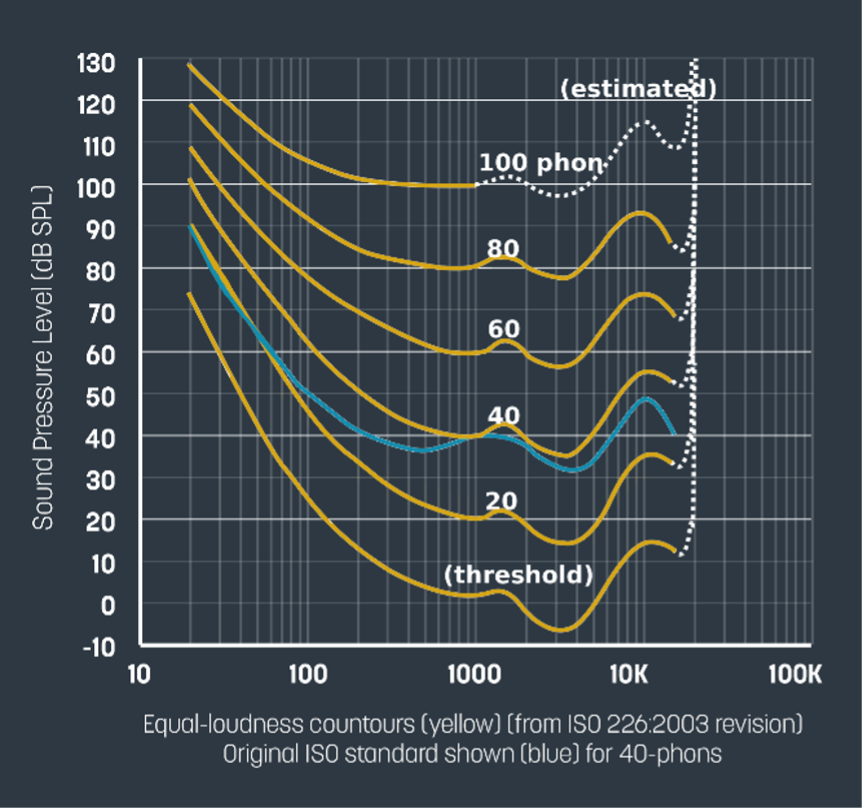
The Fletcher-Munson equal loudness curve displays how sensitive our hearing is to each region of the frequency spectrum. This is critical when it comes to metering. Depending on the type of metering, low frequencies will send meters into the red way more often than mid and high frequencies.
The 40-phon line of the chart shows that for a 100 Hz sound to be as loud as a 1000 Hz sound at 40 dB SPL, it will have to be played at around 60 dB SPL. That’s roughly one hundred times more power to achieve the same audible level.
That might sound crazy but think about it like this: low frequency sounds have very long wavelengths, so they move a significant amount of air. A wavelength at 100Hz is roughly eleven feet long. A 1000 Hz soundwave is barely longer than one foot and 10kHz is about an inch and a half. Pushing more air means using more energy, so speakers and amplifiers dedicate a huge majority of their power to the low end, often 90% or more, and that can show up on your meter (again, depending on which type you’re using.)
Types of Audio Meters
Peak Meters
Peak meters show the peak level of a waveform no matter how brief its duration is, making it a better tool for monitoring levels in real time like loud transients, quickly moving sections of music, and clipping prevention. However that does render it useless for measuring perceived loudness. Peak meters will almost exclusively be measured in dBFS, where 0 dBFS is the maximum possible signal level in a digital system before clipping and distortion—all normal operation levels are expressed as negative numbers. This is not to say that audio can go above 0dBFS but at that point, you’re introducing digital clipping and distortion, which is almost always a negative.
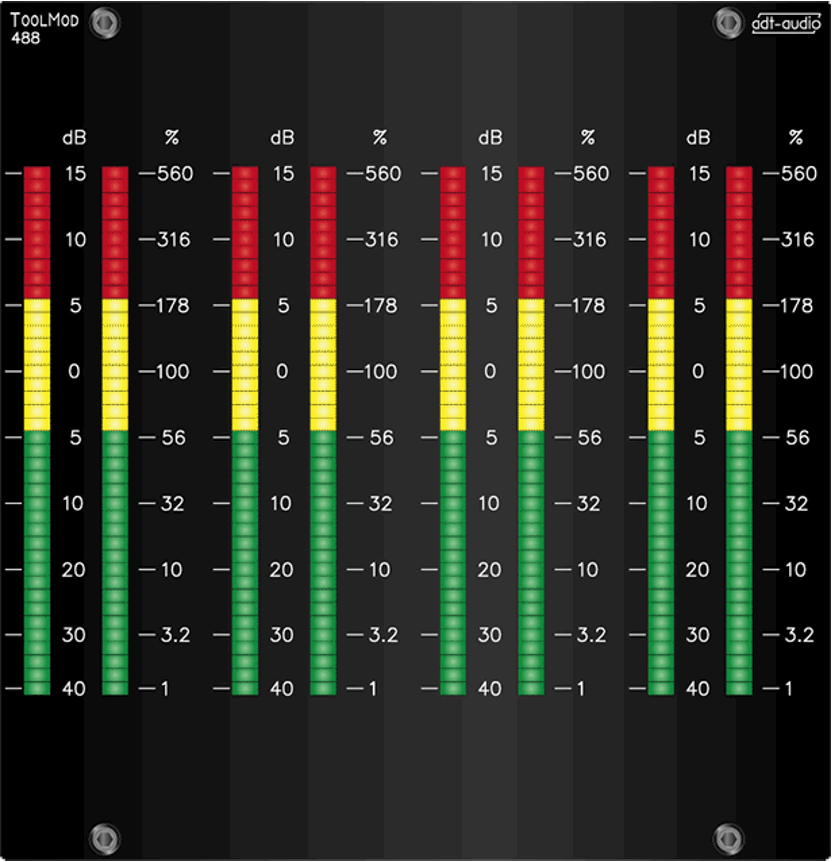
Instead of measuring loudness, peak meters are meant to manage signal integrity and avoid distortion and digital clipping—a mix might have low peaks but sound loud (high RMS or LUFS, more on that later) or have high peaks and sound quiet. Use peak meters alongside other metering tools to get a complete picture of your mix.
RMS Meter (VU and Digital)
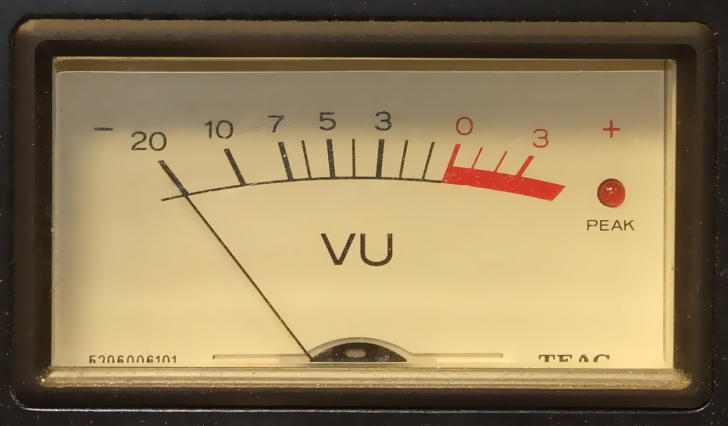
Root Mean Square is the square root of the mean of a set of numbers’ squares. Take a bunch of numbers, square them, find the mean of those squared numbers, and finally find the square root of that mean. Put simply, it provides a single value that represents data that oscillates or changes over time which is exactly what audio is in the first place. While a VU meter (the original RMS meter) accurately displays the RMS voltage of a pure sine-wave tone, actual audio signals are much more complex, so using a VU meter only approximates the audio signal’s voltage
Meters using Root Mean Square have a slower response time than peak meters, so it measures sustained energy or average loudness over an arbitrary period of time. Your RMS value will exist somewhere between the peak and minimum value of your track, with levels closer to 0 dB meaning increased perceived loudness.
Modern digital standards have allowed RMS meters to offer more information with more flexibility than its analog VU counterpart. In digital systems, a typical reference loudness is somewhere between -18 dBFS and -14 dBFS, which you can set using the parameters on your RMS meter. Keep in mind certain genres will want to be above or below that range. DAWs will often have an RMS meter displayed along with peak meters, or they can be togglable between the two.
The Volume Unit, or VU was one of the first broadly adopted meter designs used since the golden age of audio recording and broadcasting. VU is measured with dBu, calibrated such that a 1000Hz pure sine-wave tone reaches 0 VU = +4 dBu, where +4 dBu = 1.228 volts RMS.
Unlike digital meters, a VU meter is a passive electromechanical device, so it must contend with the physical nature of reality. The weight of the needle results in a slow response of around 300ms, averaging out any short variables in the signal and reflecting perceived loudness fairly accurately.
VU meters have fallen out of style for many engineers, gaining the moniker “Virtually Useless” once peak meters and especially LUFS meters became more universally accessible. However, VU meters can still be useful for matching the levels of various analog gear or setting a reference level when using ADC and DACs.
LUFS (Loudness Unit Full Scale)
LUFS (sometimes called LKFS: Loudness, K-weighted, Relative to Full Scale) is perhaps one of the most important modern metrics for the audio industry, allowing the measurement of loudness for an entire track or any amount of time within a track. Streaming services like Spotify, Apple Music, and YouTube use LUFS normalization to ensure all content has similar perceived volume and will often have a standard LUFS target for submission to their services, typically hovering around -14 LUFS. While you don’t need to mix/master your audio to streaming platform’s reference level per say, it’s good to know what the normalization process will do to your track when it’s played back.
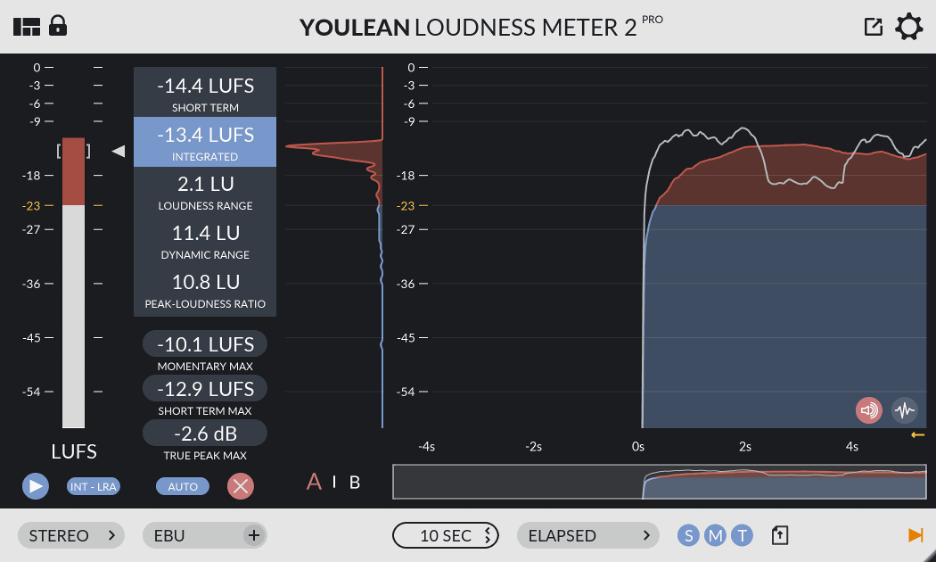
LUFS meters apply a “K-Weighting” frequency filter to an RMS value that emulates the nonlinear sensitivity of the human ear, essentially cancelling out the equal loudness curve so that the measurement aligns with human perceived loudness. Metering with LUFS will result in a single number that describes the overall loudness of your entire track or selected segment. You’ll often find at these types of measurements in a LUFS meter:
Momentary Loudness
Momentary loudness LUFS meters will measure the RMS of 400ms of audio signal at a time, with each “window” overlapping the last by 75%. This overcomes the problem RMS metering can have when metering different lengths of audio.
Short Term Loudness
This takes three seconds’ worth of momentary loudness RMS values and combines and “averages” them out into one number, so it’s less affected by the momentary peaks and valleys of your audio signal.
Integrated Loudness
When talking about attaining a certain level of LUFS, this is usually what is being referred to. Integrated LUFS calculate the average loudness of an entire project: a song, video, commercial, or even a full-length movie, taking into account each moment of the audio (with some exceptions, like moments of total silence.)
True Peak
This method measures the highest levels of an audio signal including the peaks that occur between digital audio samples called “inter-sample peaks.” These peaks occur during digital to analog conversion process (DAC), which is when an analog waveform is reconstructed from digital samples for playback. Put simply, this is achieved through “oversampling” or measuring waveforms at a much higher resolution than would normally occur during digital metering (typically as much as 4x). Typically, you’ll want your true peak measurement to reside at -1 dBTP (decibel True Peak) or less to ensure no unintended distortion happens when sending your audio to a streaming platform.
A Measured Approach
While there are other forms of metering, such as spectrum analyzers and phase correlation meters, this guide is focused on using meters to achieve proper professional loudness. In the future, we will share insights on how and when to use these other types of meters. Until then be sure to check out our other guides to mixing and mastering audio as well as our shopping guides for the best gear and tech we have on offer, and don’t hesitate to visit our online storefront or Superstore to get in touch with an expert for any questions you may have.
