
Equalizers are the most powerful tool any audio engineer or musician has in their arsenal. Like many tools in the world of pro audio, while its concept and function are simple to understand, the different philosophies of a given EQ’s design and application can result in numerable sonic outcomes. Understanding how an EQ works is extremely helpful in deciding when and where to use a certain type and will work wonders for live setups, mixing, mastering, and perfecting tone.
In this tutorial guide, we’ll begin with the basics of equalization and transition into a thorough explanation of analog EQs, which should help set the stage for some of the more advanced concepts found in digital/software EQs such as FabFilter ProQ4. From there, we’ll get into processing modes, filter shapes, and stereo applications, as well as some other concepts that may give you a leg up with EQing. Feel free to jump to the section that interests you most and be sure to check out our companion guide to compression to get a comprehensive look at the two most ubiquitous tools for audio engineering.
The Basics of Equalization
Parameters
Equalization has three basic parameteres to understand: gain, frequency, and Q (or bandwidth). These parameters are intuitive and fundamental for the successful use of any equalizer:
Gain is the amount of amplification (boost) or attenuation (cut) applied to a frequency range, measured in decibels (dB).

Frequency is the point in the frequency spectrum you want to adjust, typically between 20Hz -20kHz—different types of EQs will control frequency differently, as seen below (we’ll explain in detail later).

Q is how wide or narrow the frequency band of gain adjustment is—the higher the Q the narrower the range.
Parametric EQ vs. Graphic EQ
A Graphic EQ splits the signal into a number of adjustable frequency bands whose Qs are not adjustable. Despite offering less control, graphic EQs use faders to control the gain of the frequency band so it’s easy to quickly understand and adjust levels, making it perfect for live performance and broadcasting applications.
A Parametric EQ has two or more adjustable frequency bands and allows for complete control over gain, frequency, and Q. These EQs are either rotary, using knobs, or are using a digital UI in the case of software parametric EQ plugins. This EQ is best suited for in-studio and post-production workflow where timing is less crucial, and precision is key—but either can be used in any situation.
Analog EQs – Passive vs. Active
When choosing an analog equalizer (and their software emulations), the first thing to understand is the distinction between passive and active technology – while they achieve the same goal, their processes differ philosophically and sonically and are best suited for different purposes.
Passive EQ – Attenuation and Subtractive EQ
Passive EQs use passive components to shape a signal’s frequency response without requiring power until its final stage of processing. It is important to understand that the fundamental principle of passive EQs is attenuation—reducing or “turning down” frequencies—not amplification. This can initially be counter-intuitive as passive EQs have dials labeled “boost”—but they are bound to the philosophy of subtractive EQing.
With subtractive EQing, “boosting” occurs because the filter circuit of the passive EQ attenuates every frequency except the one you’ve chosen to boost—instead of turning up a frequency, it just turns every other frequency down. The passive EQ then compensates for this level reduction with a solid-state or tube-based makeup gain amplifier to restore the signal to its original level.
The attenuation and subsequent amplification of the signal is what gives passive EQs their sonic profile, as the makeup gain amplifies not just the chosen frequency band(s), but the entire signal, naturally adding subtle dynamic compression, harmonic distortion, and presence—especially with tube-based passive EQs. Passive EQs are almost always parametric due to their technical components, indicative of the preferred use-case of making broad, warm, and colorful adjustments where attenuating is as or more important than boosting. Passive EQs are great for mix and group busses, low-frequency content, and subtle sculpting.
Active EQs – Amplification and Additive EQ
Unlike passive EQs, active EQs use powered components that directly boost and cut specific frequencies without a makeup gain stage and can be used as both an additive and/or subtractive EQ. Active EQs offer more precise control over frequency, gain, and Q, making it more versatile and flexible for a variety of tasks and can be far more transparent and clean, adding little harmonic distortion and no compression.
It is important to keep in mind that some active EQs will add plenty of character to a signal—notably the Neve 1073 and API 550, both active rotary parametric EQs. Both have enjoyed decades of prestige and are known for their addition of bright richness to guitars and vocals especially. Whether transparent or not, active EQs are better suited for additive EQing, where boosting signals with deliberate precision is paramount. Active EQs are great for adjusting individual instruments, brightening vocals, or making aggressive boosts and cuts.
Digital EQ – Advanced Filtering and Processing
As computing power has now surpassed nearly every limitation it once had, EQing with digital software has become one of the most prominent methods in the industry. With powerful software EQs like FabFilter ProQ4, Sonnox Oxford EQ, and the EQ included in iZotope Ozone, EQ plug-ins are powerful tools that not only offer greater flexibility, better precision, and superior affordability, but allow for complex processing methods, some of which aren’t exactly intuitive. In this section, we will go over some of the techniques and methods that are not applicable to a traditional analog EQ or many of their software emulation siblings.
EQ Processing Modes – Phase
All EQs—whether digital or analog—introduce the unavoidable side effect of phasing—or delaying—the frequencies they affect. While phase can cause comb filtering or a warping of the stereo image, the introduction of phase in a well-designed EQ is minimal and is what gives the output its character. However, there are times when this phasing can be an issue, especially with low frequencies—so modern EQ plug-ins can overcome that by using different processing modes that affect phase.
Minimum Phase/Zero Latency
Minimum phase is an EQ’s natural state—all analog EQs are inherently minimum phase. This mode is the default for EQ plugins as it is CPU-efficient and introduces little to no latency to the signal which makes it perfect for real-time adjustments, use on individual tracks, and recording (phasing is delay of the affected frequencies of the signal, while latency is delay of the entire signal).
Minimum phase is not zero phase; it will always introduce a phase shift to the frequencies it affects. This becomes a problem anytime you’re processing just one of two or more identical/near-identical signals (ex. parallel processing or stereo/multi micing), when using a narrow and aggressive Q for surgical EQing, or when using a steep high-pass filter. Doing this will create destructive phase cancellation, which can thin out low-end or smear/wobble the stereo image.
Use minimum phase during recording, on an individual track, or selectively when mixing—avoid it when mastering and when creating low-frequency or surgical cuts.
Linear Phase
Linear phase equalization only exists in the digital realm and maintains perfect phase alignment across all frequencies—meaning its perfect for mastering and surgical cuts and any sort of EQing that requires the preservation phase relationships.
There are trade-offs, of course. Linear phase EQ requires an algorithm to analyze audio from both the past and the future to apply correct equalization while maintaining phase. This CPU intensive process causes perceptible latency and is unsuitable for live performances, real-time adjustments and recording. In addition, this “look-ahead” processing can introduce an unpleasant digital artifact called “pre-ring”, where a small portion of a sound’s transient occurs just before its actual location as a reverse-reverb like swoosh, destroying the punch and presence of transients—particularly an issue with low-end content like kick drums.
Use linear phase EQ when mastering, parallel processing/multi micing, or making narrow surgical cuts like removing resonant frequencies. Avoid using linear phase on low frequencies.
Natural Phase
Natural phase EQ is a proprietary mode of FabFilter ProQ and attempts to find the middle ground between minimum and linear phase EQing. Using an advanced algorithm, natural phase EQs emulate the phase shift of high-end analog EQs while maintaining relatively low latency and CPU efficiency.
Use natural phase when dealing with low frequency content or in lieu of minimum phase EQ if your computer is powerful enough. Some engineers will mix with minimum phase EQs, then switch them all to natural phase before printing/bouncing a project to save CPU.
Dynamic EQing
Dynamic EQ automatically applies a boost or cut to a frequency range in real time based on the level of the input signal. With dynamic EQing, you can set a threshold for each frequency band and specify the amount gain to add or subtract to that band when the input signal meets that threshold. You can also set the attack and release, controlling how quickly the EQ will react and return when the input exceeds the threshold.
Functioning similarly to a multi-band compressor, a dynamic EQ is useful for taming problematic frequencies at specific moments rather than permanently. This is especially useful for de-essing vocals, fixing intermittent muddiness or harshness during dynamic performances, sidechaining to create space for competing instruments, and adding air to an instrument while avoiding unwanted noise or hiss.
Filter Shapes
Most EQ plugins will offer a variety of filter shapes, many of which may not have an obvious use case. Here are nine common filter shapes and some suggested uses for them.
Bell/Peak

The default and most common EQ filter, the bell filter affects an adjustable range of frequencies around a center point. Best for general boosts and cuts.
Notch

A bell filter with an extremely narrow Q—used for surgical cuts and to find unpleasant resonances.
Shelf

A slope, whose steepness is according to the Q, that approaches a specified frequency and gain. Often used to add air (high shelf) or reduce rumble (low shelf).
High Pass/Low Pass

Like a shelf filter but completely removes frequencies below (high pass) or above (low pass) a specified cutoff (the slope goes to -∞dB instead of chosen gain). Pass filters have many uses, both practical such as removal of rumble or hiss, and creative such as simulated proximity and underwater effects.
Band Pass
The combination of high and low pass filters, the band pass filter only allows frequencies between a specified band to pass. Often used for creative effects like emulating the sound of a radio, megaphone, or telephone.
Tilt Shelf
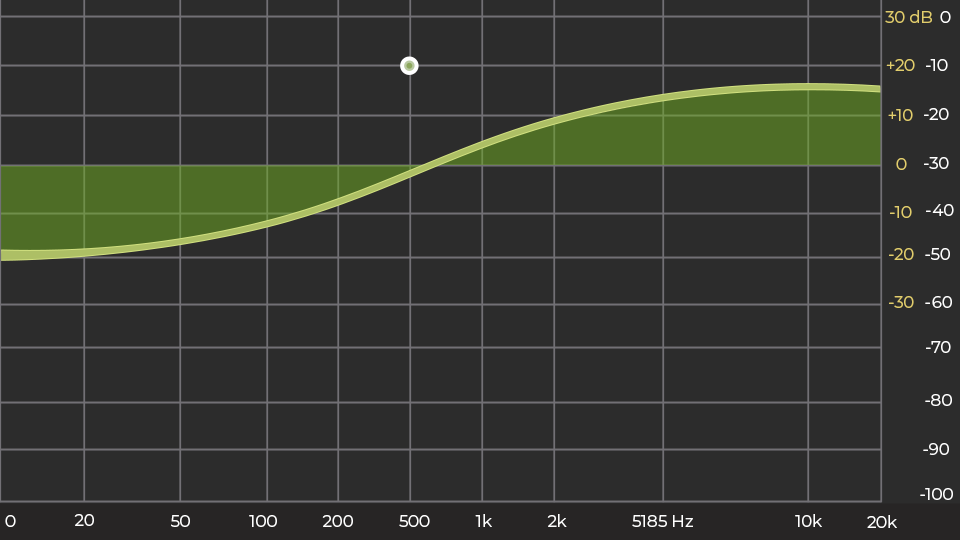
A single filter whose slope (whose steepness is according to Q) pivots around a specified frequency point and levels out a chosen gain point (boosting one side and attenuating the other). Good for broad tonal adjustments.
Flat Tilt
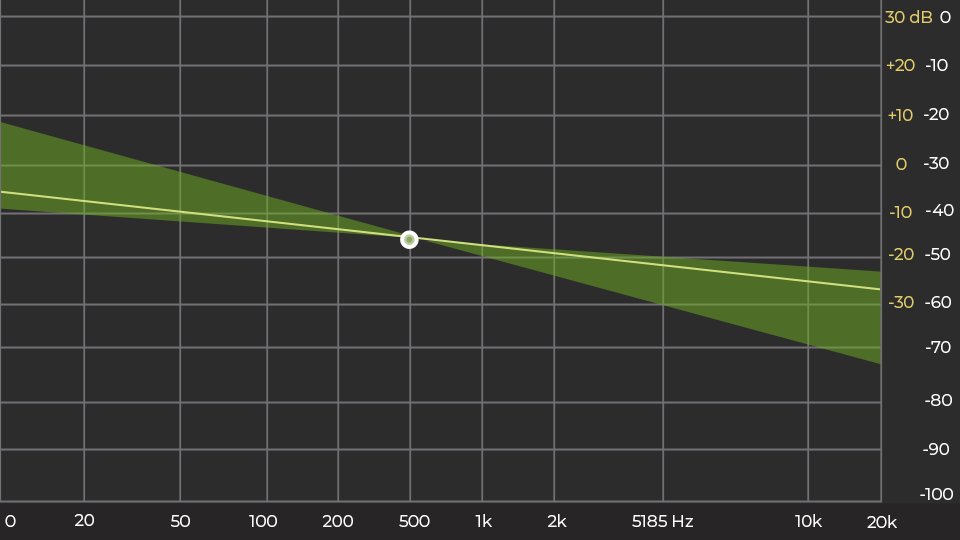
Like a tilt shelf except in a straight line. Used like tilt shelf but has more transparency.
Comb
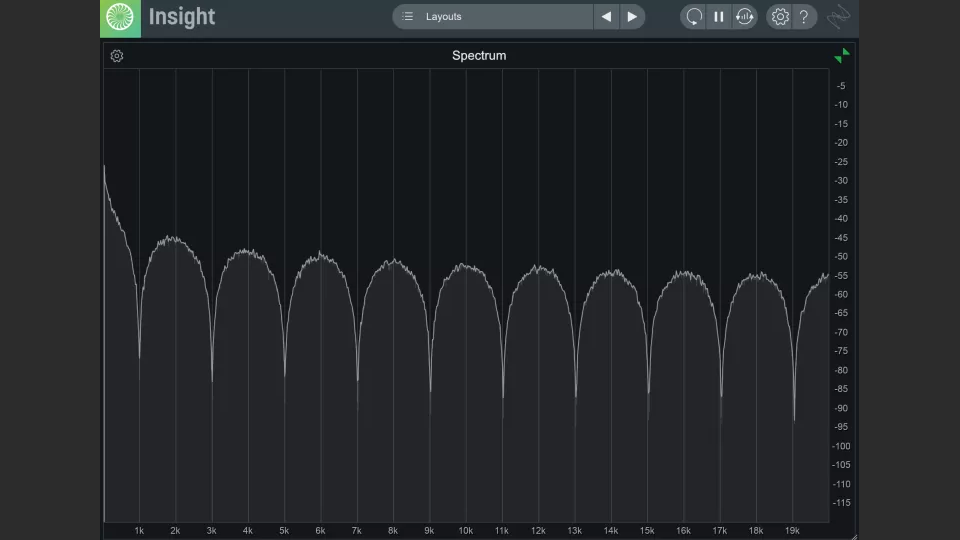
A series of peaks and troughs throughout the frequency spectrum that resembles a comb. Although technically a filter, comb filtering is a natural digital phenomenon (and usually a mistake) that occurs as a result of phasing between two identical signals. When used intentionally, comb filters can be used to create effects such as flangers and phasers.
All-Pass
This esoteric filter allows some or all frequencies to pass through the EQ with no change in gain—its purpose is to change the phase relationships between frequencies without boosting or attenuating them. It is used for highly advanced audio processing such as aligning the phase of a speaker array, creating artificial reverb and delay, correcting non-linear phase distortion, and some non-audio related analyzation and optimization processes. Creatively, it can be used as a building block in physical modeling synthesis and as a resonator in various sound design applications.
Stereo Application
EQs don’t have to work evenly on both left and right sides—using different stereo applications with an EQ can not only solve problems but be used creatively or to widen/narrow stereo width of specific frequencies without affecting others.
Stereo
The default mode of EQ. When in stereo mode, changes affect both left and right channels equally. Used broadly.
L/R
Left-right equalization uses separate EQ settings for left and right channels of a stereo track. L/R EQing can be used to fix unbalanced stereo recordings, enhance stereo width (the more different the left and right channels are, the more width in the stereo image), stereoizing a mono signal by duplicating it, hand panning, adjusting each side differently, adjusting panned instruments, and for creative purposes like panning tricks or ping-ponging.
Mid/Side
Mid/Side equalization has the same concept as mid/side micing but achieves it through a different process. Instead of using three signals as you would when recording in mid/side, a mid/side EQ splits input into two channels. The mid channel or “sum” channel contains all the audio information that is identical between the left and right speakers. The side (or “difference”) channel contains all the audio information that is different between the left and right speakers.
There are some interesting use-cases for mid/side EQing—one of my favorites is tightening bass content. Human beings have difficulty perceiving the direction of low-frequencies, so it would behoove you to place a high-pass filter on the side channel to remove low frequencies from only the stereo image. When in true mono, bass and kicks become solid and clear, perfectly in the center. Inversely, you can use mid/side to widen the stereo image by placing a high shelf filter on the side channel to boost the differences between left and right for only the high frequency content, avoiding harshness and leaving the stereo image of mid and low frequency content alone. There are many more creative and practical applications of mid/side EQing—I highly recommend experimenting with it.
We hope this guide has demonstrated the power and versatility of equalization and illuminated some of its many different practical and creative uses, all while helping you avoid some of the common mistakes and pitfalls that many beginners unknowingly make. For more knowledge and tips, check out our guides to legacy compressors, vocal chains, and rock recording, and look forward to a guide on some of the most legendary equalizers ever produced!
