
Whether you grew up listening to records, or you recently discovered collecting and playing vinyl, the idea of recording your favorite vinyl records into your computer may have crossed your mind. Having a digitized version of your vinyl collection is useful for loading songs into portable devices and for having an archive of your favorite tunes in the digital realm. When captured properly, a digital recording of a vinyl record will sound vastly superior to a compressed MP3 file. Besides, many of the albums that you find in thrift stores and garage sales aren’t even available to purchase as digital downloads.
Most people hope that the vinyl-capturing process is as simple as pushing a single red button. Advances have been made to simplify the process of digitizing vinyl, but so far it's not as easy as pressing a button. Just as the act of playing a vinyl record requires a bit of effort on your part (taking the record out of its sleeve, placing it on the platter, putting the needle in the groove, etc.), the act of digitizing vinyl records requires your attention and care, as well. With a little bit of patience, your entire vinyl collection can be shrunk down to fit into your shirt pocket to travel around with you anywhere you go.
Here are three ways you can capture vinyl into a computer:
1) Using an all-in-one turntable/CD burner;
2) Using a USB turntable;
3) Using an audio interface to connect a turntable to a computer.
The first method (using an all-in-one turntable/CD burner) is probably the easiest way to go. An all-in-one unit features both a turntable and a CD burner in a single device. You simply burn a CD of the vinyl in the unit itself, and then load the burned CD into your computer. Specific models worth checking out are the Teac LP-R550USB and the Crosley Radio CR2413A Memory Master II. Be forewarned that you may not be able to mark individual tracks using this method.

USB turntables can be less expensive than all-in-one units, but they require you to interact with a computer and software in order to digitize your records. The ION Audio Classic LP and the Audio-Technica AT-LP60USB are inexpensive options in this category.
Of the three vinyl-capturing methods mentioned, using an audio interface to connect a turntable to a computer requires the most technical know-how. The plus side is that some audio interfaces can be obtained very inexpensively. If you go this route, you need to understand the difference between a “line-level” signal and a “phono-level” signal.
Some of the turntables available today feature line-level outputs, but many only have phono-level outputs. To convert a phono-level output to line level, a phono preamp is needed. This preamp utilizes the Recording Industry Association of America (RIAA) equalization curve. The process of creating vinyl records or “cutting vinyl” employs the RIAA EQ curve to reduce low frequencies and boost high frequencies to prevent distortion and skipping. The phono preamp uses an inverse of the RIAA EQ to decode the audio coming from the vinyl, generating full-frequency, line-level audio.
If you already have a record player that you plan on using to digitize your vinyl, try to figure out what kind of output it has. If it has an output labeled "Line" or a headphone jack, you can get away with using an inexpensive audio interface. Your setup will look something like this:

Some audio interfaces feature special phono inputs specifically for connecting record players. The ART USB Phono Plus is among the most affordable of these devices, and it connects to your computer via USB. The graphic above also illustrates how these devices connect to your computer.
If you’re using an older record player, it's likely that the output is phono level. This means that if you plugged the output of your record player directly into the line-level inputs on a computer audio interface, the signal would not have been compensated for the RIAA EQ curve. One option is to buy a phono preamp, such as the Rolls VP29. Such a setup will look something like this:

If you have a stereo system at your disposal, you may not need an external phono preamp. Look at the back of your stereo receiver. If it has designated inputs for phono, then you're halfway there. Plug your turntable into the phono input. Most stereo receivers have outputs as well. People used to make copies of recordings with external cassette decks. Most stereo receivers were designed to route the audio coming in from a record player and send it to the "tape out" to be recorded by the cassette deck. In this case, instead of recording to a cassette deck, you will be recording to a computer. The setup will look something like this:
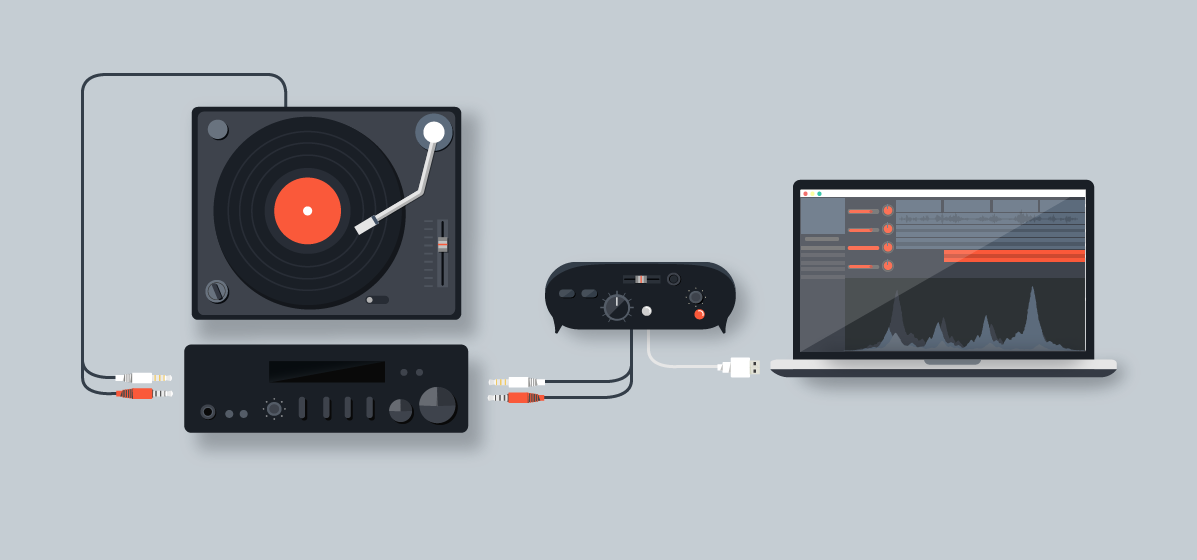
No matter what method you use to connect a record player to a computer, you’re going to need audio software to record and edit the digital audio. B&H sells a full range of very capable audio production software, but if you’re on a tight budget, there’s a free audio-recording program available for Mac, Windows, and even GNU/Linux, called Audacity. I recently recorded some vinyl into my computer with a turntable using Audacity. Below you will find a few pointers I can share from my experience.
Tips on Using Audacity Software
When you open Audacity for the first time, trying to figure out how the software operates can be a bit confusing. You’re essentially looking at a blank box with a few buttons and controls at the top. If you’re using a USB turntable and it’s plugged into the computer with a USB cable and powered on, the first thing you want to do is adjust the preferences in Audacity. On a Mac, this is accomplished by clicking on “Audacity” in the top menu bar and selecting Preferences from the dropdown menu.
With Audacity’s Preferences window open, you’re presented with a list of tabs at the top; the first option being Audio I/O. Click on the Audio I/O tab and adjust the Device setting in the Recording area. You need to assign your USB turntable as the input source for the software in the dropdown menu next to Device. Click on the menu options and change this setting from Built-in Input to the USB Turntable setting. In my case, the Audio Technica AT-LP60 showed up on this menu under the somewhat strange name, “USB Audio CODEC.”

If you’re capturing albums that were recorded in stereo (as opposed to mono records), there’s another key setting that you need to adjust in Audacity’s Preferences. Under the Audio I/O tab, in the Recording area, you need to change the Channels setting to: 2 (Stereo). This way when you start recording a new album, Audacity will automatically create a stereo track and start recording the Left and Right stereo channels from the vinyl into the computer.
Below the Recording area of the Audio I/O tab in Audacity’s Preferences there are a number of boxes. For my needs (which involved recording a vinyl record in my cubicle at work with no other home-stereo equipment and just a laptop and a pair of headphones), I checked the boxes for Hardware Playthrough, Software Playthrough, and Do Not Modify Audio Device Settings. Changing these settings enabled me to listen to the vinyl through my computer as it was recording.

With these settings, when you click the Record button on Audacity’s main screen, the program should create a stereo track automatically and start recording the input directly into it. When you get to this stage, start recording in Audacity first, then start the record player and put the needle on the record. I found that I needed to turn up the input gain all the way in Audacity. The input gain is the little slider near the top of the GUI next to the little microphone icon. The volume level still sounded kind of weak while I was recording, but upon playback it sounded better. I also turned up the gain on the stereo track itself during playback. The stereo track’s gain is the little slider on the left side of the screen between the – and + signs. These adjustments really helped the overall volume of the recording and made it sound the way I hoped it would.
Finally, once you're finished recording your record collection into your computer, try to refrain from throwing your albums away in the trash. There are thrift shops and secondhand stores that would gladly accept your records as donations. Why send all of that vinyl to a landfill when someone else (like me) may cherish it?
If you have any more questions about digitizing vinyl records, please submit them in the Comments section, below.
