
There are many kinds of car rigs, from hood mounts to “hostess trays,” side mounting, car-mounted jib arms, stabilizers, and full-blown process trailers. Each set up provides something different in terms of shot selection, flexibility, and how much you are asking the actor to do. On many large films, when an actor is seen driving a car, the car is often being towed behind a process car, so the actor doesn’t have to drive, and instead can concentrate on their performance. That isn’t possible for every shoot, and it may not work stylistically for your shoot, so if you are looking to add shots from a car-mounted camera to your next filmmaking endeavor, read on as I go over some basic ways of rigging a camera to a car, focusing on suction cup and magnetic mounting.
Safety, Safety, Safety
Be safe—it is only a movie and not worth anyone getting hurt, or worse.
Rigging a camera to a car is more complicated than strapping luggage onto a roof rack and hitting the highway. If you are rigging a camera to the outside of a moving vehicle, you want to check into local laws and requirements when using public roads. Also, getting a grip on board who knows about rigging cameras to cars will be an immeasurable help, and I cannot recommend that enough. Remember to always “safety your gear,” much as you do when hanging lights from a grid, which means running extra ropes/ties/cables to your device as a backup in case your attachment method fails.
Do not obstruct the driver’s view with your rig.
Basic Mounts
Suction cup mounts and magnetic mounts are fast and easy to set up, and perform much the same function, although there are differences. Obviously, with magnetic mounting you must attach the mount to a metal (iron or steel) surface, and suction cups must be attached to smooth, nonporous flat surfaces. I’ve become more fond of magnetic mounting, because a dirty surface or age may lead to issues with suction cups, but I was able to use magnetic mounts and a suction cup successfully, as you will see.

Please be aware that no matter how careful you are, cars are not built to be camera friendly. There is always a chance of doing cosmetic damage to the vehicle on which you are mounting your camera.


Hood Mount
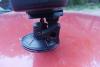
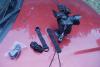
For the hood mount, I first started by cleaning the hood—always a good idea—then I positioned a Delkin Devices Fat Gecko Stealth Single Suction Cup, and locked it in place. I mounted my GH5 on the cup. However, you cannot just stop there. You really must “safety your camera” to the car. For rigging, I like to have a camera in a cage of some kind because it affords additional mounting points that usually are not built into the camera body. I used two RigWheels CineRopes attached to the camera and cage to hold the camera snug and help prevent vibration. I attached these to the car using RigWheels Hood Hook Car Mounting Straps, which are meant to slide into the grooves between body panels and do a really nice job, although I hooked them under the edge of the wheel flares. The cine ropes use S-hooks to attach, and they have a nice pulley system with a locking mechanism, allowing me to snug the ropes securely without relying on knots to make them tight.
“Safety” the Mount
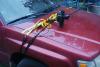
With the camera mounted and the mount tightened down, it was time to “safety” the rig. For this I used a Kupo Ratchet Strap across the hood, providing an anchor point to use for safety lines. With a safety line, sometimes referred to as a tether, the idea is that if any part of your mounting rig fails, the safety line will catch your gear, hopefully, before it tumbles to the ground or strikes a person. The safety is different than the mounting system and any stabilizing lines you may run. It is also wise to run a separate safety for your mounting device—in this case, the suction cup—as well as the camera itself. I prefer not using an S-hook tor a safety, because I fear it may slip out, so I tie it off with rope, or use a cable with a locking carabiner.


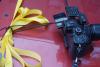
Magnetic Side-Mount
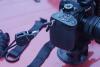
I have Oben and Rig Wheels magnetic mounts, and I used one of those screwed into the cage to mount the camera on the side of the car. The nice thing about these magnets is that they have a rubberized exterior, which helps protect the mounting surface, and a built-in ¼"-20 screw for attaching accessories. Once again, I ran a ratchet strap as a safety to the top of the car, and then used a CineRope to provide tension against the safety. My biggest fear as I drove around my backyard was getting the camera too close to something and breaking it.


A note about the magnets: These are very strong and can be difficult to remove. I’ve found the best way is to attach a lever—in this case, I use a baby-pin with a ¼"-20 threaded hole, or similar, and screw that onto the magnet. This allows me to leverage the magnet off the surface easily. Without the lever, it becomes very difficult, and if two of the magnets stick to each other, just forget about getting them apart without a lever.
Inside Rig
I know that earlier I wrote about not being able to use magnets on surfaces other than iron-bearing metal, which isn’t exactly true. I learned a neat trick, which I was able to apply when mounting a camera on the inside of a windshield. That is to use two magnets, one on the inside and one on the outside. The magnets grip each other well and hold position. Also, it couldn’t hurt to use a strip of clear tape across the magnet on the outside of the car, so as not to obstruct the driver’s field of view.


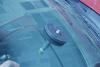
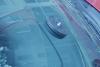
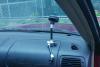
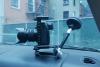

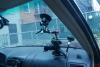

So, for this rig I used a magnetic mounting system and a suction cup on the inside of the window. These provided my anchor points. I attached the camera to the points by using a couple of articulating arms. I’ve been acquiring a lot of bits and pieces of camera grip gear, and this was a good opportunity to use them. You may notice that I used a baby stud and a clamp in addition to the arm. This is just because I ran out of female-to-female ¼"-20 couplers, so I had to make do. Even though we are inside the car, don’t neglect your camera safety. If there is a crash, you don’t want the camera flying all around the car.

Wrapping It Up
Getting neat shots in a moving vehicle can be a lot of fun. They can add to your film’s production value, create interesting twists, and be a great way to see something from a different angle. But remember, no matter how careful you are, accidents happen, so take your time, take precautions, and always “safety” your gear.
If you have any thoughts about rigging for beginners, please add them to the Comments section, below.
