
Mixing audio is not an exact science—there are many ways to achieve similar results, and what works for one project may not for another. In my ten-plus years of mixing, I’ve had the privilege and opportunity to learn both common and lesser-known techniques from some of the best engineers in the world, as well as the time and practice to discover my own tricks and techniques through experimentation and a few happy accidents. We don’t gatekeep at B&H—here are ten helpful techniques you can use to bring the best out of your mix.
1. Use Reverse EQ Curves to Create Space and Clarity
This relatively simple technique can make a huge difference in your mixes, whether it’s between two competing instruments like bass and kick, or between entire sub-mixes like vocals and the instrumental. All you need is a match EQ like the one that comes stock with Logic Pro X, or a software plug-in with the capability like FabFilter ProQ4 or the iZotope Ozone Equalizer.

Match EQs will analyze and store the average frequency spectrum of the input signal you send to it and automatically create an EQ curve template that reflects its overall energy throughout. Let’s use creating space between the vocals and instruments as an example of how to utilize a match EQ.
Begin by routing all instrument tracks into a bus and all vocals to a separate bus—place match EQs on both busses and let them do their thing. Now that you have the EQ templates, use them with a parametric EQ on the opposite track and reverse those EQ bands—in FabFilter ProQ4, it’s as easy as selecting all nodes and dragging the mouse up or down to reverse the amplitude. The curve should be subtle—these EQs shouldn’t add or cut more than a couple dB in each frequency band.
This should result in immediate and noticeable clarity and space, opening up your mix and removing any muddiness or competing frequencies.
You can also use this in one direction, for example between a bass and a synth with competing low-mid frequencies—match EQ only the bass and place that curve in reverse on the synth track, giving some room for both instruments to be heard clearly. Likewise for any other competing instruments in your mix.
2. Mix Quiet, Reference Loud
The Fletcher-Munson Curve is a chart that visualizes a human’s perception of volume at different frequencies. Low frequencies need more intensity to be as audible as higher frequencies, meaning many people will listen or mix loud to hear more bass. However, during mixing, this can be a problem, because many people will be listening to your music on lower quality speakers or headphones, or at a lower level than what you were listening to while mixing.

When mixing loud, the low end may sound big and deep and the high end bright and shimmering. But you didn’t do anything to achieve that—you’re being fooled by an artifact of your speaker system’s output level. Mixing at a conversation level around 50-60 dB SPL emphasizes midrange and isolates any issues with your low end. When mixing low, you’ll find that it’s much easier to hear the effects of compression and dynamic processing, and you’ll find that throwing energy on your bass or kick at 100 Hz doesn’t do all that much. This will force you to fix any volume imbalances and make every part of your mix audible in the midrange, ensuring your mix will sound good in any playback environment. People love bass, but its presence lives in the mids. You can measure the dB SPL of your playback at your position with an SPL meter.

Once your mix sounds great at a quiet level, bring your mix up to around 82 dB SPL and compare it to a reference track. This level is too loud for mixing over an extended period and can lead to ear fatigue and even hearing damage, but it’s good practice to make sure your mix is up to par with other professional recordings.
If you’re in the audio industry, your ears are your livelihood—the most important tool you have! It’s important to take care of them. Mixing low is not only good practice for your music, but your body as well.
3. Use Multiband Compression and Dynamic EQ Against Each Other to Tighten, Tame, and Saturate
I discovered this technique myself and it was subsequently validated by a Grammy-winning audio engineer. While I don’t mean to sing my own praises (it’s not like I was the first to do it), I haven’t seen anyone talking about this online, so I’ll go a bit more in depth with this one.
In the aforementioned Grammy-winning audio engineer’s mixing/mastering class, I was assigned a project with a vocal performance that sounded dull and buried in the mix. Naturally, I wanted to accentuate the high-mids, but boosting anything 1500-3500 Hz ended up sounding too harsh and sibilant and compressing it took the magic out of a great dynamic performance. I needed a way to boost presence without adding harshness or overly affecting levels. Here’s how I got an A on that project:
I used a dynamic linear-phase EQ with a ~+2 dB bell-curve boost at ~2250 Hz with a Q extending from ~1500-3000 Hz (along with some subtle cuts to tame sibilance and harsh resonance). The vocals still had some harsh transients and lacked body, so I then used a multiband compressor after the EQ to target the same frequency band, set with a moderate ratio and threshold, fast attack and release, and just a touch of makeup gain.
This technique created what is essentially a reactive and frequency-specific combo de-esser/de-harsher and saturator/exciter. The dynamic EQ delt with any problematic resonance tails while giving the compressor enough signal to soften any harsh transients and to inject enough saturation and harmonic distortion needed to cut through the mix. Because both the EQ and the compression were only affecting frequencies above the vocalist’s range, the dynamics of the performance were left effectively untouched.
This made the vocals sound extremely tight, dense, and rich, while avoiding static compression’s loss of dynamic range or the EQ’s boost of shrill resonance. You can think about it like a super-unsophisticated, do-it-yourself dynamic resonance suppressor like Soothe2, that also adds some character and juice.
Be careful using this technique: My professor admitted this is a trick he uses quite often but he purposely does not share it. While I wouldn’t be surprised if he’s participating in a bit of gatekeeping, I’ve found that it can easily lead to some sonic weirdness and phase issues when used improperly or aggressively. Experiment using this technique to find when, where, and how it works best for you.
4. Calibrate a Static Mix Using Pink Noise as a Level Reference
I like to begin mixing without using any plug-ins or processing—many engineers will turn to their favorite plug-ins the second they hear a problem but doing this won’t give you the proper context of the recording and can quickly lead to plug-in bloat. By just using faders and panning, you can create a static mix that can sound great on its own and will become the true starting point of your session.
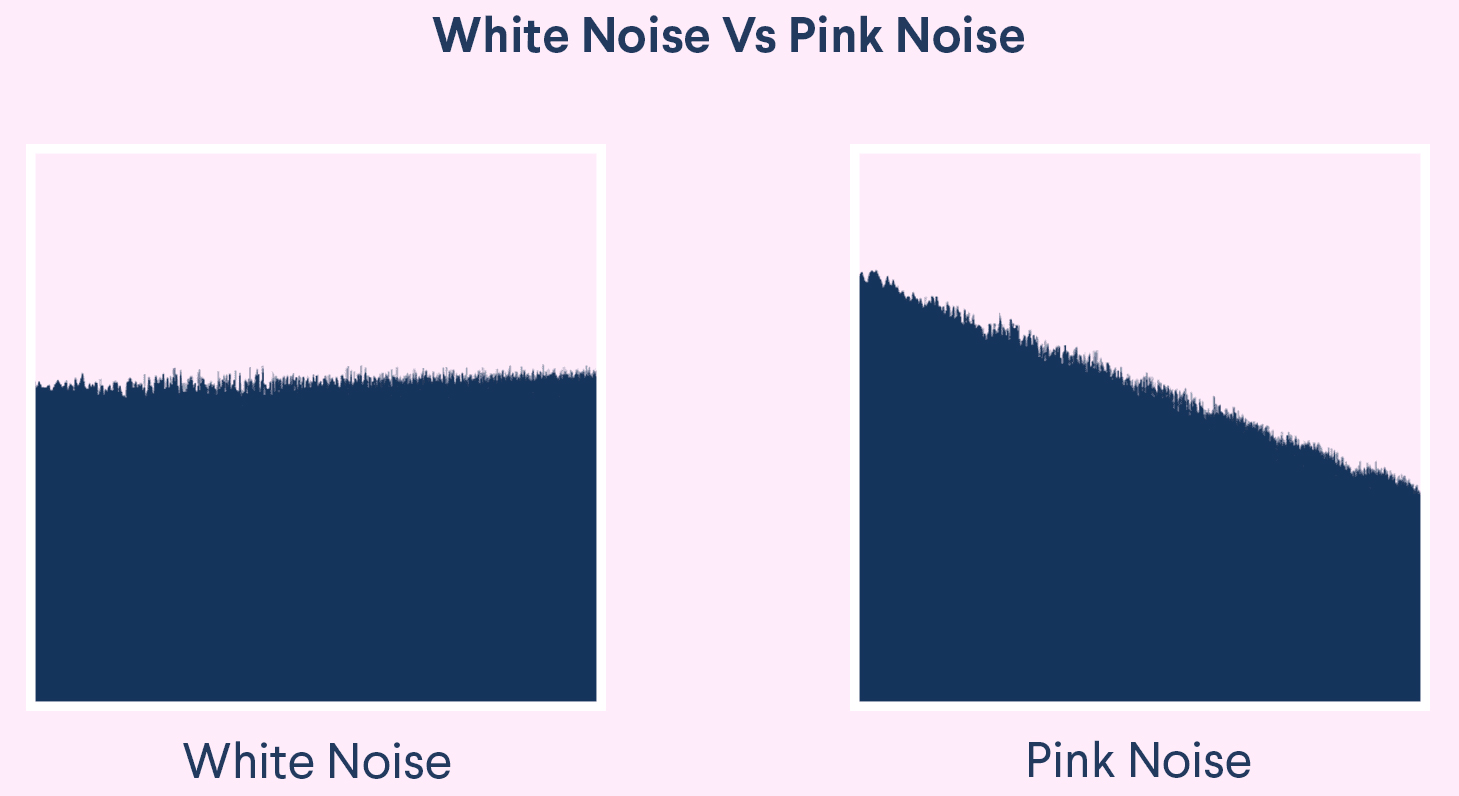
Engineers can use pink noise as a reference level for mixing sessions, useful to balance out a track to ensure all signals are at proper initial levels before riding faders and adding processing. White noise has a completely flat response, meaning that it has equal power at all audible frequencies. However, as we’ve stated previously, humans do not perceive all frequencies at equal power—when we listen to white noise, we perceive it increasing by 3 dB per octave upwards, making it inappropriate to use as a level reference. Pink noise takes this into account, losing 3 dB per octave, making it a perceptually perfectly leveled sound throughout all frequencies.
Use a pink noise generator before you begin mixing to calibrate your project. At the stereo bus the level of the pink noise should register a normal average level for mixing on your meters (different engineers have different opinions on what it should be, feel free to experiment). Then, solo a track along with the pink noise and balance it with your ear. You’ll want to bring the track’s level where it’s just barely audible above the pink noise. Repeat this process with the rest of your tracks and you’ll have achieved a basic mix level to begin working. You should find that you’ll be doing less tweaking on the mix than you would have when focusing on a mix track by track.
5. Understand Distortion and Embrace Mathematics
For how commonly distortion is used in music and sound design, it’s all-too-often misunderstood and underutilized—and it may be the most fundamental concept in mixing and mastering. Understanding just some of the basic mathematics of distortion and how it affects an audio signal can illuminate its usefulness and give a solid understanding of when, where, and how to use it to its full potential.
Distortion is any alteration of a signal’s waveform—while most people associate distortion with the driven sound of guitars in rock music, it’s more useful to think about it fundamentally. Any audio processing will add harmonic distortion, introducing integer (or non-integer) multiples of a signal’s fundamental frequency. Here’s a simplified explanation:
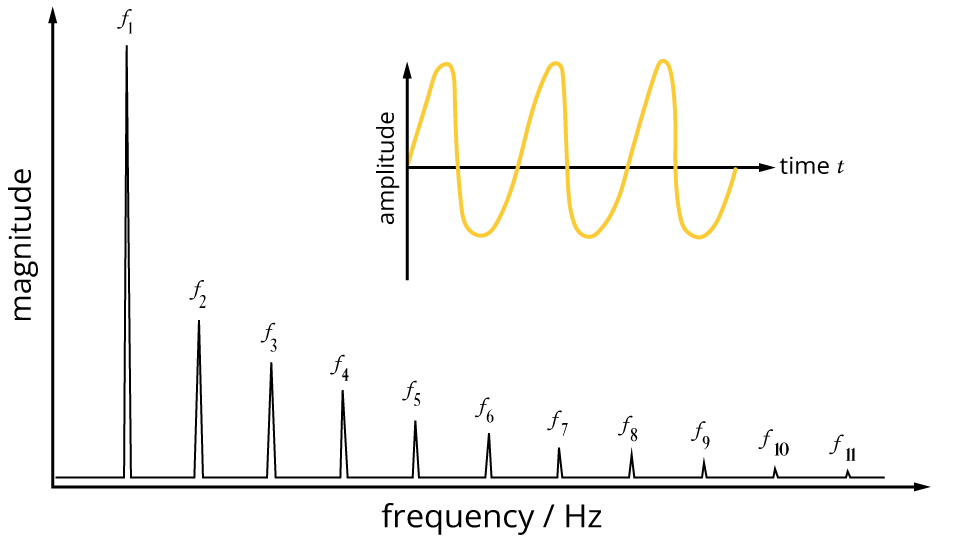
The fundamental frequency is the lowest or base frequency in a waveform. If the fundamental is sine wave at 100 Hz, adding harmonic distortion would introduce energy to integer multiples of 100 Hz (i.e., 200 Hz, 300 Hz, 400 Hz, and so on)—decreasing in amplitude as defined by the Fourier Transform (an intimidating and gorgeous mathematical principal that transforms audio from the time domain to the frequency domain and vice versa, key to signal processing).

This type of nonlinear harmonic distortion is induced by the transformers and tubes of audio processing gear, the physical limitation of magnetic recording tape (tape saturation), or with digital audio processing tools. This phenomenon is the reason why these tools add “warmth” and “richness” to a sound.
Understanding this, we know that adding distortion contributes to the presence of a signal throughout the entire frequency spectrum, not just its fundamental—adding compression to a bass line between 80-200 Hz will affect frequencies far above its “audible” range. Always consider the outcome of distortion while mixing.

Moire patterns offer a simple visualization of what distortion does to sound. Adding energy to a signal at mathematical intervals affects its presence and thickness, not unlike how these two consistent patterns can line up in different ways to create weight and opacity at specific intervals.
Understanding and properly using (or avoiding) harmonic distortion is critical to getting a good mix—it could be argued that mixing nothing but adding distortion! There are many great resources online going into the utilization of distortion, and it should be a top priority when it comes to your practice and education.
6. Create Width and Direction with Duplication and Parallel Processing
Just panning a sound left or right doesn’t accurately mimic the directional sound we experience in real life. To mimic the reality of directional sound, you must take inter-aural level and time difference into account. Here’s some techniques to create directionality you can experiment with:
To mimic a sound coming from the left or right, duplicate a mono track and hard pan them left and right, turning both tracks down by -6 dB to compensate for the doubling (depending on your system’s pan law settings). Leave the track whose side you want the sound to be coming from mostly dry. Lower the volume of the other track around -10 dB to -15 dB, place a low-pass filter around 8-12 kHz, add about 30 ms of delay, and add a high-quality dark reverb with minimal pre-delay. Adjust the settings and panning to your liking and see what kind of depth you can create.
Why does this work? When sounds are further away from you, high frequencies naturally roll off as it travels through the air (think about the sound of thunder when it’s far away as opposed to nearby), and the ear further away from the sound will hear it slightly later (more on that soon). The reverb is used to create realism and atmosphere—your choice of reverb is up to your creative judgement.
The Haas Effect, or precedence effect, can be used by itself to great effect, widening a sound without the use of reverb. Achieving this effect is very simple: duplicate a mono track and pan hard left and right. Delay one of the tracks a very short amount (between 5-35 ms)—this should create a convincing sense of width and depth.
Using parallel processing and panning with a variety of different processes will add depth and presence to a sound—try it with a combination of delay, distortion, compression, or modulation and see what kind of results you can achieve! But be cautious—whenever using techniques that involve delaying a duplicate signal, phase cancellation will be introduced which is problematic for any mono summing. You can use more processing to help compensate for any destructive cancellation—the more different the duplicate signal’s waveform is, the less phase cancellation will occur.
7. Check Your Mix with a Single Mono Speaker
If your mix sounds great in stereo and terrible in mono, you have a bad mix. Your work should sound great and balanced both sonically and spatially—a mono collapse of your mix will reveal issues that would be otherwise hidden in stereo. Using things like stereo widener plugins to create the illusion of massive width or relying too heavily on L/R or mid-side EQing can make vital parts of your mix vanish in mono—especially when played back on portable Bluetooth or phones.

Mixing in mono will force you to be more decisive, especially when dealing with separate parts with competing frequencies. It’s a simple fix to have two guitars in the same range panned left and right, but a more advanced choice would be to carve out space for them regardless of stereo position, allowing the signal to be crystal clear and distinct between the two (tip #1 is especially useful for this).
Professional recording studios will often have a small monophonic monitor like the Auratone 5C along with one or two stereo monitor pairs to quickly reference a mono-collapsed version of their material. Another advantage of these smaller mono monitors is their less-than-stellar frequency response that lacks the high-end shine and low-end power of the more expensive stuff. As mentioned in tip #2, all the content within your mix should have some amount of presence in the mid-range, or else it will disappear in most realistic listening environments.

Conversely, it can be useful to monitor only the stereo content of your mix by isolating the side channel of a mid-side EQ or using a dedicated mid-side monitoring plug-in. Because any content identical in both speakers is removed, you can monitor the balance of the stereo image, check if there are any errant low frequencies that should be tamed to the center, and diagnose any phase issues you may have missed when collapsing to mono.
8. Add Whisper Tracks to Give Vocals Air and Intimacy
Sometimes, vocals can sound dull or lack the proper diction to be intelligible throughout a mix, and oftentimes and re-recording an entire part is too time-consuming or impossible. Adding subtle whisper tracks on top of a vocal recording is an easy way to bring life, intimacy, and clarity to the performance.
While using recordings of the original vocalist are always preferable, the nice thing about recording a whisper track is not having to worry about delivering a strong vocal performance—most anyone can record a whisper track over existing vocals, even someone besides the original vocalist.
The singer should record a version of their song whispering the lyrics in tight sync with the main vocal track, emphasizing breathiness and sibilance. Take advantage of the proximity effect to simulate whisper-in-your-ear closeness but consider using a pop filter to manage plosives. This technique is usually doubled or even quadrupled to get a more layered and present sound—record at least two pass-throughs.
I recommend processing these whisper tracks with a high-pass filter to remove unnecessary low-end frequencies, a high-shelf boost to emphasize air to your liking, and de-esser to tame any harshness using your preferred method (tip #3 is probably overkill, but feel free to try). This should be barely audible in the mix, adding only the bite and presence of the whisper to the vocal track. Feel free to pan, automate, or further process the whisper tracks to your liking. Using whisper tracks is a creative tool without many guidelines, so always be free to experiment!
9.Use Subtractive EQ More than Additive EQ
This tip comes down to your philosophy of mixing—additive EQ is fantastic and can solve many problems, but a mix containing mostly additive EQ can become unwieldy, creating balance issues that will be hard to pinpoint or are caught up in a web of hundreds of previous choices. A better approach would be to remove sounds you dislike first—that way you can balance the mix while maintaining the headroom you’ll need to make boosts later.
When EQing, I try to keep the ratio of cuts to boosts at about 4:1—a soft rule that won’t always apply to every track in the mix but helps keep the mix in check and allow for more aggressive boosts later in the session. I strongly recommend this approach, but like anything else in mixing, the choices you make should be defined by your personal taste of how best to serve the song.
10. Create Mix Templates
Projects on a DAW can quickly become overwhelming. I’ve worked with sessions with over two-hundred tracks, all with their own processing and routing. A problem that especially occurs when composing/producing a track is the bloat that can occur over time, leaving you with a confusing and obtuse session—a huge problem when collaborating with other musicians and engineers who may have not been a part of the project from the start. Starting with a robust template will save you and your collaborators an enormous amount of time and frustration and give you more options and flexibility at every stage of production.
A boilerplate example of a great mix template is a session organized with a series of stereo mix-buses (aux outs) already labeled and color coded, allowing you to quickly route any number of tracks to those specific sub-groups. There should at least be one each for the drums, bass, instrumentals, vocals, and effects, as well as a stereo out or master bus at the end of the chain. Depending on your preference, you can also set up any plug-in chains you like to use often, such as placing an EQ, compressor, and limiter on the master bus.
When starting a session, before even static mixing or leveling, make sure each of your tracks are labeled and color coded in concert with the mix-bus they will be routed to. If your drum bus is red (and hopefully labeled “drum bus”), the kick, snare, overheads, etc. should also be red, and routed to the drum bus—likewise with all other groups. These groups should all be routed to the master stereo output, giving you control over the entire mix in one place.

You should also set up multiple individual mono or stereo auxiliary tracks that can be used for any go-to parallel processing such as reverb or distortion—you may want to make multiple of the same type, such as a plate reverb and hall reverb, or place those aux tracks near the group or subgroup that will be routed to it. This way you can quickly send any track or mix-bus to an effect that can be tweaked to your preference. Additionally, making a reference track for static mixing is super convenient—see tip #4 for a suggestion on what you can use for this purpose.
Templates will speed up your work and increase your flexibility, allowing you to make macro and micro adjustments on the fly and saving you time by having plug-in chains preloaded so you don’t have to menu dive and load them individually.
There are plenty of mixing templates for free online for most DAWs, making it easy to get started with one right away. Be sure to stay flexible and make your own adjustments and refinements over time to suit your needs.
Mixing Down
One extra tip: When mixing down a project, its easy to simply “bounce” the audio file and have it sent to a folder in your hard drive right away—this is usually fine, but occasionally, some artificing or plug-in nonsense can occur. The industry standard way to do this is to “print” the mix to another channel as to monitor the final output and ensure no processing misfires occur. Simply route the master bus output to a new record-enabled stereo track and press record.
We hope these tips and tricks can help you improve your mixes or help you get started quickly. We have a plethora of pro audio options at B&H, hardware and software. Ask our expert pro audio team any questions you might have—happy mixing!
