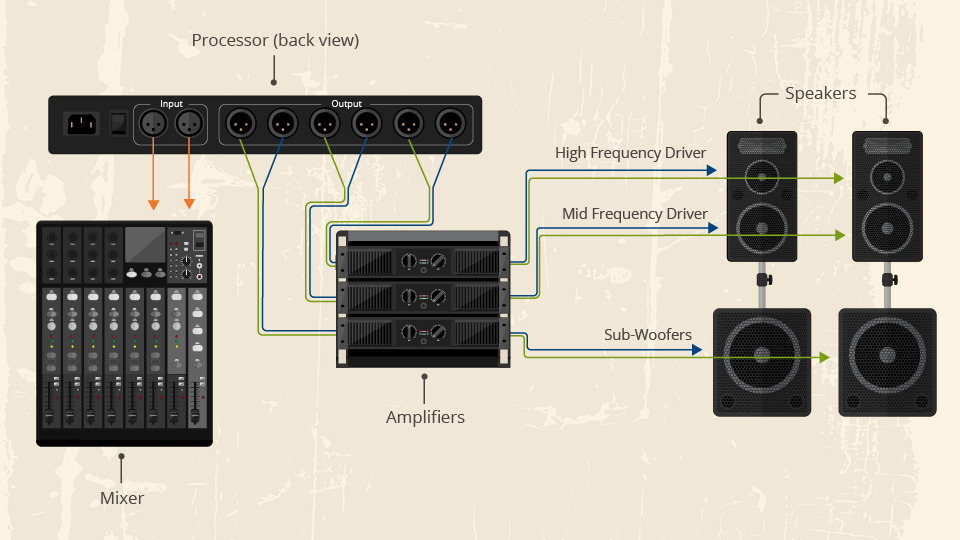
Now that we’ve discussed the basic gear you need to put on a live show, lets look at the specific kind of gear and knowledge you’d need to set up a professional event at a large venue, stadium, or arena. Whether you want to gain more knowledge in pro live sound or you’re just curious, you’re in the right place!
If you’re a beginner or want more context for this article, go ahead and check out the first part of this guide where we go over the basics of how to set up a DIY show in a backyard or basement. If you’re feeling confident however, move on ahead!
Passive Speakers
Even though it means more research, preparation, and gear to buy, installation setups typically employ the use of passive loudspeakers. Passive means they don’t have their own built-in amplifier or power supply which offers several advantages:
-
Significantly greater flexibility, modularity, and scalability of the setup
-
Less weight and cost than powered speakers
-
Entire speaker array can be controlled from a single location
-
Speakers do not have to be plugged into a power outlet and only require a single speaker cable
-
Significantly better longevity and serviceability. Each point of failure can be repaired/swapped individually without having to replace entire speaker units.
The tradeoff is that you’ll need to use a separate stand-alone power amplifier or powered mixer with a built-in amplifier, and you may require some more advanced tools like speaker crossovers and processors.
In recent years active systems have primarily superseded passive speakers for most touring and portable live sound systems as pro line arrays are often active with digital control and offer more convenience with their integrated amplification. However, passive speakers remain the go-to for modular systems that require extremely high-fidelity audio and long-term reliability, especially for custom installations and independent component upgrades. High quality no-phones dance halls and listening rooms like those found in New York—Public Records, Nowadays, Refuge, as well as London’s Fabric and Berlin’s Berghain—all will passive systems for these and other reasons.

Setting a passive system up properly takes some know-how and understanding of power, connection, type of amplification, and other core concepts. We already discussed wattage, so let’s dive a little deeper into the technical world of loudspeakers.
Ohms and Impedance - Wiring Techniques and Safety
When working with passive speakers, you’ll need to make sure your separate amplifier is compatible with your speakers and your system. We can do this by checking the specs of both the loudspeakers and amplifier, specifically ohms (represented as Ω because omega sounds like ohm) to quantify how hard the amp will work to drive the speaker. We got to make sure they play nice together!
Ohms are a measure of electrical resistance, called impedance. To help illustrate, a common analogy is the flow of water through a pipe. Low impedance (like 4Ω) is like a pipe with a large diameter, allowing more water (electrical signal/power) to pass, where high impedance (8Ω) is a thin pipe, allowing less. The amplifier is the proverbial water pump, and the loudspeakers are the faucet.
Does this mean low impedance speakers and subs are always better? Absolutely not: the diameter of the pipe (the impedance) won’t matter if you don’t have a pump (an amplifier) with enough output (power) to fully fill the space!
For smaller and single speaker applications, doing this is as simple as matching the numbers: if you have a speaker that’s designed to work with 4Ω, pair it with an amplifier that outputs 4Ω. But it gets a bit trickier when working with multiple speakers in a live rig. The combined impedance of all the speakers needs to match the amplifier, and it’s not always as easy as just adding up and matching the numbers. Here’s the math concepts and wiring techniques you need to know when considering speaker setups for a live rig:
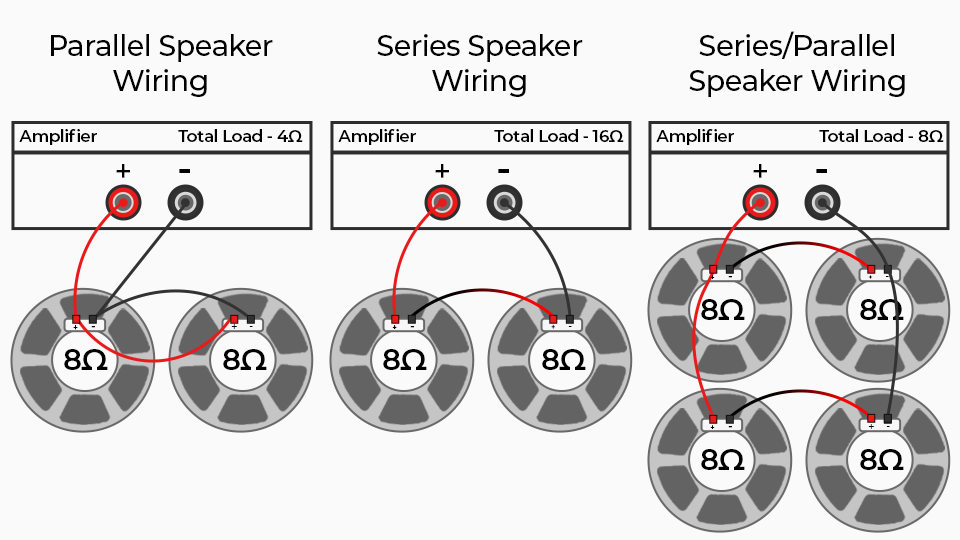
Parallel Wiring
Parallel Wiring is akin to splitting the wire two ways, matching positive to positive and negative to negative connections from the amp to the speakers. This can be done by connecting each speaker directly to the amp, or by matching positive to positive and negative to negative connections between each speaker.
This method decreases the total impedance of the system. The formula is intuitive: if the speakers have the same impedance (which they should if you don’t want to tear your hair out with harder math), divide the Ω by the number of speakers: if you’ve got two 8Ω speakers, you’ll want a 4Ω load for the amp (8/2=4).
Think about it like the number of lanes on a highway: the more lanes (speakers), the more cars (energy) can pass through at once (civic engineers, please excuse the simplification).
This is the most common wiring method as it gives each speaker full voltage and has good reliability. If one speaker fails, the rest will still work. However, anything under a 4Ω load can lead to overheat and damage. Parallel wiring two 4Ω speakers is not recommended. Because of this we have another way to wire up a system.
Series Wiring
Series wiring is necessary when the combined load of the speakers drops below the amplifier’s minimum safe rating. Particularly useful when hooking up a pair of 4Ω speakers or using more than two in your rig. This is done by creating a daisy-chained loop, where the positive amplifier output connects to the first speaker’s positive output. Then, that first speaker’s negative output is connected to the next speaker’s positive output, repeating the process for as many speakers are in the system. Finally, the negative connection of the last speaker in the series connects to the negative connection on the amplifier, creating the series.
For a dual speaker system, it’s like this: Amp (+) → Spkr 1 (+) → Spkr 1 (-) → Spkr 2 (+) → Spkr 2 (-) → Amp (-)
This method increases the total impedance of the system. Unlike parallel wiring which adds another lane to the electrical highway, series wiring adds to the length of it, meaning the power is sent to each speaker one by one, each increasing overall impedance. To figure out what amp you need, simply add the individual speaker’s ohms together: two 8Ω speakers = 16Ω load (8+8=16), two 4Ω speakers = 8Ω load (4+4=8).
While this type of wiring is safer than parallel, it comes with some key disadvantages: because the power is divided between each speaker, they’ll be quieter and have less bass response, and if one speaker fails, the entire system goes kaput.
Series-Parallel Wiring
You might have noticed that those two methods generally assume that you’re using only two speakers. For four or more speakers, series-parallel wiring is a common solution because it allows for a single amp to maintain proper and safe power loads for many speakers at once.
If done correctly, this method keeps impedance of the system consistent, given that they’re all matching. This is how it works:
1. Create two series-wired pairs of speakers (both are 8Ω + 8Ω = 16Ω) – do not connect the speakers to the amp
2. Once completed, connect each pair to the amplifier in parallel
3. Because there are now two 16Ω loads in parallel, you divide by 2: 16Ω ÷ 2 pairs of speakers = 8Ω
4. Expand this method accordingly to the number of speakers in your system
Speaker wiring and amplification isn’t the easiest topic to nail down, but it’s extremely important to understand when setting up a professional grade live rig! There are plenty of great resources that get into the specifics online.
Positioning the Speakers
I suggest setting the tops at shoulder to head level, about 5 to 6 feet from the floor. If you are utilizing subwoofers, you might try ground-stacking the tops on top of the subs.
Many speakers offer pole mounts for use with speaker stands. This is the simplest way to get proper height, especially if you don’t have multiple subs to create a ground stack. At the very least, you want your high-frequency driver above the heads of the people in the audience.
Subs
Subwoofers also come in active and passive options with the same pros and cons. There are many different designs that can offer outstanding results. The best bang-for-the-buck I recommend is a Yorkville ES18P. It is a self-powered, single 18" rear-horn loaded design with a tremendous output, rivaling or surpassing most double 18" designs.

Depending on your setup and how many subs you have, you will have more consistent results by placing all the subs together. Placing two subs together will yield a 3 dB gain in SPL and they will couple without interference. A stereo sub configuration may create null points in the room where certain frequencies cancel each other out. Other tricks to maximize bass are to place the subs near a wall or corner, as each of the boundaries will reinforce the sound and help load the room. My favorite configuration is to center-cluster four subs together (2 wide x 2 tall).
Speaker Crossovers
Crossovers isolate and route frequency ranges to each speaker component and use built-in limiters for protecting the drivers. A three-way active speaker (tweeter, mid-range, and woofer) will have two or more built-in crossovers, which isolate the high, mid, and low frequencies. The advantage of active speakers is the ease of setup and operation. They only require a line level input and you won’t have to use separate amplifiers to power them.
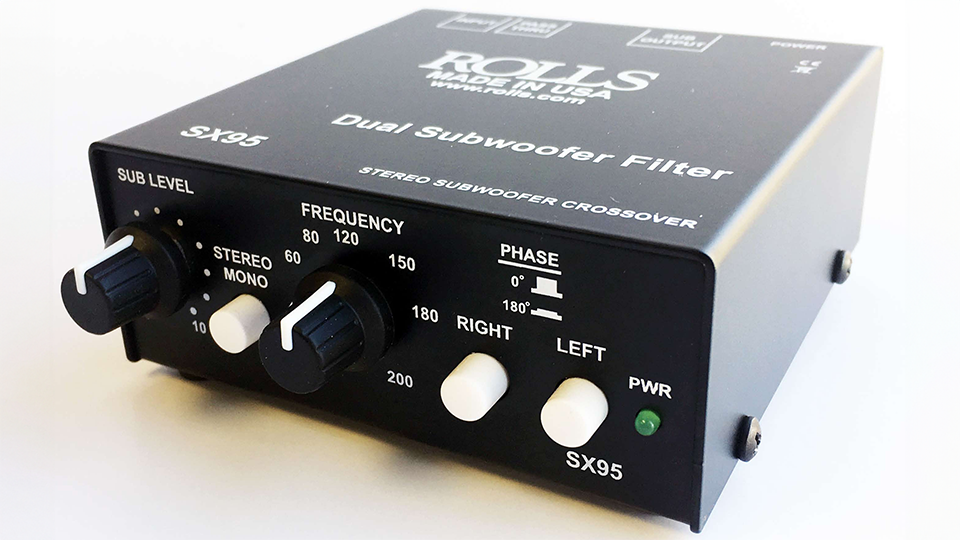
Passive speakers require amplification, speaker cables, and may require an outboard crossover like the Rolls SX95 or dbx 223xs, as well as other signal processing. Some passive speakers will utilize an internal crossover network, which functions much like the active speakers. Other speakers are designed to be bi-amped or tri-amped, which can be a benefit, as this allows greater control over the speaker components, but also requires a separate amplifier for each component of the speaker. If you decide to go with a passive speaker design, you’ll need to look at the specification sheet provided by the manufacturer to determine the correct amplifier(s).
Speaker Processors
Regardless of whether you are using active speakers or passive speakers with an amplifier, you should invest in a speaker processor. In our opinion, it is the most important piece of gear and will save you time, money, and headaches.
A speaker processor combines a number of processors into a rackmount signal processor. You will find gain, EQ, delay, crossovers, and limiting for both input and output. A typical processor might have a stereo input and six outputs. The inputs will feature a 6- to 8-band parametric EQ and/or a graphic EQ, as well as a system delay. Each output on your processor will offer gain, a 4-band parametric EQ, a delay for time-aligning speaker components in a bi-amp or tri-amp application, or a full-range speaker and a subwoofer.

You will also find digital crossovers featuring Bessel, Butterworth, and Linkwitz-Riley band-pass filters. Each crossover offers a high-frequency and low-frequency setting with selectable filter types. For tops, I typically set the HPF to 96 Hz on a 24 dB per octave Linkwitz-Riley filter and the LPF to off. For subs, I set the LPF to 96 Hz on a 24 dB per octave Link-Riley filter and the HPF to 30 Hz on a 48 dB Butterworth filter. The major focus is the crossover between the LPF of the sub and the HPF of the top. A 24-dB-per-octave Link-Riley filter keeps the frequency response flat where both the subwoofer and top are crossing over.
Note: A speaker processor delay is not a digital delay effect, as it is intended to literally delay a signal by a set amount and does not offer a “wet/dry” setting. If a manufacturer offers time delay settings for your speakers, you can use those to time align the tops and subs. For example, if a subwoofer has a 3 ms delay, then adjusting the tops to match the inherent delay of the subs will provide a coherent and phase-accurate wave front. If you don’t have the specs, you can invest in a measurement system like SMAART. For those on a budget (and in possession of an iPhone or iPad), you can purchase the AudioTools app by Studio Six Digital, which can help you measure and calibrate your sound system.
Mixers: Powered or Unpowered?
Powered mixers have a power amplifier built into them, so they’re a great way to save money and setup time – however, if you’re using powered speakers, they’ll have an amplifier already built into them, making a powered mixer unnecessary.
-
Powered speakers with unpowered mixer = no standalone amplifier needed
-
Unpowered speakers with powered mixer = no standalone amplifier needed
-
Unpowered with unpowered = Standalone amplifier needed
While you should keep in mind the rules of wiring when using a powered mixer, because you won’t have to carry around extra equipment or worry about compatibility issues between the mixer and amp, using one can make things a lot easier, especially for smaller setups.
What Amplifier Class?
When choosing an amplifier, there’s more to consider than just the wattage and impedance. There exists multiple methods of amplification that are separated by classes. But don’t confuse this for a tier list, there are many advantages and disadvantages to each class, each of which will suit different needs, preferences, and budgets depending on your setup. Here’s an overview of the most encountered amplifier classes used in professional live sound:
1. Class A – Purity
Class A amplifiers use a single transistor, amplifying both positive and negative halves of a waveform signal. They’ll deliver the purest sound quality because there is no distortion from switching between transistors. Because its single transistor is always on – even with no signal passing through the amp – class A amps are notoriously power inefficient and run extremely hot.
Class A amps are often quite expensive, and because they can realistically be used as space heaters, Class A amps have massive heatsinks, adding significant bulk and weight.
2. Class B – Efficiency
Class B amps use two transistors that each take on the role of either the positive or negative halves of a waveform signal; conceptually, they’re both working only half the time. This mitigates the heating and efficiency issues found in class A amps and makes them much cheaper to produce (particularly when used in high-powered systems).
The two-transistor nature of the class B design causes distortion when the positive and negative waveforms have “crossover” between the two (when the waveforms cross 0). High-end audiophile systems do not use Class B amps because of this, making them best suited for situations where power and volume is a priority, but fidelity is not.
3. Class AB – Compromise
Class AB amps introduce diodes and resistors that create a voltage bias before the electricity hits the transistors, noticeably reducing crossover distortion. Conceptually, the transistors are on more than half the time because they don’t turn on and off instantaneously like Class B amps do.
These amps are often found in home hi-fi setups due to their sonic fidelity and reasonable cost, but they suffer from some of the same weight and heat issues that class A amps deal with.
4. Class D – Digital Complexity
While not digital devices themselves, Class D amps are often associated with digital because they are small and ultra-efficient, often found in modern electronic devices, Bluetooth speakers, and automotive sound systems. They use Pulse Wave Modulation (PWM), a process that rapidly switches its transistors on and off to mitigate crossover distortion and conserve energy.
Class D amps have been criticized for the characteristic “harsh and clinical” sound of digital audio, but more modern and high-end builds have largely solved this issue. They are also great with band-limited applications like driving subwoofers.
Check out our always-relevant article on amplifier classes for a more in-depth explanation of amplifiers and their classes, as well as other less common variants.
In-Ear Monitors/Wireless Monitoring
For larger and higher-end professional shows, musicians often eschew physical on-stage speaker monitors for In-Ear Monitors, or IEMs. IEMs look indistinguishable from high-quality earbuds but are usually connected to a bodypack that can wirelessly receive a high-quality mix of the performance from a dedicated transmitter, delivering a personalized mix for each bandmember while providing the naturally added benefit of hearing protection.
IEMs offer superior quality monitoring and better customization and flexibility while eliminating the chance of any feedback occurring from the output of stage monitors. But they are notoriously more difficult and time consuming to set up: you have to make sure the wireless transmission system is compatible and abides by local radio frequency guidelines (which will depend on your area), make a separate mix for each band member and route them accordingly, and rely on batteries which can potentially fail during a performance. There are some affordable options, but real-deal pro IEMs can come with a four-figure price tag, so budget accordingly.
For a more in-depth discussion on IEMs, check out our guide here.
Wireless Microphones
If there is the budget and desire for wireless microphones, I highly recommend the Shure GLXD24R+ or SLXD+ series digital microphones. The GLXD is an affordable option with a clean, clear sound without any artifacts, a simple setup, and a built-in charger in the receiver.

Wireless systems can be quite complex to setup—you’ll need to know the right frequency band to use (its regulated by law depending on your location, check your local guide), have to make sure there’s no interference or dead zones in your venue and performance area, and you need to make sure they’re properly charged to prevent on-stage failure.
When setting up any wireless system, you can use a radio frequency spectrum analyzer like the RF Venue RF Explorer Pro Portable RF Spectrum Analyzer which can enable frequency coordination calculations, interference monitoring, and intermodulation analysis. This machine is extremely useful (especially for larger event spaces) as it can pinpoint less occupied channels when working with performance tools in the 2.4 and 5 GHz frequency bands and record, save, and spit out recorded data in binary or .CSV format.

Wireless systems can be a bit of a pain and head-scratcher to figure out at first, but once your system is up and running, it can eliminate a lot of sound issues, decrease setup time, and allow performers more freedom on stage.
Equipment racks/Audio Snakes
A stage box or multi-channel snake is highly beneficial for reducing clutter on the stage. Some larger stage setups use a splitter that splits the signal from all the sound sources on stage between FOH and monitors. Most mid-level bands typically don’t have a dedicated monitor engineer, so the FOH engineer will perform both main mixing and monitor duties.
With an analog setup, you’d be working with a 16- to 24-channel audio snake with a cable run of 100+ feet. A drum kit may have 8 to 12 microphones set up to capture the sound, so a dedicated sub-snake allows for shorter mic-cable runs and a much cleaner stage setup.

Utilizing stage sub-snakes before going to the main stage snake will keep the cable clutter on stage to a minimum. Many digital mixers offer digital stage boxes that function like an analog stage snake, only instead of a 16- to 24-pair multi-channel cable, the digital snake will use a single CAT5 cable to connect to the mixer in the FOH position. This cuts down considerably on the weight and setup time of the entire system.
In Conclusion
As you can see, there are many directions one can choose when setting up a sound system for your band or event—we could write an entire book on this topic, but this article has already gone for two parts! The most important thing is to use your ears when making decisions. Always listen to speakers before purchasing and, if possible, demo speakers and subs together, especially if you are using different brands. We can’t recommend enough the importance of having a dedicated speaker processor for any system, regardless of size or budget.
We hope this guide has helped you understand some of the complexities of setting up live sound. We went quite in-depth, but the rabbit hole goes deep—use this guide as a primer to help understand what you need to better understand, and good luck on your journey in live sound production!