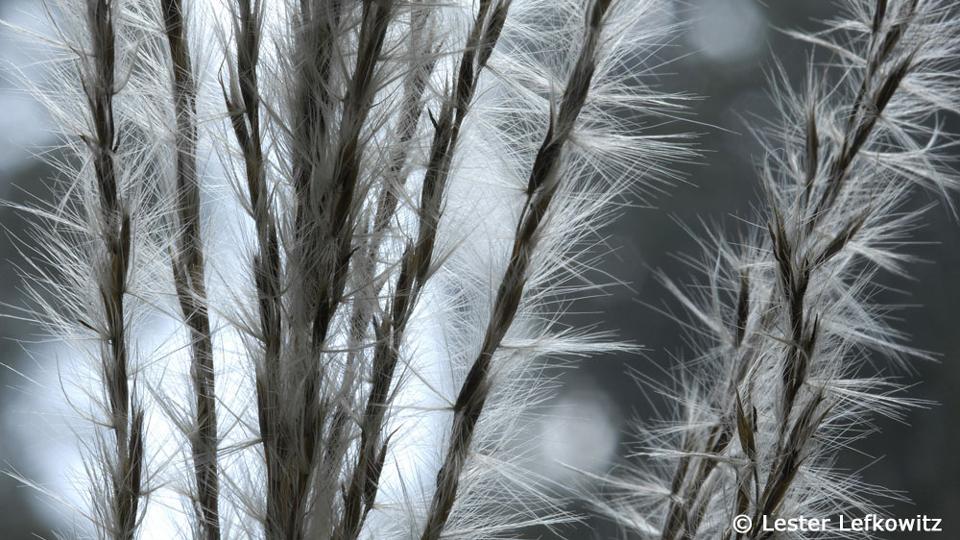
The mysterious realms of miniscule objects, colorful flora and creepy-crawly bugs hold a fascination for image makers of all sorts. Most photographers know that capturing images on such an intimate scale requires a macro lens or special accessories to allow for close focusing, but another critical component is the lighting.
For an overview on the different lighting tools and approaches to consider, we spoke with macro photography and lighting specialist Lester Lefkowitz, who will present a talk about macro photography at the B&H Event Space on June 22.
“While the hard part of macro photography is steadiness, focusing, and depth of field, lighting is the second thing that people have to deal with when they’re new,” he explains.
Natural light close-ups with ambient sunlight

The most basic approach to macro work is to take advantage of natural sunlight. Arguably the most popular subjects to explore here are the flowers and foliage from your nearest garden.
With your gear tightly framed on your macro subject, the unfiltered sunlight might seem adequate for making a picture, yet in reality it’s not quite that simple. “Even though it may look pretty to your eye, direct sunlight is usually very, very harsh,” says Lefkowitz. “You want much softer light.”
The easiest options for tempering direct sunlight are to wait for overcast conditions or find a shady spot. You can also hold a small collapsible reflector over the subject for instant shade. “This makes a huge difference in how the flowers look,” Lefkowitz says.
Another technical consideration is motion blur. At macro scale, Lefkowitz explains that there’s no such thing as a windless day. “When you’re that close up, the slightest breeze will look like an earthquake is striking,” he says. The patience to wait until everything stops shaking is crucial.
Considerations when introducing flash

To avoid motion issues and control the lighting better, many photographers choose to incorporate a flash unit with macro subjects.
Built-in or on-camera flash units illuminate the subject straight-on, resulting in a flat, boring effect. Lefkowitz notes, “Pop-up flash generally doesn’t work very well for macro work,” since the light from a built-in flash unit can be blocked by the camera lens at close distances. When using a hot-shoe-mounted flash, he advises to, “get the flash off the camera and hold it off to the side.” To do this while taking advantage of TTL exposure controls, you’ll need a flash synch cord, a remote transmitter or an optical slave to maintain a connection between your camera and flash.
Ring flash techniques
 |
 |
| Queen Anne’s lace, photographed outdoors with a ring flash in varied positions. At left, it surrounds the lens, creating fairly flat illumination. At right, it is handheld from the side, offering more dimensional lighting. | |
A specialty option well suited to macro work, a ring flash has a circular design that surrounds the camera lens. Invented for use in dental photography, its characteristic shadowless, flat light also makes it very useful for other medical applications.
While ring flash provides soft light when fitted around your lens, Lefkowitz suggests, “Take it off the camera and handhold it a little off to the side. You’ll get much more interesting, dimensional light.”
Although shooting with the flash in one hand and your camera in the other might seem precarious, Lefkowitz says, “although the camera’s flash synch speed might be 1/200 of a second, the effective shutter speed is about 1/2000 of a second, or faster,” which is more than sufficient to ensure sharpness.
Macro tools and techniques for moving creatures

Another popular macro subject, insects generally require much higher magnification—1 to 1 (life size), 1X, 2X, 3X, or more. “At that magnification, the bug will be out of focus if you’re off by a millimeter, so shooting with available light is generally not practical,” says Lefkowitz, although he has used available light for caterpillars and butterflies. “They’re much bigger and tend to hold still for a fraction of a second,” he explains. To minimize movement, Lefkowitz recommends shooting early in the morning, when it’s cool and critters are not as active.
 |
 |
| Spider and its web, illuminated with ring flash mounted on 150mm lens, and five-exposure focus stack. At left, about 1.5X; at right, about 2X. | |
When shooting bugs, Lefkowitz generally recommends a flash, saying, “If the insect moves a little bit you can follow it and the flash freezes your motion, and obviously freezes the insect’s motion.”
Adding diffusion
With any macro subject, an on-flash light modifier is a handy accessory for your lighting setup. As Lefkowitz explains, following the basic rule of thumb that “small sources make harsh light and large sources make soft light,” modifiers serve to diffuse and broaden the light for a softer effect.
Considering things from a macro dimension, he notes, “the illumination from a 1 x 2" flash head is very small, and therefore harsh, yet a 4 x 6" flash diffuser is really big compared to an insect.”
Flash diffusers come in a variety of shapes and sizes and slip easily onto a flash head or attach with hook-and-loop fasteners. Lefkowitz suggests aiming the light, “more or less above the insect, which mimics natural light.
Indoor studio setups and shooting tents
 |
 |
| Still life with peaches on a windowsill, shot on a very cloudy day. Macro view of peaches at about 1/2X. Intentional large aperture (f/5.6) for shallow depth of field. | |
Moving indoors, Lefkowitz says that a windowsill with indirect ambient light can be a suitable setting for macro work. “You want the window light coming in from the side or even a bit behind you” he explains.
But while a windowsill can make a quick and easy studio set, natural light changes quickly, which becomes an obvious limitation. For maximum control, many people prefer capturing indoor macro situations by setting up strobes or continuous lighting and a shooting tent, which creates “a dome of soft unified light,” Lefkowitz says.
Focus stacking for macro work

“With all macro work, you’re usually using small apertures to get what little depth of field you have,” says Lefkowitz. “As you get closer and closer, the effective aperture gets smaller and smaller.”
He mentions the rule of thumb that, “at 1X, (meaning the image on the sensor is the same size as your object) you effectively lose two stops of light, and at ½ life size, you lose about a stop,” which is a valid reason to add strobe or a continuous source such as LED or incandescent lighting.
While not strictly related to lighting, one trick for enhancing the sharpness in a studio setting is a technique called focus stacking, wherein a series of digital photos are taken at different focus points, and then combined in special software. This technique is described in Shawn Steiner’s explora article, Photo Editing Tutorial.
Stop-motion macro subjects
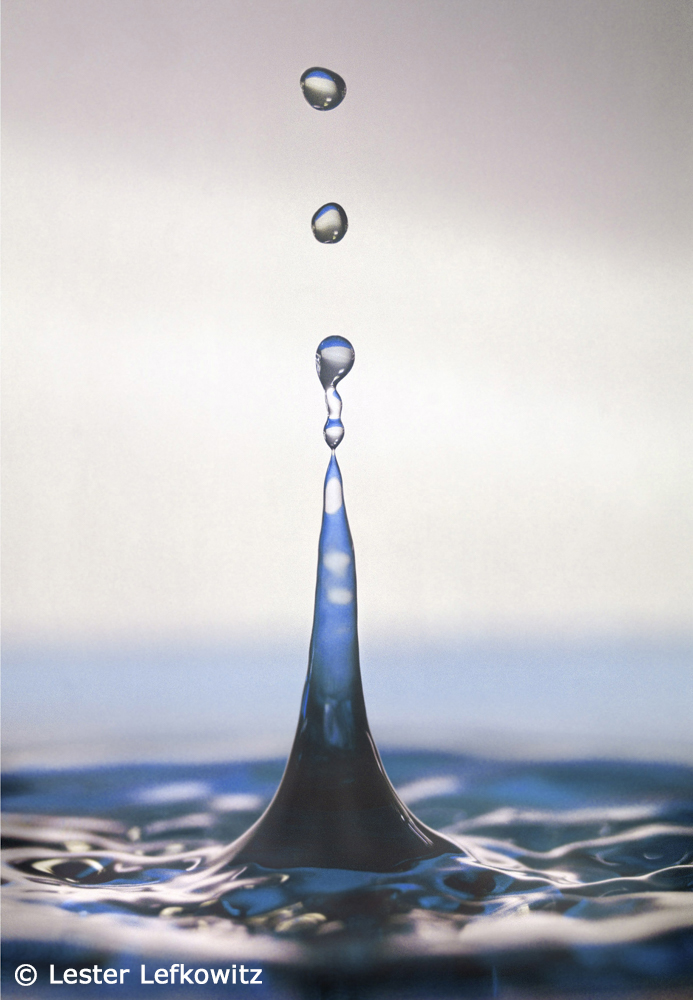
Perhaps the ultimate challenge for macro photographers is the classic water drop splash. This is best achieved in a completely darkened room with the camera on a tripod and the shutter open. Most importantly, “you need some way of triggering the flash at the instant the droplet hits the water,” Lefkowitz explains. “You also have to set up some kind of device to make the liquid drip in a consistent manner, creating the splash at the exact point of focus.”
The key component is an electronic trigger, armed with either a laser or infrared beam, which is aligned right below where the water drop comes out. The trigger incorporates a timer, which is adjustable to the millisecond. The falling drop breaks the beam, and triggers the timer, which fires the flash.
Adjusting the timer to the right instant in the trajectory of the drop requires testing, since the flash can easily fire a little too soon or too late. Lefkowitz says, “you can adjust the delay between when the water droplet breaks the beam and the time it takes to fall the distance and make the splash,” thereby allowing you to capture discrete instants in the full range of motion—from when the drop starts falling, to its growth, until it makes a crown on the surface of the water, and then collapses.
With this setup, “don’t aim the flash at the subject,” he advises. “Light up the background instead, so you’re looking at the water through the background—it’s much prettier.”
Contrary to other macro flash techniques, stop-motion lighting is usually done with the flash in manual mode, instead of TTL. A TTL system measures the light at the film plane or sensor, which does not account for lighting shifts based on the motion of the drop. “You’ll be trying to capture the splash over and over and over until you get the timing right,” Lefkowitz explains. “So you need the lighting to be consistent.”
He recommends setting the flash to low power, “because you want that really short duration to freeze the motion. When you’re photographing something far away, at maximum power, the flash will stay on for as long as 1/1,000 of a second, but as you get closer and closer to the subject you don’t need as much flash power, he adds. “The flash typically turns off around 1/30,000 of a second.”
In bringing up flash duration, Lefkowitz reveals a general misconception that people have when it comes to flash photography. “People think that an automatic flash puts out different amounts of light,” he says, “but that’s not true, it puts out light of a different duration. That’s how a flash controls its brightness.”

A frequent speaker at the B&H Event Space, join Lester Lefkowitz on Monday, May 23, from 4:00-6:00 p.m., for an engaging lecture on travel photography.
On Tuesday, June 7, he will be leading a Macro Photography Walk in Central Park from 3:00-6:00 p.m., as part of the B&H Optic 2016 conference. On Wednesday, June 22, from 1:00-3:00 p.m., Lefkowitz will focus on Macro Photography at the B&H Event Space. And during the weekend of August 13-14, join him for a weekend workshop on Close-Up and Macro Photography at New York’s International Center of Photography.
You can view more of Lefkowitz’s macro work at www.macrophotographer.net, and his travel and industrial work at www.LesterLefkowitz.com.
For more information on everything photography, check out B&H’s Learn Photography portal.
Feeling inspired by these tips? Let us know in the Comments section, below.
