
If there’s one question fledgling photographers often ask, it’s “How did you get such a nice background?” Backgrounds are an essential element of a photograph that are often neglected. In fact, it’s safe to say that a background is as important to a composition as the subject itself. After all, a distracting one will detract from an image.
In this guide, we’re going to cover the many methods used to capture clean, smooth backgrounds in our images. This will encompass the settings and gear involved as well as the in-the-field techniques you can put into practice to get the results we want in order to realize our creative vision. But first, lets get one thing straight: Just because we can blur our background, doesn’t mean we always should.

As with any art form, you must first ask why you’re doing what you’re doing. How does it serve the greater composition? Not every image is going to benefit from that silky smooth solid wall of color. Context can be crucial to taking a textbook snapshot, and converting it into a work of art. The choice is ultimately yours, but before we can start making these decisions, we need to know how to get those smooth, blurry backgrounds to begin with, and the answer is something known as depth of field.
What Is Depth of Field?
Simply put, depth of field is the area of apparent focus in an image, defined by the closest and farthest object in the frame that appears acceptably sharp. The subject that we focus on will be tack sharp, whereas its surroundings will gradually fall further out of focus the farther it is from the plane of focus. What determines our depth of field, is not as straight forward. You may be familiar with the effect aperture has on our depth field, but it is only a small piece of this puzzle, as many factors must come together to determine how deep or shallow our depth of field is.
There are four factors affecting depth of field, but for the purposes of this article, we’re going to focus on just three. We’ve already mentioned aperture, which plays a significant role in this process, but we also must consider the focal length of our lens, and the distance to subject. It can be argued that the latter two are more significant than the first, but we’ll touch upon that later.


Aperture
Aperture is the opening in our lens that controls the amount of light allowed to reach our imaging sensor. This is likely one of the first factors we consider when changing our depth of field, as large apertures, defined by smaller f-stops like f/1.8, create a narrower depth of field, while smaller apertures, defined by larger f-stops like f/22, produce a greater depth of field.
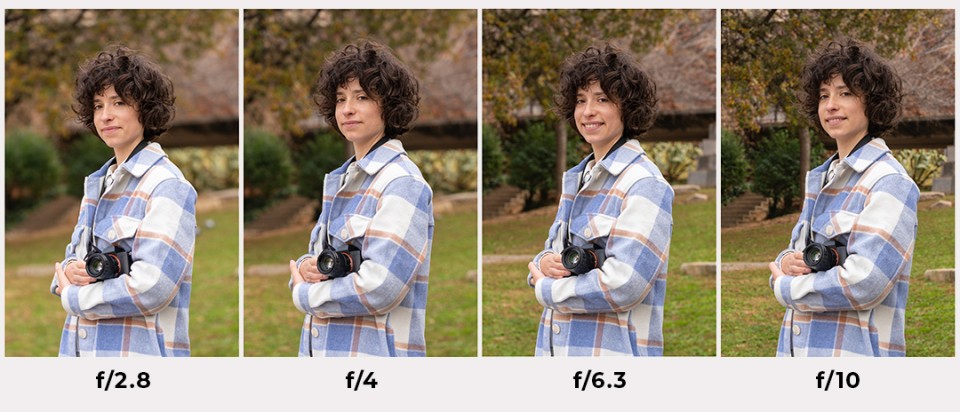
One of the first tangible tools to better our background rendering is to get a lens with a faster maximum aperture. As our aperture changes, our depth of field changes as well. A fast, wide aperture will result in a narrower depth of field, and subsequently, a blurrier background. Now you don’t need to drop thousands of dollars to get pleasing backgrounds. While it certainly can help, there’s more you can do in the field than a lone lens can do. First and foremost, it's watching our distance to the subject and distance from the subject to the background.
Distance
Distance plays a large role in depth of field. If our subject is closer to the camera than it is to the background, our background will appear blurrier than if the subject were right up against it, no matter the aperture. Even at f/22, if we put distance between our subject and background, we have some level of blur. How? Our plane of focus shifts with our focus point, and if we focus on a closer object, anything outside of that plane will gradually fall out of focus. The farther an object is from that plane, the farther out of focus it will become.
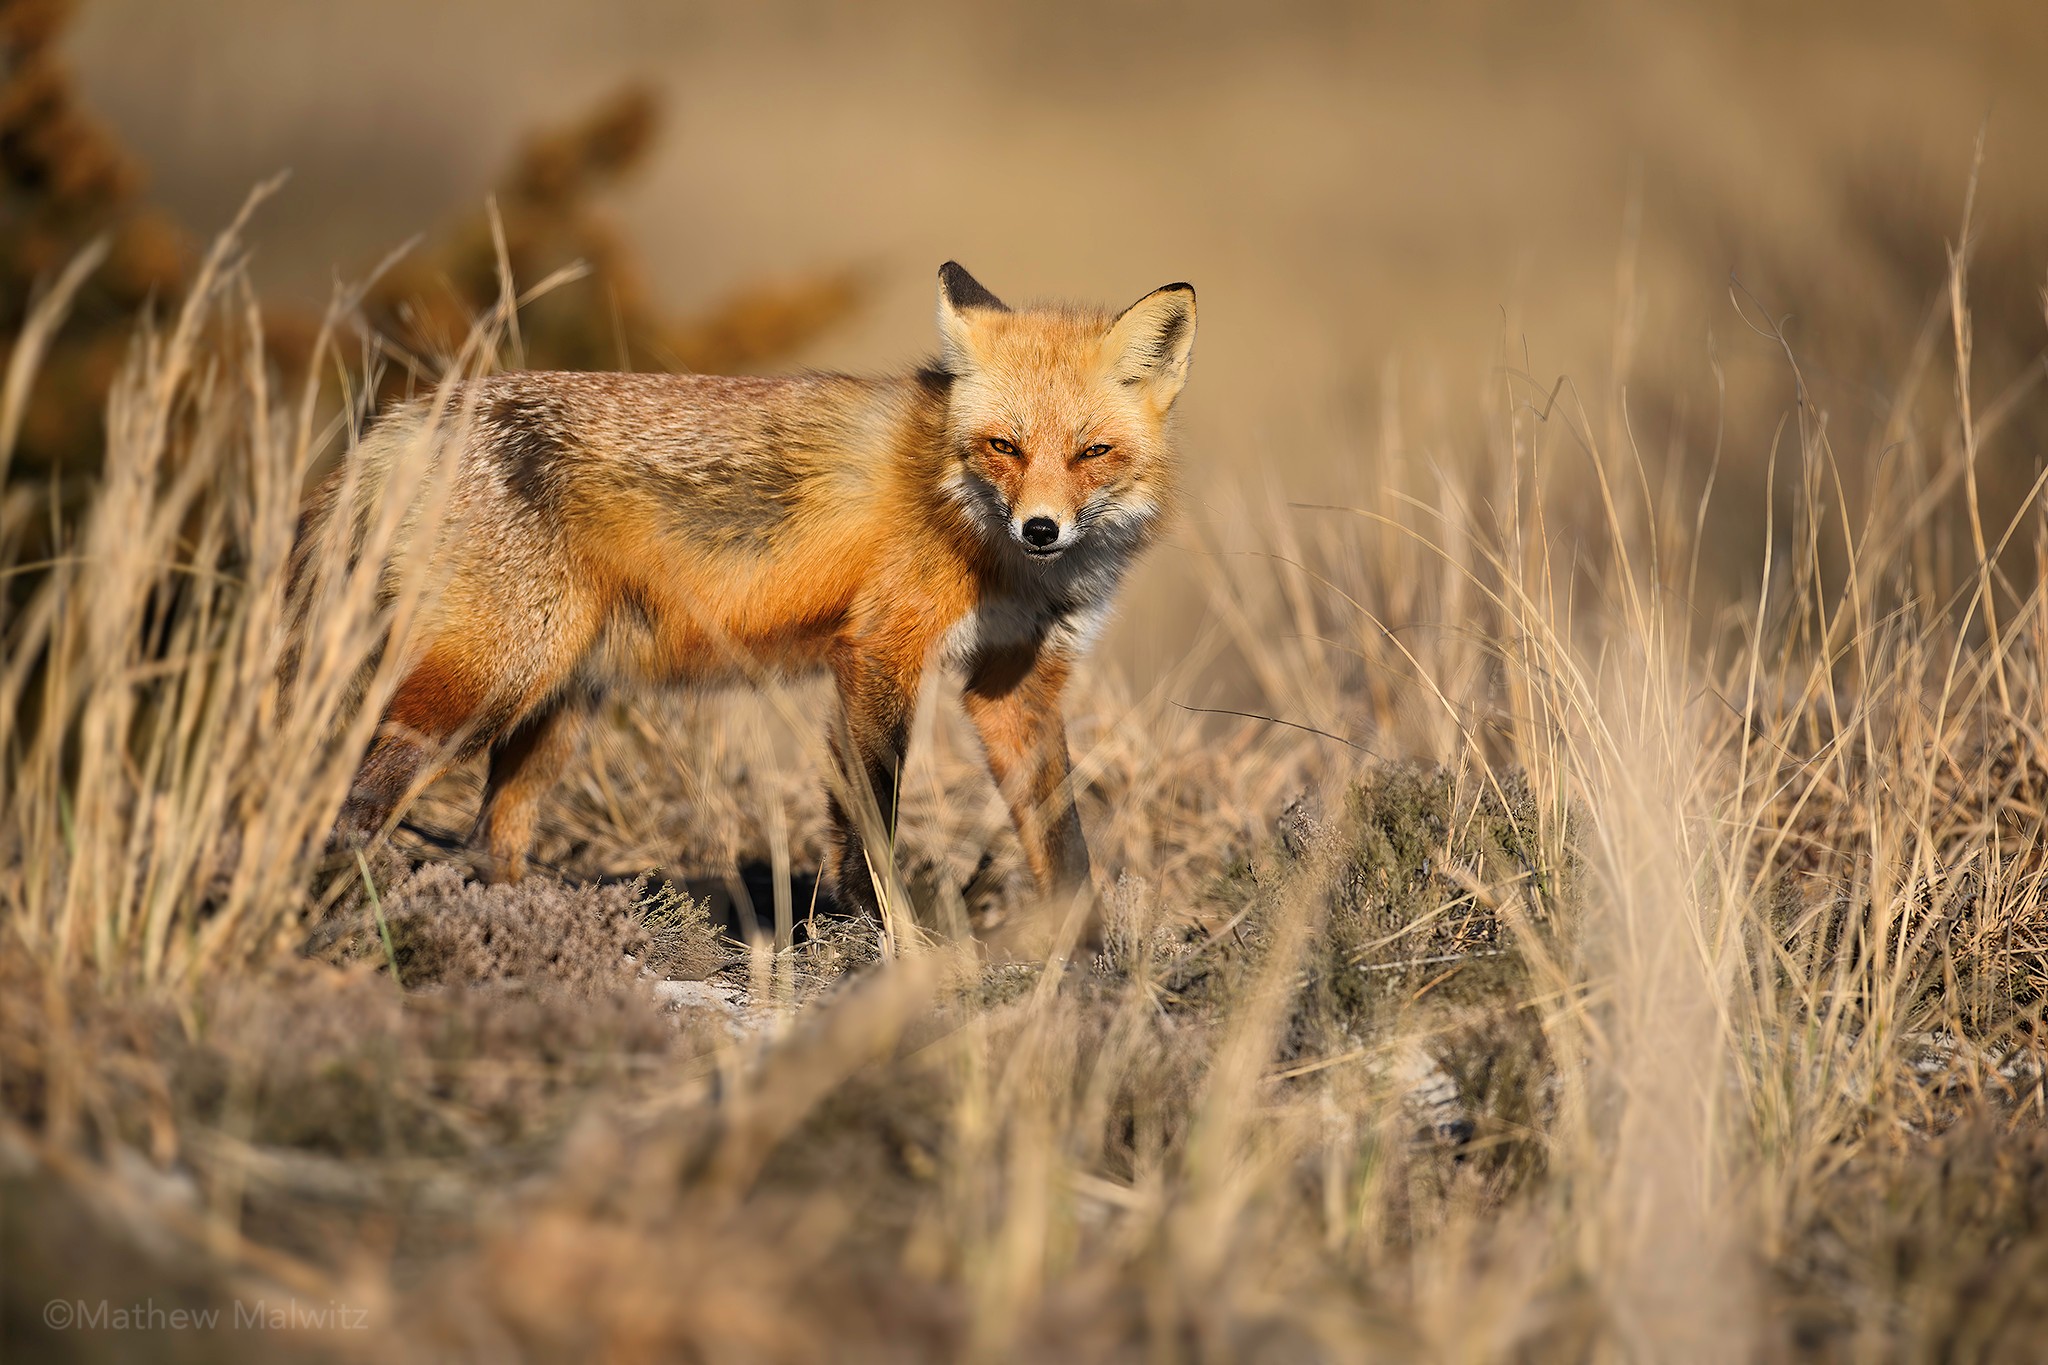
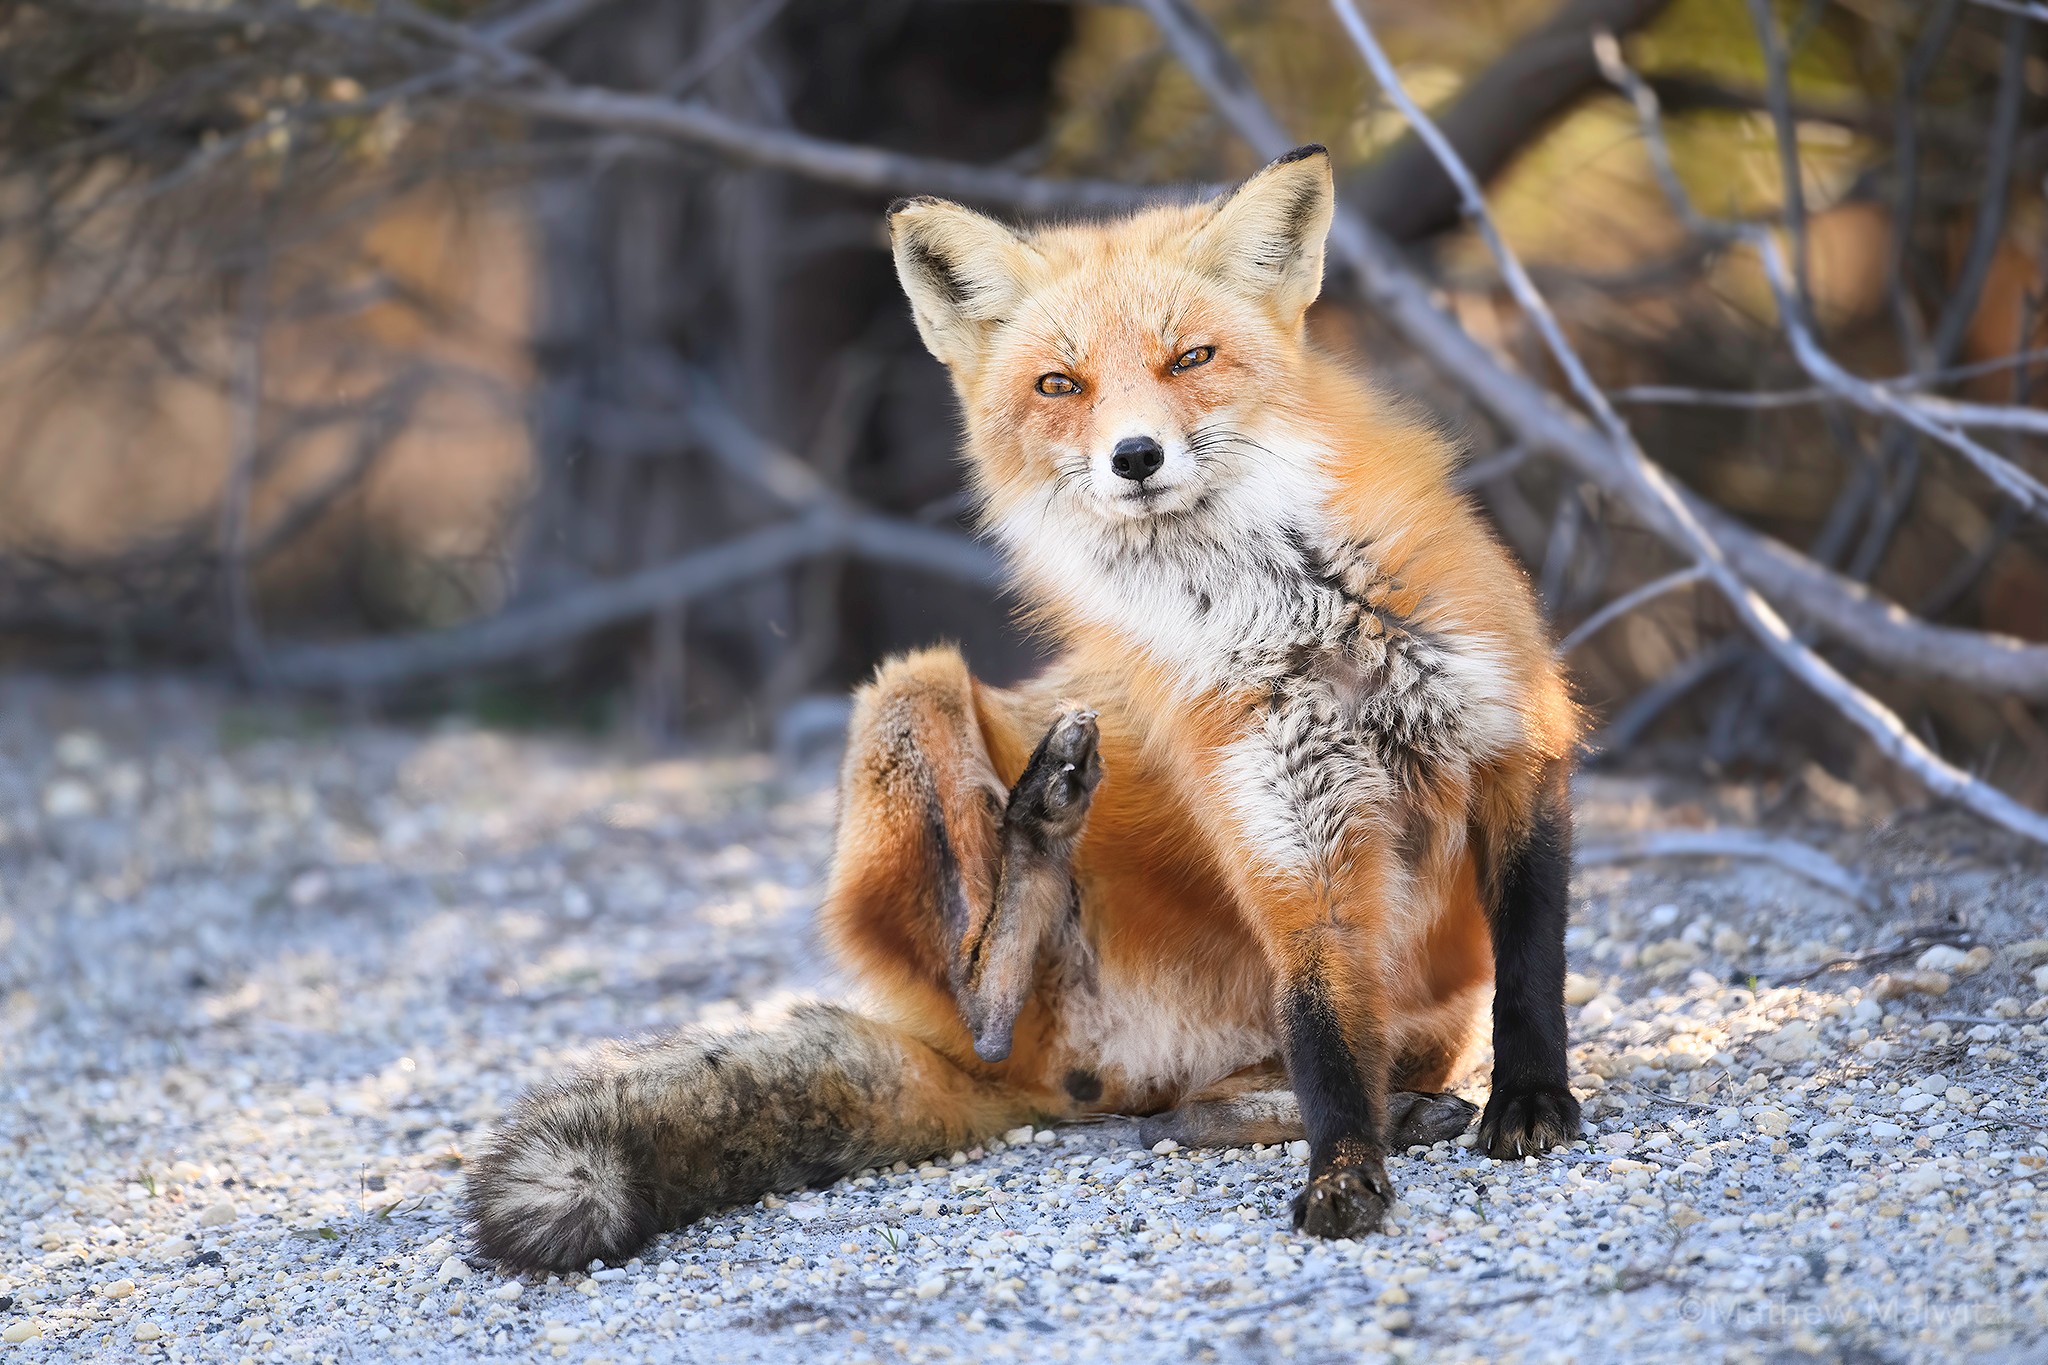
For example, let’s say you’re photographing a fox across a field at your local park. If the fox is hugging the distant tree line, it will be literally impossible to get a blurry background. The fox is simply too close to the trees for there to be any separation. That said, if the fox is out in the middle of the field, we’ll capture that separation we’re after. The closer you are to the fox, the better that separation will become, though we shouldn’t be approaching wild animals.

Let’s look at the real-world results of the above sample. Similarly to the hypothetical fox scenario, we have a real fox that had been accustomed to human presence in its habitat. As a result, it was very comfortable and curious around people. When first photographed, it was resting along the side of the trail, very close to the background. The resulting image shows noticeable detail in the trees, twigs, and shrubs behind the fox. Compare that to another image taken during that same outing of the same fox now atop a dune with significantly more distance between it and the blurred background. Notice how the closer juniper shrub is more defined than the distant grasses.
Focal Length
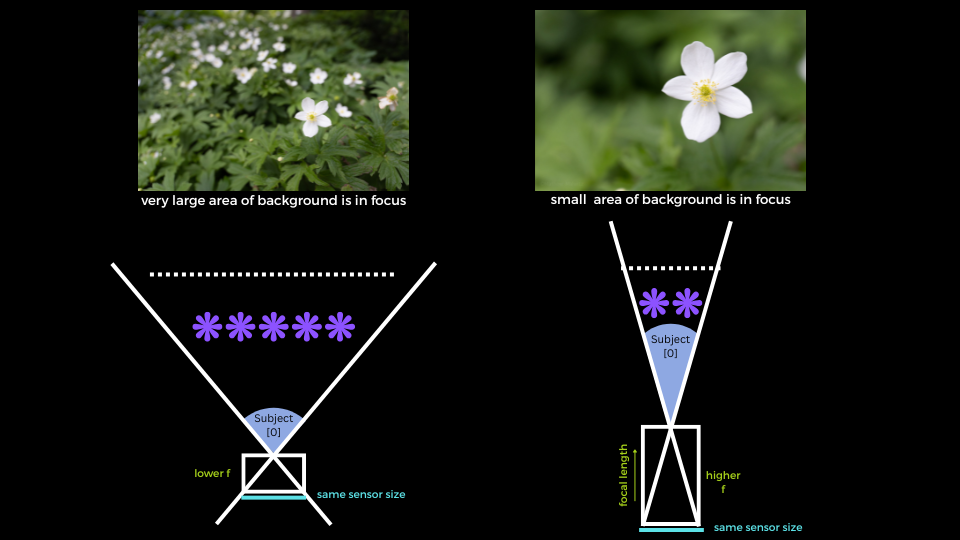
Our focal length, or magnification, does more than make a distant subject look big in the frame. It makes everything look enlarged in the frame, whether it’s 10 feet in front of us or 300 yards away. This is known as special compression. As our focal length increases, our field of view decreases. So, if we’re making a distant object look bigger while simultaneously shrinking our angle of view, we’re seeing less of the background. If our background is already blurred, we’ll see a smaller, more focused area of that blur with little to no discernable detail or less defined shapes.
Let’s look at yet another real-world example. Below, you’ll see two images taken of the same yellow songbird sitting on the same branch. Both images were taken from about the same distance give or take a few inches. One was shot using a 400mm focal length, and the other zoomed out to a wider 100mm focal length. The same lens was used, so the aperture remained at a close range. The tighter shot was actually shot at a smaller aperture value due to the design of the zoom lens. Can you tell the difference?
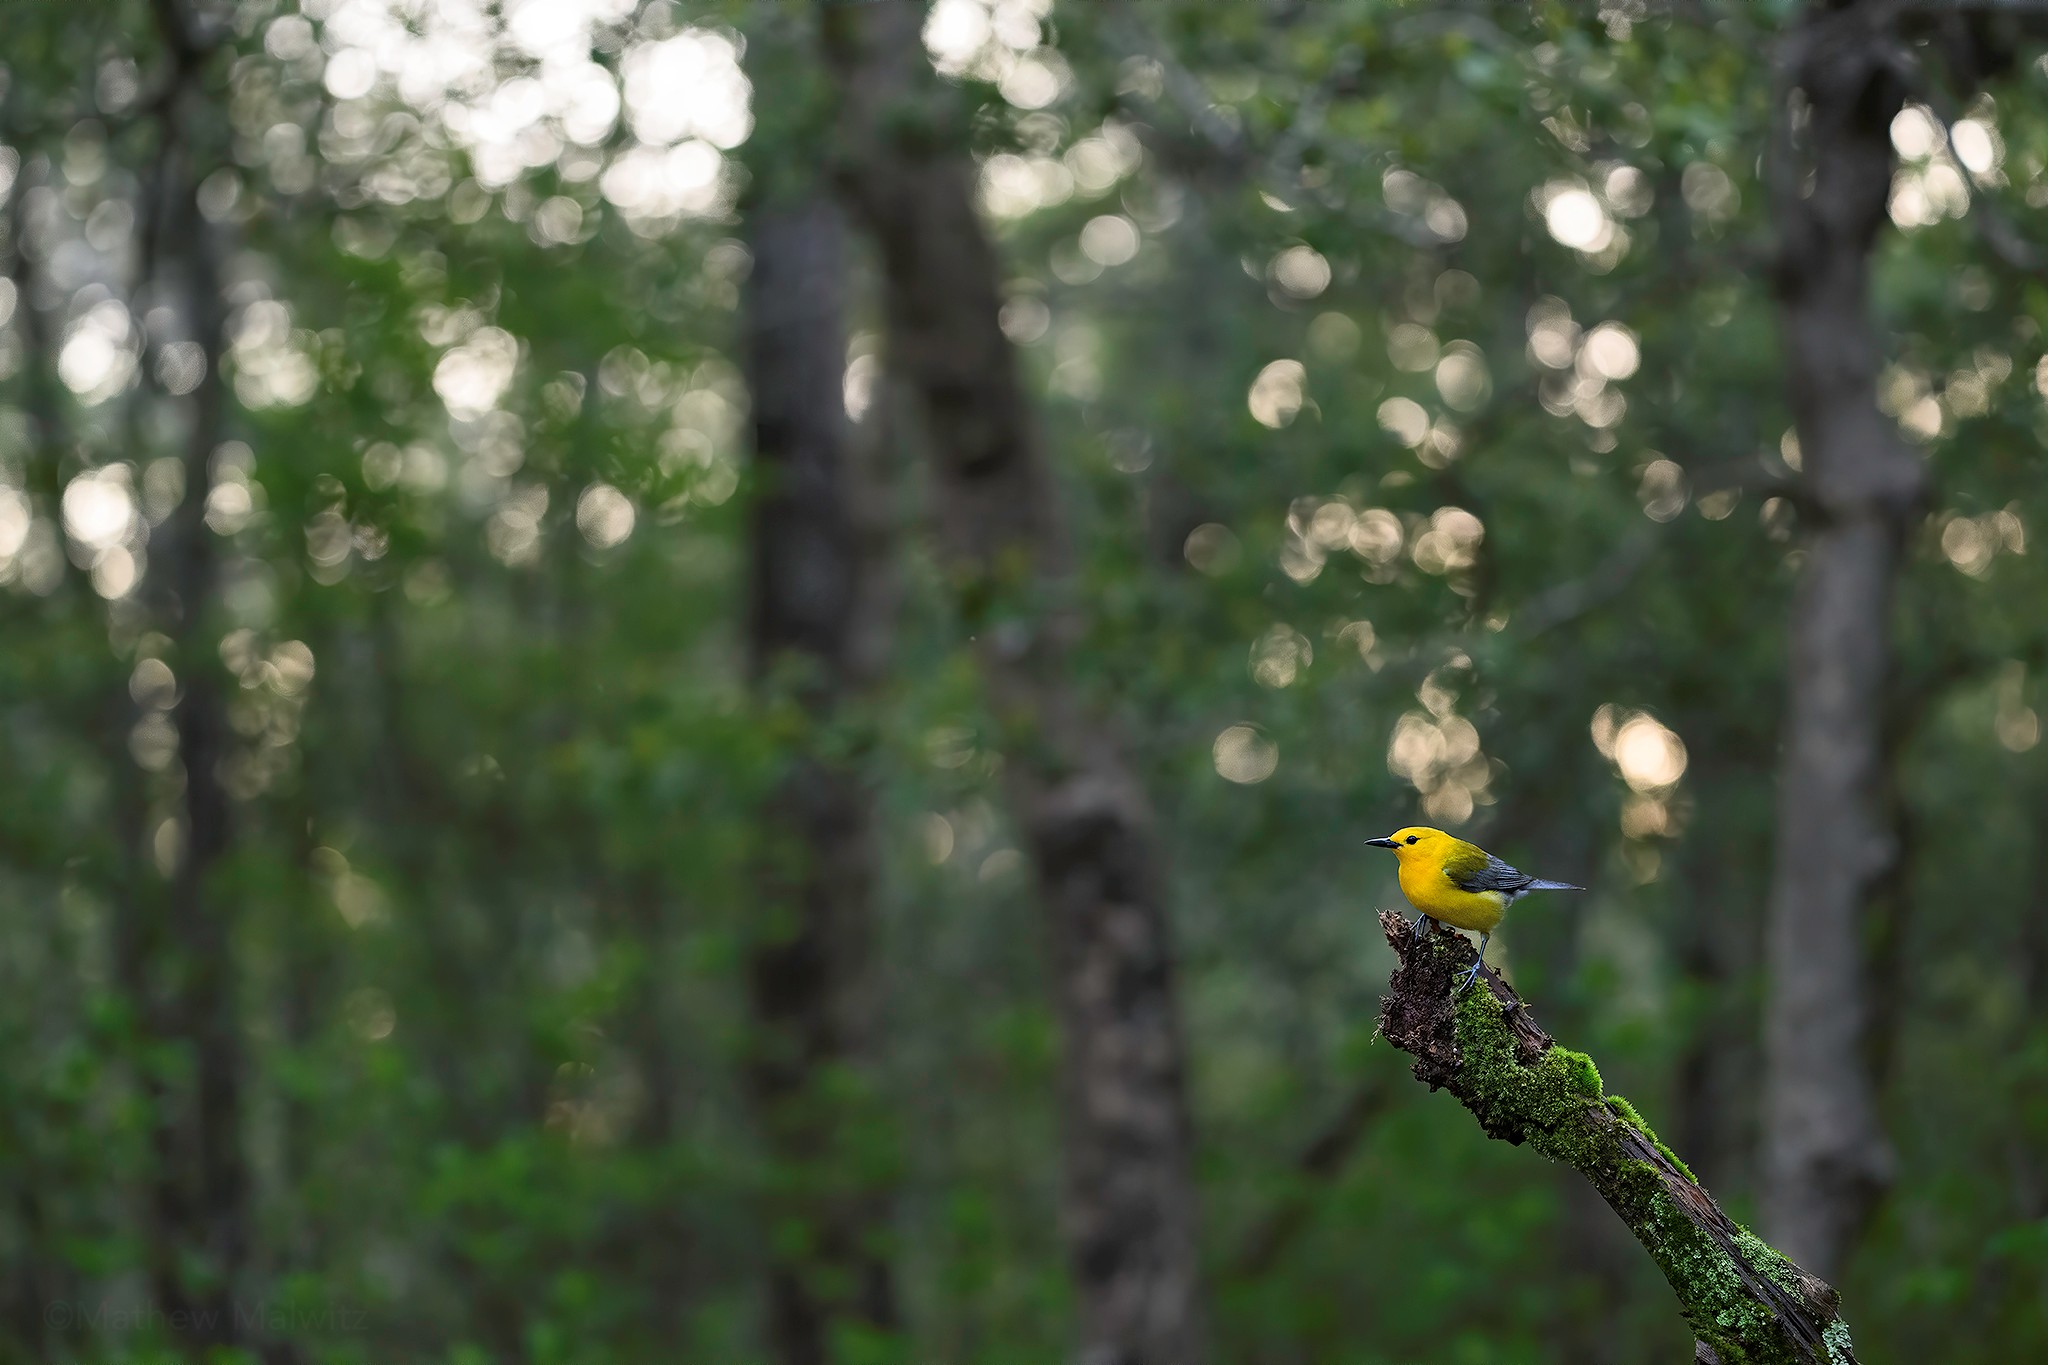
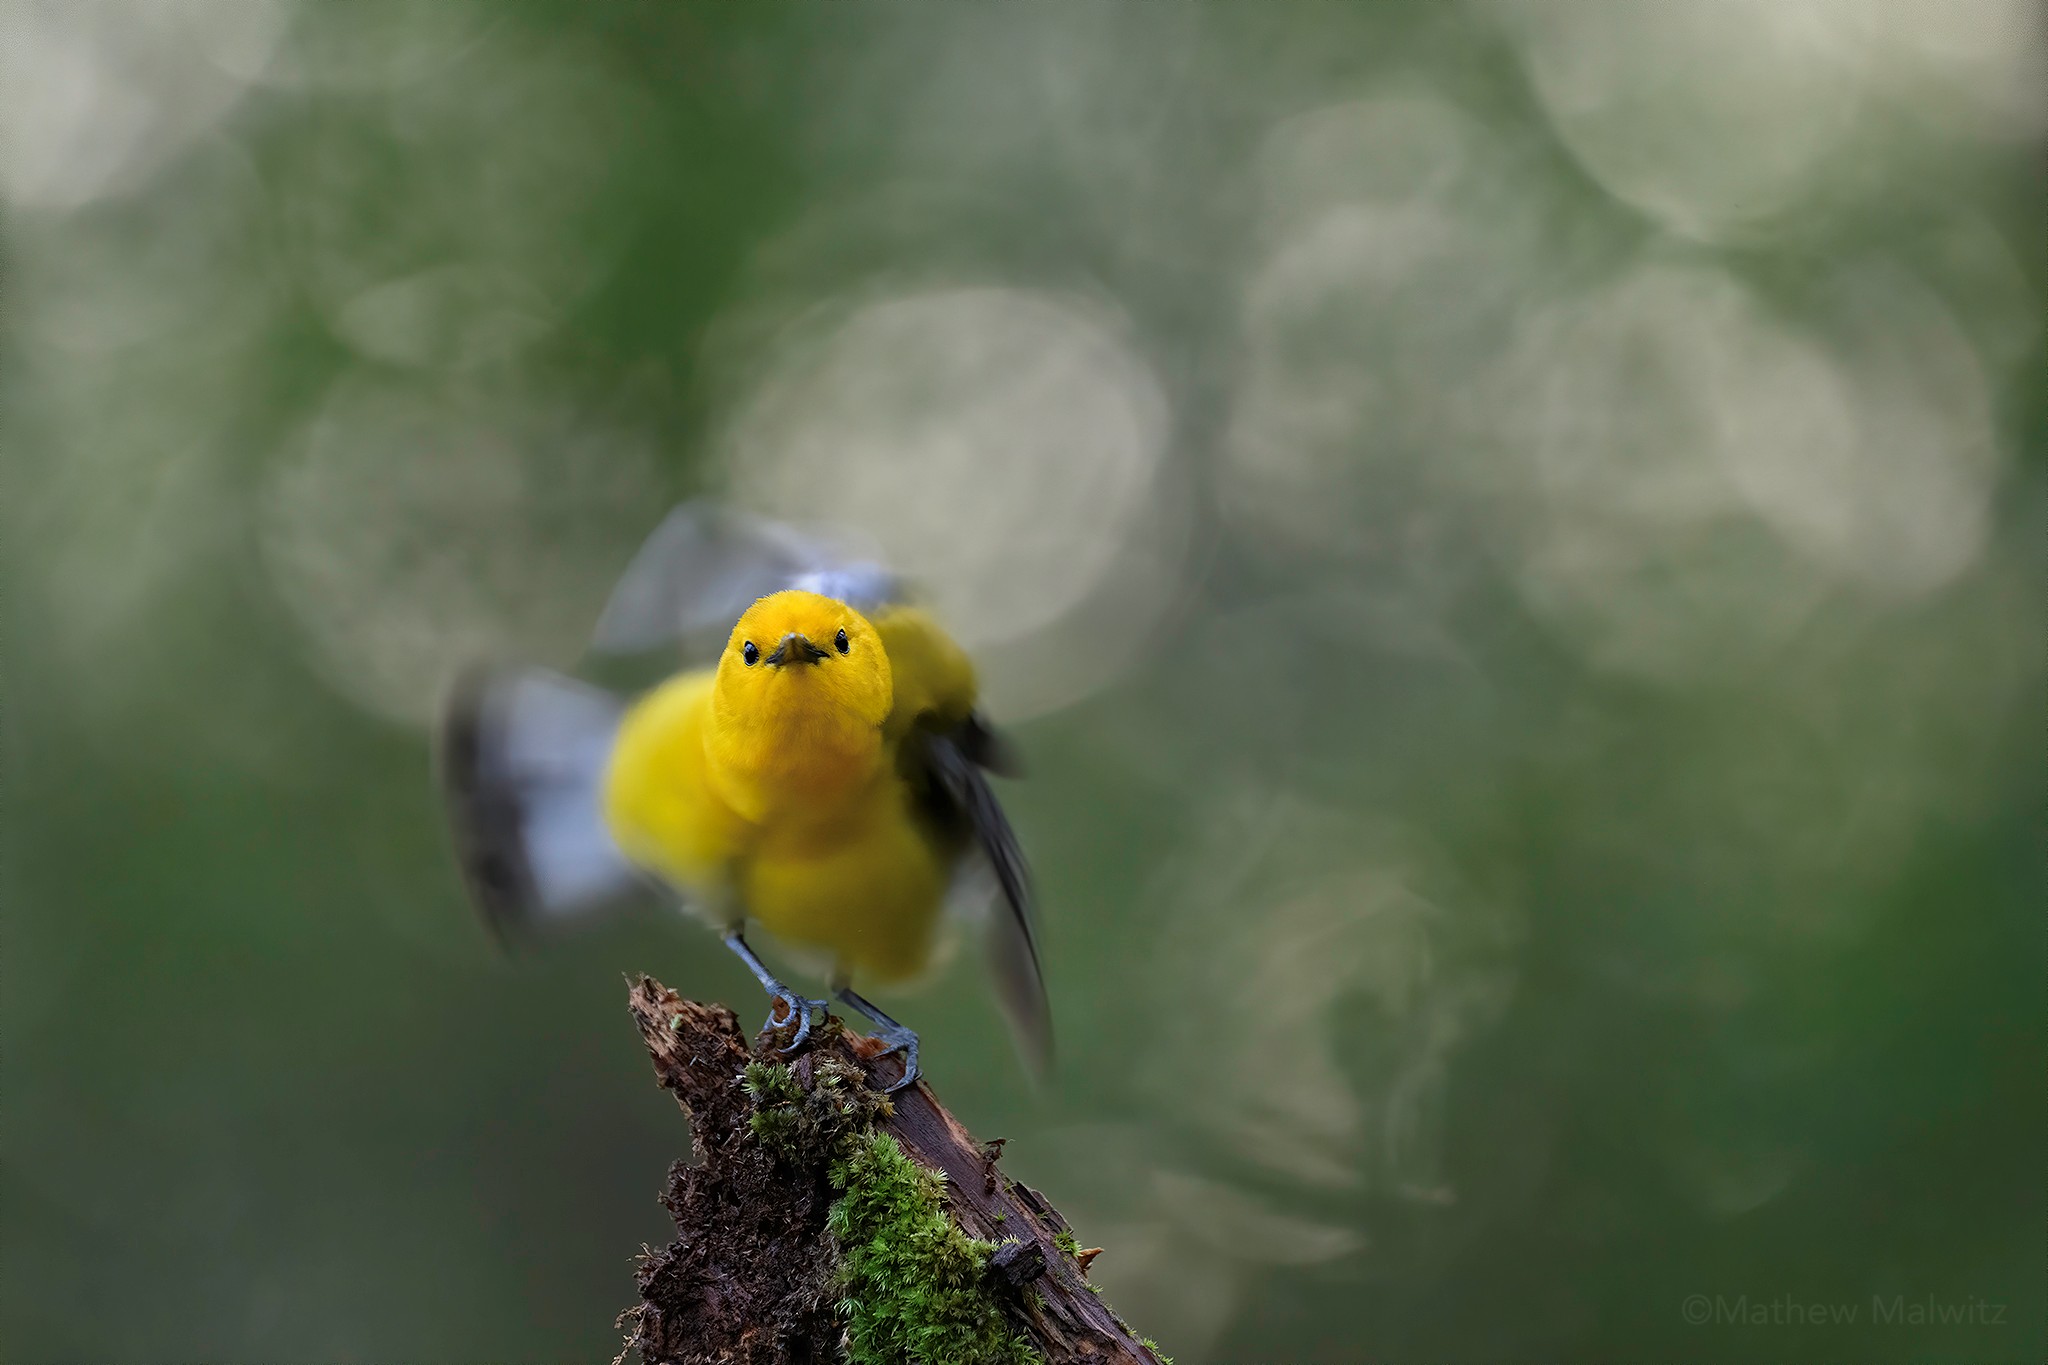
The differences are quite obvious, but upon closer inspection, you may be surprised. If you were to crop the above “wide” image to better match the field of view in the tight shot, we’ll find that the background looks much blurrier than it does in the full wide shot. In fact, it’s not too far from the 400mm shot in terms of separation between the subject and background. This is because we’re seeing less of it, just as we do when using a telephoto lens. There is some variation as different focal lengths bend and render light differently, but the result Is shockingly similar. Plus, more magnification means more pixels on the subject!
 image. Notice how blurry the background looks compared to the full image.")
A Balancing Act
Can we achieve our desired level of blur with just one of the aforementioned factors? Yes and no. It depends on which of the three we’re starting with as aperture’s effect is dependent on both focal length and distance. And distance is only significant if we have the focal length required to capture the subject matter we’re after. You can probably tell where we’re going here.
Focal length is technically the most powerful tool for creating a narrow depth of field. There’s a reason daytime sports and wildlife photographers are perfectly happy with lens that shoot at f/6.3 and higher, as the extreme reach obliterates most backgrounds.
If we photographed the same subject at the same distance with a 24mm and 200mm lens, we’d find that a 24mm lens at f/2.8 will have a greater depth of field than a 200mm lens as the same aperture. Make sense, considering what we’ve covered so far. If we increase our aperture to a higher value like f/11, we’ll get the same results. Even if we were to decrease the distance between the subject and the 24mm lens, the results would be largely the same.
The key takeaway here is to shoot with a normal to telephoto range lens, somewhere between 35mm and 200mm for most everyday situations. Obviously, sports and wildlife shooters will benefit most from longer lenses with maximum focal lengths between 400 and 600mm. Pair these focal lengths with a good distance and a fast aperture, and you’ll be set, that is, so long as you avoid distractions.
Field Techniques
With the technical elements at our disposal, it’s important to not discount what goes into making a good background when we’re in the field. When photographing a subject, especially in a natural setting, it’s very easy to shoot first and ask questions later. The problem with this is that any stray twig or bright area can completely ruin our shot, no matter how narrow our depth of field. The first key to capturing a good background in a photograph is to find a visually pleasing, uniform backdrop to begin with.
But first a little quiz. It’s not just trees growing out of heads we should be weary of. Let’s look at the example below. Here we have a family portrait in a snowy environment. The image does almost everything right, from proper exposure to a level horizon line, but there’s just one issue. We’re not revealing anything just yet. Take a look for yourself and see if you can figure out what’s gone awry.

Any ideas? It’s not any highlight as the background is uniformly bright, drawing the eyes to the family. Speaking of, notice anything intersecting with the family? How about the tree that appears to be in the mother’s hand? It conveniently matches the color of the daughters’ pigtails as well, making it more noticeable and visually jarring. These are the little things that can detract from an otherwise great photo.
Look for areas of relatively uniform color, free of odd shapes, bright spots, or intersecting lines. No one wants to see a telephone pole growing out of their head in the wedding album. On the topic of bright spots, it’s important to know that our eyes naturally gravitate towards the brightest highlights in an image. For that reason, you want to avoid any highlights away from the subject itself, unless you’re trying to capture a high-key image.
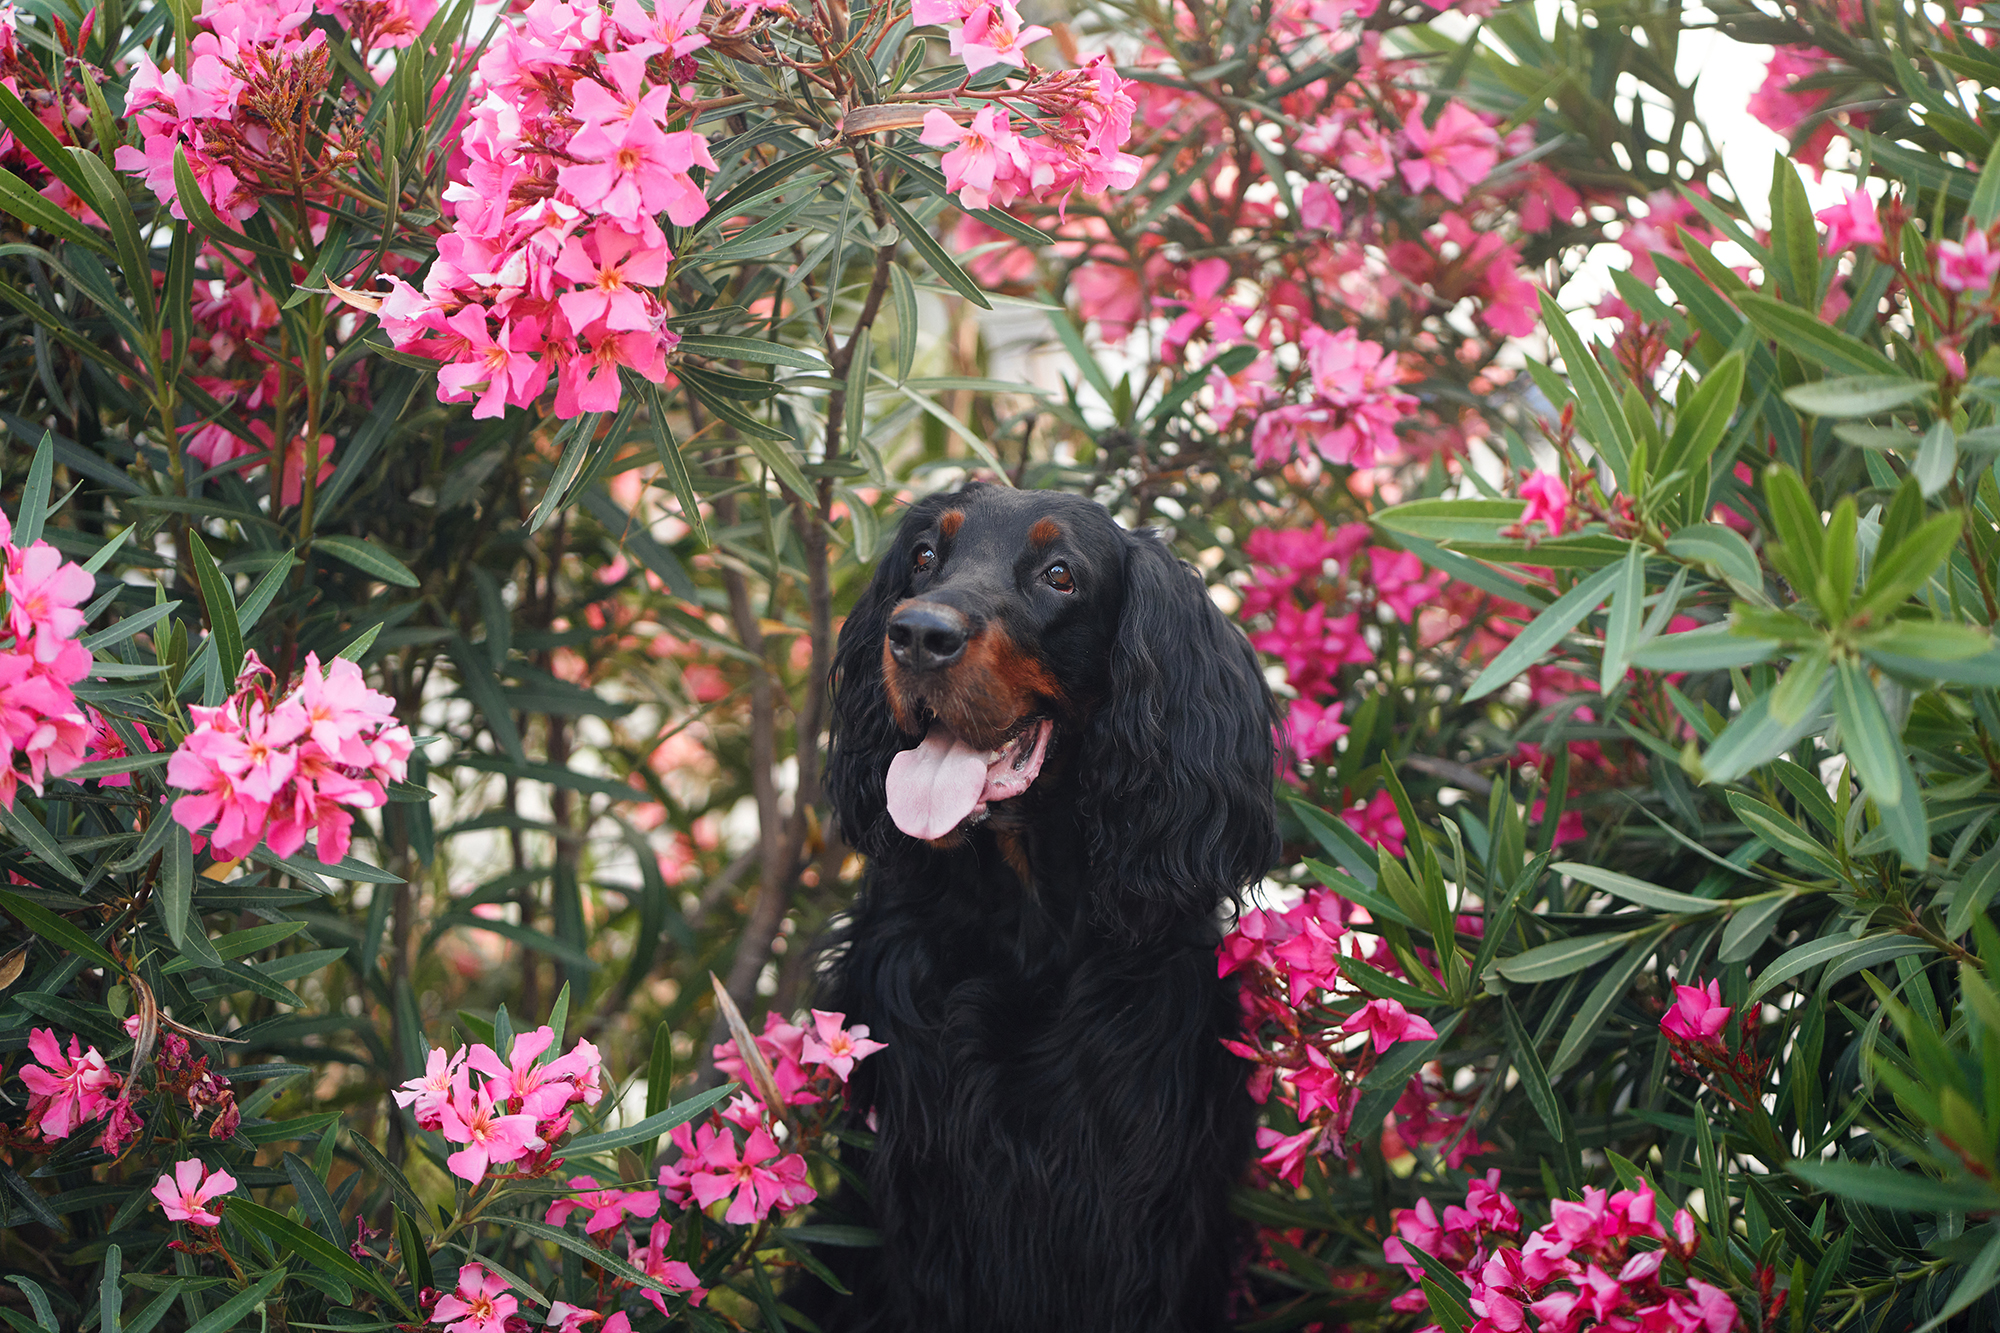
Color is another factor to consider when selecting a background. As seen in the example below, the bird not only pops on a cleaner background, but it stands out thanks to the contrasting colors. Had the background been a conflicting brown color, the bird would still be lost. Choosing a background that consists of like colors can aid our eyes in visually blending an otherwise busy background into something less offensive.

Sometimes we can control our backgrounds, like in a studio. Set up a roll of seamless paper or a canvas backdrop and you’re good to go. While the technical elements of achieving that smooth, creamy background still apply, we need not worry about stray highlights or harsh lines and shadows. Photo backdrops are designed to make this aspect of the job easier. As convenient as these may be, who doesn’t want to get outside and shoot in a stunning environment.
When dealing with natural backgrounds, we need to be ready to face less predictable elements. A solid hedge of green may show highlights through it with just a light breeze. We may find an aspect that hurts our image from one angle but aids it from another. By moving around, we open opportunities to change how objects in our frame are juxtapose. Often, it is this positioning that takes what would be a snapshot and turn it into a photograph. The act of positioning elements in our frame is known as composition.

What Is Bokeh?
Bokeh is attributed to the quality of the blur we capture in an image, though it is often misused in reference exclusively to the background of an image. This is only part of the equation, but first, a little background. The word itself is inspired by the Japanese word boke, which means "to blur." It was allegedly shortened from the word pinboke which roughly means “out of focus.” Suffice to say that the term bokeh refers to the aesthetic qualities of the out-of-focus elements across our entire image, not just the background.
 in their backgrounds. But wait, is that one in the foreground?")
The out of focus areas in the background and those in the foreground can vary in quality depending on the lens itself. In some cases, the background or foreground can appear softer whereas the opposite appears harsh. A well calibrated, high-quality lenses should provide a rather uniform performance, though this comes at a price. This is why practice and a familiarity with your gear is of utmost importance. Know the strengths and weakness of your lens.

You can have a pleasing background without a pleasing bokeh. This begs the question. Just because a background is only slightly out of focus, does it still count as a pleasing bokeh so long as the quality of the blur is visually pleasing? Does it really matter? Only you can decide what you find visually appealing, and while there are rules to photography, something as simple as how blurry a clean background is may be insignificant.

Putting It to Practice
If you do all the above, but miss one stray twig or distracting spot, don’t panic. This is where post processing software comes in handy. With editing tools like photoshop or lightroom, we can use spot removal tools to clean up these less than pleasing elements in our image. It’s always best to do things correctly in-camera, but mistakes happen. If you’re not sure of an image, try the age-old trick of flipping it upside down. If your eyes still gravitate to the subject, great! If not, you have some work to do.
As with anything, the more you study your backgrounds and carefully compose your shots, the better the final images will look. Be sure to keep horizons level and in line with the upper and lower thirds as dictate by the rule of thirds. Also, not every photograph needs to be set against a solid, blurry background, but it’s important to know how the look can be achieved. Always aim to have some diversity in your portfolio, while also maintaining diversity in your skillset.
As artists, we’re always learning. Never discount the benefits of a new tool in your arsenal and always be open to new ways of doing things. Much can be accomplished with the gear you have if you just take the time to practice. To learn more about photography, check out our other guides and articles on the B&H Explora page!
